Difference between revisions of "Starter AVR USB"
| Line 85: | Line 85: | ||
=Support= | =Support= | ||
For Questions, technical support and feedback about this product, do comment below! | For Questions, technical support and feedback about this product, do comment below! | ||
| + | =Additional Notes= | ||
| + | * The board uses Optiboot boot-loader which fits in 512 Bytes in size. The remaining 32256 Bytes can used by the application code. | ||
| + | *JTAG is disabled by default so that PORTC can be used as normal IO. | ||
| + | *Bootloader section is locked for to prevent application from flashing code in excess of 32256. | ||
| + | LOCK Byte: 0xCF | ||
| + | LFUSE:FF | ||
| + | HFUSE:DE | ||
| + | <gallery> | ||
| + | File:Fuse_values.GIF|Fuse Values | ||
| + | File:Fuse options.GIF|Features set when shipped | ||
| + | </gallery> | ||
{{DISQUS}} | {{DISQUS}} | ||
Revision as of 19:12, 1 October 2014

Contents
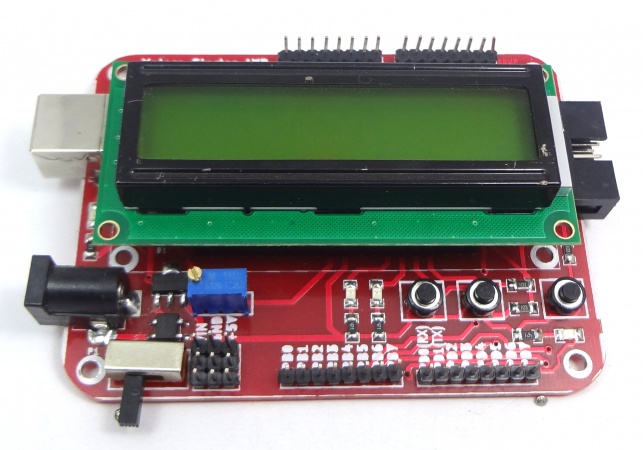
Features
- Atmega32 MCU
- 32K bytes of In-System Self Programmable Flash Memory
- 1024 bytes EEPROM
- 2K bytes Internal SRAM
- 32 IO pins
- UART, SPI, JTAG and I2C support.
- Real Time Counter with Separate Oscillator
- Four PWM Channels**8-channel, 10-bit ADC
- 8 Single-ended Channels
- 2 Differential Channels with Programmable Gain at 1x, 10x, or 200x
- USB Interface CP2102: for communicating with the host computer.
- LCD Interface: 16 characters, 2 lines
- Test Leds (2) and Switches(2)
- 5X2 ISP Programmer Connector
- Breakout for all Ports
- Breakout for +5v,Gnd and Vin
- Power Supply compatible with AC/DC adapters(9 to 12V DC, 1A).
Physical Features
- Dimensions: 70mm X 90mm
- 1.6mm Glass Epoxy, FR4 PCB
- Wave Soldered.
Downloads:
Setting up the XploreFlash Programmer
Step 2:To connect Development board with computer USB driver is required. Windows USB to UART Drivers for CP2102
- For Other Operating system please download from Silicon Labs website.
Step 3: Download and install XploreFlash GUI. (XploreFlash GUI is based on AVRDUDESS)
Step 4: Follow the steps on images below to flash the board.
Note: The GUI software will require .NET framework 2.0 or later please download and install it.
{{#seo: |title=AVR_Atmega32_Development_Boards |titlemode=append |keywords=Atmega32, AVR 32pin Development board, AVR Starter board. |description=AVR Development Boards }}
Using Starter AVR with Arduino Software
The Starter AVR USB development board has Atmega32 on board, it can be used with Arduino Software. Below are the details on how to set it up.
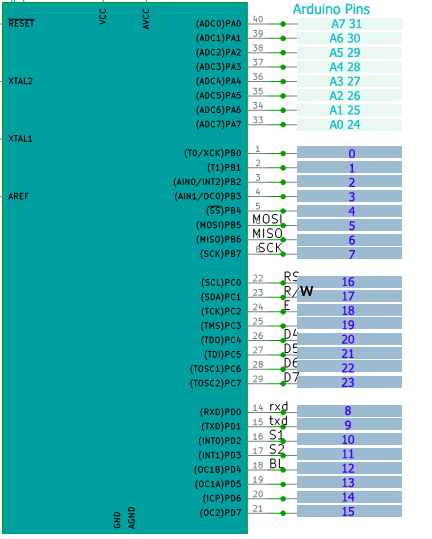
PIN Mapping
- Find the path similar to one below on you computer:
C:\Program Files\Arduino\hardware\arduino\variants\mega32
- Download and add pins_arduino.h file after creating a mega32 folder under variants.
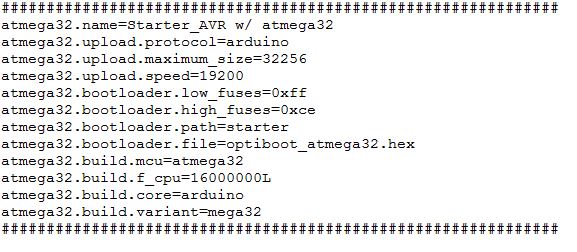
Add the Starter_AVR_USB_Board to Arduino
Text shown in the image below needs to added to boards.txt file under arduino installation similar to C:\Program Files\Arduino\hardware\arduino
- Copy the text from Boards.txt and paste it into boards.txt file on your computer(under Arduino installation)
Support
For Questions, technical support and feedback about this product, do comment below!
Additional Notes
- The board uses Optiboot boot-loader which fits in 512 Bytes in size. The remaining 32256 Bytes can used by the application code.
- JTAG is disabled by default so that PORTC can be used as normal IO.
- Bootloader section is locked for to prevent application from flashing code in excess of 32256.
LOCK Byte: 0xCF LFUSE:FF HFUSE:DE


