
Tit, a supercharged Arduino Pro Mini with Atmega328pb
Ever wanted to have two hardware Serial Ports, two SPI, two I2C and more PWM pins on the Arduino Pro Mini? Tit has all of this, and retains the same form factor. Tit uses Atmega328PB at its core.
Tit, is pin compatible with Arduino Pro Mini, the chip Atmega328pb is software compatible with Atmega328p. Hence all the existing code and libraries should work without any changes. Tit uses higher version of avr-gcc toolchain, we have bundled it up as a package along with additional libraries required to access the extra features. Check the setup section on installing support for the board in the Arduino IDE.

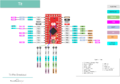
Pinout Diagram
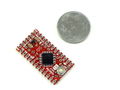
Size
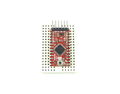
On Mini Breadboard


Contents
[hide]Features
- Processor: Atmega328pb
- Speed: 16MHz
- Flash: 32KB
- RAM : 2KB
- EEPROM: 1KB
- GPIOs x24
- Analog Channels x 8
- HW UARTs x 2,
- SPI x 2
- I2C x 2
- PWM x 9
- Interrupt Pins x 2
- Unique HW ID
- Castellated Pads
- Pin compatible with Arduino Pro-Mini
Setup on Windows
- Download the Tit-Windows support files.
- Extract the content \hardware directory of your arduino sketch directory.
- After extracting the directory structure should look like ..\Documents\Arduino\hardware\Tit-Windows
- Open the Arduino IDE, select the board as Tit, and verify if the sketch compiles.

Note:To get the latest version you may check the latest release on github
To upload the sketch connect a USB to Serial device with FTDI or CP2102 etc as shown in the image below. Verify the COM Port and hit upload. (Install the drivers if you're using the USB to serial board for the first time.)

Setup on Linux
- Download the Linux support files from links below for your machine.
- Extract the content \hardware directory of your arduino sketch directory.
- After extracting the directory structure should look like ..\Arduino\hardware\Tit-Linux-64 or ..\Arduino\hardware\Tit-Linux-32' on a 32 bit machine
- Open the Arduino IDE, select the board as Tit, and verify if the sketch compiles without errors.

Setup on MAC
[will update this soon]
Examples
The HW Serial Ports
This is probably the first example you might want to try, get hands on the additional HW serial port.
- void setup() {
- //intialiaze both the ports
- Serial.begin(9600);
- Serial1.begin(9600);
- }
- void loop() {
- // send messages on the ports
- Serial.println("hey, tit on COM0");
- Serial1.println("hey, tit1 on COM1");
- delay(1000);
- }
The results are below:

References and Credits
- Thanks to work by Andre Moehl on *uino Mini Super (Atmega328PB) project on hackaday.io