
Setting up Bluetooth HC-05 with Arduino
Even though Bluetooth Low Energy Modules available at a reasonable cost, most of these modules are not compatible with existing devices that support the classic Bluetooth. The HC-05 is an expensive module that is compatible with wide range of devices including smartphone, laptops and tablets. Adding a Bluetooth to Arduino can take your project to the next level. It opens up lots of possibilities for user interface (UI) and communication. The phone/tablet etc can act as an UI element or data logger and interpreter for your next project.
So let's get started , in the first part we will simply look at how easy it use the module with Arduino and transfer data to a Smart Phone. Later we will look at various configurations the HC-05 module like the device name, pass-code, modes of operations and all of that with the help of AT commands.Later we will also look at pairing to Bluetooth modules, configuring one as Master and other as Slave. You need not configure the module, if you simple want to use it.
Contents
[hide]The Module:
Observe the tiny switch on the board on the top end of the switch, we will be using it to put the board in the AT command mode.

The Pinout:
The module available at the EE Store has 6 pins as shown below:

Pin Funtions
| Pin | Description |
|---|---|
| State | can be connected to the Arduino Input in order to know the state of the connection. Paired or disconnected. |
| Rx | Receive Pin of the module. It is recommended to use a voltage divider as shown in the hookup. |
| Tx | Can be connected directly to the Arduino Rx Pin |
| GND | connected to GND pin of Arduino |
| 5v | This breakout board has a internal 3.3v regulator on board. |
| EN | Enables or Disables the module. Rarely Used. |
Simple Data Transfer Example
We will start with a very simple example of establishing a serial connection between the HC-05 and the Smart Phone and send/receive message. You can take the example forward to control devices or log any data that you wish.
Hookup
We will use pins 10 and 11 of the Arduino to connect the HC-05 and use the SoftwareSerial library to communicate with the module. The Hardware serial port on arduino is used to send/receive messages from the computer to the Arduino.
The voltage divider on the Rx line of the module is recommended to ensure that module does not receive signals above 3.3v.
In a real application you might want to use the HW serial port itself to connect the Bluetooth module, if you need hardware interrupts.

Code
This is probably the simplest code to test all the device that support the serial port communication. It simply connects the computer terminal and the HC-05 in a loop. The codes sends the messages from the terminal to the Bluetooth Module and messages from the Bluetooth module to the terminal.
- #include <SoftwareSerial.h>
- SoftwareSerial EEBlue(10, 11); // RX | TX
- void setup()
- {
- Serial.begin(9600);
- EEBlue.begin(9600); //Default Baud for comm, it may be different for your Module.
- Serial.println("The bluetooth gates are open.\n Connect to HC-05 from any other bluetooth device with 1234 as pairing key!.");
- }
- void loop()
- {
- // Feed any data from bluetooth to Terminal.
- if (EEBlue.available())
- Serial.write(EEBlue.read());
- // Feed all data from termial to bluetooth
- if (Serial.available())
- EEBlue.write(Serial.read());
- }
Demo
There are numerous Android apps to connect your phone the blue-tooth Module. I used the Bluetooth Terminal to connect it to the HC-05.

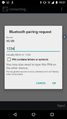
Enter the PIN Code

Connect to the Device

Send the Message


The output as seen on the Arduino Terminal. This way we have established a blue-tooth link to send messages form the phone to the Arduino with HC-05.

Configuring with AT Commands
As said earlier, you might want to configure the module to setup various things like the device name, pass code, baud rate etc. To do all of this, you need to first put the module in AT command mode.
AT command Mode
We have the breakout board with a switch on it as shown in the first picture, for this module perform the steps below:
- Disconnect the +5v line from the modules end as shown in the hook diagram above.
- Press and hold the switch (DO NOT RELEASE IT!)
- Reconnect the +5v connection
- Now Release the switch and take a breathe. Observe that the led on the module starts blinking once every two seconds, slower than normal disconnected mode.
- Upload the code below to the Arduino.
- #include <SoftwareSerial.h>
- SoftwareSerial EEBlue(10, 11); // RX | TX
- void setup()
- {
- Serial.begin(9600);
- EEBlue.begin(38400); //Baud Rate for command Mode.
- Serial.println("Enter AT commands!");
- }
- void loop()
- {
- // Feed any data from bluetooth to Terminal.
- if (EEBlue.available())
- Serial.write(EEBlue.read());
- // Feed all data from termial to bluetooth
- if (Serial.available())
- EEBlue.write(Serial.read());
- }
Notice that the only change in the code is the baud Rate. This is the rate at which the module speaks in the command mode. We need not change anything on the terminal because we are still speaking the with the Arduino at 9600 baud.
Open up the terminal hit AT and check if the module echos back OK!

Setting up Device Name and Pass key
| Command | Response | Description |
|---|---|---|
| AT+NAME="EE BLUE" | OK | Sets the name to EE Blue. |
| AT+PSWD="2425" | OK | Sets the pairing key. |
Resources
- AT commands for HC-05
- HC_05_Core_Datasheet.pdf
- Detailed setup details for other types of HC-05 modules with different breakout board type at itead.cc.