
Difference between revisions of "RF Robot"
| Line 4: | Line 4: | ||
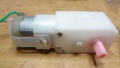
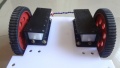
==Mounting the BO Motor with Clamps== | ==Mounting the BO Motor with Clamps== | ||
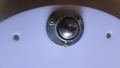
[[File:Robo Wheel mouting 7.JPG|Attaching BO Clamps to BO Motor]] | [[File:Robo Wheel mouting 7.JPG|Attaching BO Clamps to BO Motor]] | ||
| − | < | + | <gallery> |
File:Robo_Wheel_mouting_1.JPG|Step 1 | File:Robo_Wheel_mouting_1.JPG|Step 1 | ||
File:Robo_Wheel_mouting_2.JPG|Step 2 | File:Robo_Wheel_mouting_2.JPG|Step 2 | ||
| Line 11: | Line 11: | ||
File:Robo_Wheel_mouting_5.JPG|Step 5 | File:Robo_Wheel_mouting_5.JPG|Step 5 | ||
File:Robo_Wheel_mouting_6.JPG|Step 6 | File:Robo_Wheel_mouting_6.JPG|Step 6 | ||
| − | </ | + | </gallery> |
| + | |||
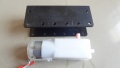
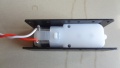
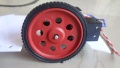
==Attaching Wheels to chasis== | ==Attaching Wheels to chasis== | ||
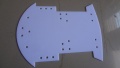
[[File:RF_Robo_Attaching_wheels_2.JPG]] | [[File:RF_Robo_Attaching_wheels_2.JPG]] | ||
| − | < | + | <gallery> |
File:RF_Robo_Attaching_wheels_1.JPG|Step 1 | File:RF_Robo_Attaching_wheels_1.JPG|Step 1 | ||
File:RF_Robo_Attaching_wheels_2.JPG|Step 2 | File:RF_Robo_Attaching_wheels_2.JPG|Step 2 | ||
File:RF_Robo_Attaching_wheels_3.JPG|Step 3 | File:RF_Robo_Attaching_wheels_3.JPG|Step 3 | ||
File:RF_Robo_Attaching_wheels_4.JPG|Step 4 | File:RF_Robo_Attaching_wheels_4.JPG|Step 4 | ||
| − | </ | + | </gallery> |
| + | |||
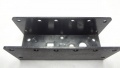
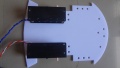
==Assembling the Base== | ==Assembling the Base== | ||
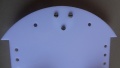
[[File:RF_Robo_Assembly_6.JPG]] | [[File:RF_Robo_Assembly_6.JPG]] | ||
| − | < | + | <gallery> |
File:RF_Robo_Assembly_1.JPG|Step 1 | File:RF_Robo_Assembly_1.JPG|Step 1 | ||
File:RF_Robo_Assembly_2.JPG|Step 2 | File:RF_Robo_Assembly_2.JPG|Step 2 | ||
File:RF_Robo_Assembly_3.JPG|Step 3 | File:RF_Robo_Assembly_3.JPG|Step 3 | ||
File:RF_Robo_Assembly_4.JPG|Step 4 | File:RF_Robo_Assembly_4.JPG|Step 4 | ||
| − | </ | + | </gallery> |
| + | |||
=The Transmitter and Receiver RF Boards= | =The Transmitter and Receiver RF Boards= | ||
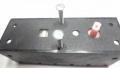
[[File:RF Robo Tx.jpg|framed|Right|x300px|Controller with Transmitter]] | [[File:RF Robo Tx.jpg|framed|Right|x300px|Controller with Transmitter]] | ||
Revision as of 18:20, 3 July 2014
We always wished to build a wireless robot without a Micrcontroller. This robot can be assembled and built by anyone! From small kids(16+ years!) to big kids(60+) no programming required!!!
Contents
Assembling the Robot
Mounting the BO Motor with Clamps

Step 1
Step 2
Step 3
Step 4
Step 5
Step 6


Attaching Wheels to chasis

Step 1
Step 2
Step 3
Step 4


Assembling the Base

Step 1
Step 2
Step 3
Step 4


The Transmitter and Receiver RF Boards

Controller with Transmitter

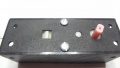
Receiver with Motor Driver
Ready to drive
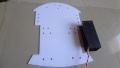
- Once you assemble the chasis, mount the Receiver board on it with 2 or four 8mm (length) screws and nut.
- Connect the motors and the batteries as shown in the image.

- Follow the same sequence of connections as shown in the images or else the Robot might not work!


If you've any questions about the RF robot, comment below, if you've built, share your experience!