
Difference between revisions of "PIC Library Usage Guide"
| Line 5: | Line 5: | ||
| − | Step 2: A new window opens which will guide to create and configure the project. Click next to proceed. | + | *''Step 2: A new window opens which will guide to create and configure the project. Click next to proceed.'' |
[[File:guide_createproj.png]] | [[File:guide_createproj.png]] | ||
| + | |||
| + | *''Step 3: After clicking next a new window opens to select the device, select Pic16f877A from the drop down and click next.'' | ||
| + | [[File:step_one.png]] | ||
| + | |||
| + | *''Step 4: Once the device is selected a new window opens to select the compiler, select Hitech Universal ToolSuite from the drop down and click next.'' | ||
| + | Note: | ||
| + | *''Ensure the HiTech tool chain is installed before creating the project. Evaluation version of Hitech Compiler is embedded in Mplab Setup which needs to be installed along with Mplab.'' | ||
| + | [[File:step_two.png]] | ||
| + | |||
| + | *''Step 5: Upon selecting the ToolChain, Browse to the project folder and provide the suitable project name and save it. .'' | ||
| + | [[File:step_three.png]] | ||
| + | |||
| + | *''Step 6:'' | ||
| + | [[File:project_saveas.png]] | ||
| + | |||
| + | *''Step 7: Click next to proceed as there are no files(.c/.h) to be added at this stage.'' | ||
| + | [[File:step_four.png]] | ||
| + | |||
| + | *''Step8: Finally click finish to create the project. Now the project will be created with no initial files.'' | ||
| + | [[File:summary.png]] | ||
| + | |||
| + | *''Step 9: Create a new .c file to write the main program.'' | ||
| + | [[File:create_newfile.png]] | ||
| + | |||
| + | |||
| + | *''Step 10: Write your program using the library functions and save it.'' | ||
| + | Note: | ||
| + | *''Include the respective header files before calling any library functions. '' | ||
| + | [[File:program_using_library.png]] | ||
| + | [[File:program_using_library1.png]] | ||
| + | |||
| + | *''Step 11: Provide the suitable file name(main.c) and save it in the same project folder. '' | ||
| + | [[File:suitable_name.png]] | ||
| + | |||
| + | *''Step 12: Include your source files to the project.. '' | ||
| + | [[File:include_sourcefile.png]] | ||
| + | |||
| + | *''Step 13: Select all the source files which needs to be included in the project and click open.'' | ||
| + | Note: | ||
| + | *''Library files should be copied to the project folder before including them into the project'' | ||
| + | [[File:select_allsrcfiles.png]] | ||
| + | |||
| + | *''Step 14: Include your header files to the project.. '' | ||
| + | [[File:include_headerfiles.png]] | ||
| + | |||
| + | *''Step 15: Select all the header files which needs to be included in the project and click open.'' | ||
| + | [[File:selectall_headerfiles.png]] | ||
| + | |||
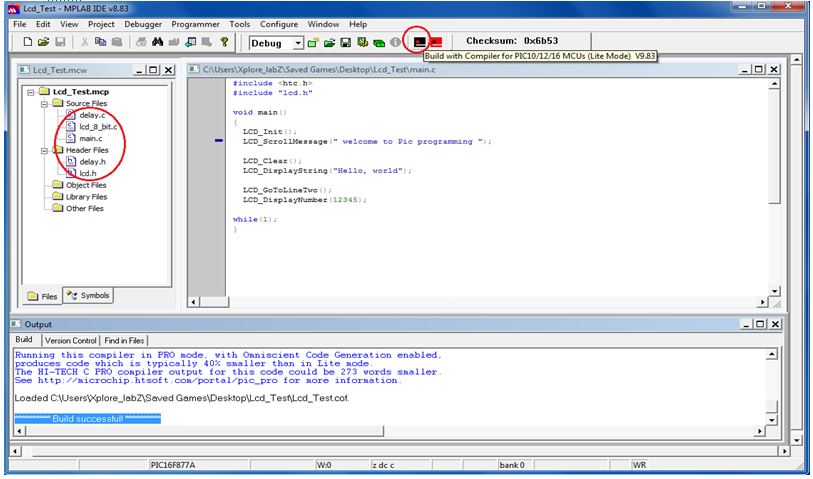
| + | *''Step 16: The included files will be visible in the left side project navigator, if any file is missing then it should be copied to the Project folder and included as shown in step 11.'' | ||
| + | **''Compile the project by clicking on Build as shown below Project complies if there are no errors. If there are any errors fix them and re-compile.'' | ||
| + | [[File:compile.png]] | ||
| + | |||
| + | *''Step 17: Once the project is built(compiled), hex file will be generated with the project name in the selected project folder. '' | ||
| + | [[File:hex_files.png]] | ||
Revision as of 11:59, 24 October 2013
Libray usage guide
- Below example demonstrates the step by step procedure to include the libraries into any applications.
- Step 1: Open the Mplab software and select the Project Wizard from Project Menu as shown below.

- Step 2: A new window opens which will guide to create and configure the project. Click next to proceed.

- Step 3: After clicking next a new window opens to select the device, select Pic16f877A from the drop down and click next.

- Step 4: Once the device is selected a new window opens to select the compiler, select Hitech Universal ToolSuite from the drop down and click next.
Note:
- Ensure the HiTech tool chain is installed before creating the project. Evaluation version of Hitech Compiler is embedded in Mplab Setup which needs to be installed along with Mplab.

- Step 5: Upon selecting the ToolChain, Browse to the project folder and provide the suitable project name and save it. .

- Step 6:

- Step 7: Click next to proceed as there are no files(.c/.h) to be added at this stage.

- Step8: Finally click finish to create the project. Now the project will be created with no initial files.

- Step 9: Create a new .c file to write the main program.

- Step 10: Write your program using the library functions and save it.
Note:
- Include the respective header files before calling any library functions.


- Step 11: Provide the suitable file name(main.c) and save it in the same project folder.

- Step 12: Include your source files to the project..

- Step 13: Select all the source files which needs to be included in the project and click open.
Note:
- Library files should be copied to the project folder before including them into the project

- Step 14: Include your header files to the project..

- Step 15: Select all the header files which needs to be included in the project and click open.

- Step 16: The included files will be visible in the left side project navigator, if any file is missing then it should be copied to the Project folder and included as shown in step 11.
- Compile the project by clicking on Build as shown below Project complies if there are no errors. If there are any errors fix them and re-compile.

- Step 17: Once the project is built(compiled), hex file will be generated with the project name in the selected project folder.
