
Difference between revisions of "Mini AVR USB"
| Line 12: | Line 12: | ||
</gallery> | </gallery> | ||
| − | + | =Features= | |
| − | + | ||
| − | Features | + | |
| − | + | ||
{{Box|type=l_green_light|text=-> | {{Box|type=l_green_light|text=-> | ||
*USB Interface CP2102: for communicating with the host computer.<br/> | *USB Interface CP2102: for communicating with the host computer.<br/> | ||
| Line 27: | Line 24: | ||
}} | }} | ||
| − | + | ||
| − | Physical Features | + | =Physical Features= |
| − | + | ||
{{Box|type=l_green_light|text=-> | {{Box|type=l_green_light|text=-> | ||
*Dimensions:65mm X 90mm. | *Dimensions:65mm X 90mm. | ||
| Line 35: | Line 31: | ||
*Wave Soldered | *Wave Soldered | ||
}} | }} | ||
| − | + | =Downloads= | |
| − | Downloads | + | |
| − | + | ||
{{Box|type=l_green_light|text=-> | {{Box|type=l_green_light|text=-> | ||
[http://exploreembedded.com/wiki/images/c/cc/MINI_AVR_USB_Schematic.pdf Schematic]<br/> | [http://exploreembedded.com/wiki/images/c/cc/MINI_AVR_USB_Schematic.pdf Schematic]<br/> | ||
[http://exploreembedded.com/wiki/index.php?title=File:Arduino_code.zip Arduino Sample Code]<br/> | [http://exploreembedded.com/wiki/index.php?title=File:Arduino_code.zip Arduino Sample Code]<br/> | ||
| − | + | }} | |
| + | |||
| + | =Programming and Usage= | ||
=====Using the Board with AVR Studio and Flashing with XploreFlash===== | =====Using the Board with AVR Studio and Flashing with XploreFlash===== | ||
| + | {{Box|type=l_green_light|text=-> | ||
{{Box|type=l_green_light|text= | {{Box|type=l_green_light|text= | ||
Step 1: Xplore flash is based on various opensource software, it requires avrdude. Avrdude is part of WinAVR GCC complier. [http://sourceforge.net/projects/winavr/files/latest/download?source=files Download and install it.] | Step 1: Xplore flash is based on various opensource software, it requires avrdude. Avrdude is part of WinAVR GCC complier. [http://sourceforge.net/projects/winavr/files/latest/download?source=files Download and install it.] | ||
| Line 61: | Line 58: | ||
Note: The GUI software will require [http://www.microsoft.com/en-gb/download/details.aspx?id=16614 .NET framework] 2.0 or later please download and install it. | Note: The GUI software will require [http://www.microsoft.com/en-gb/download/details.aspx?id=16614 .NET framework] 2.0 or later please download and install it. | ||
}} | }} | ||
| − | + | {{Box|type=l_green_light|text=-> | |
=====Using the Board with Arduino Software===== | =====Using the Board with Arduino Software===== | ||
For the board to appear in the arduino software add the following lines in the '''boards.txt''' file.<br/>File location:e.g: C:\Program Files\Arduino\hardware\arduino | For the board to appear in the arduino software add the following lines in the '''boards.txt''' file.<br/>File location:e.g: C:\Program Files\Arduino\hardware\arduino | ||
Revision as of 16:02, 3 July 2014


.jpg)


Contents
Features
- USB Interface CP2102: for communicating with the host computer.
- LCD Interface:16 characters,2 lines.
- Test Leds(2) and Switches(2).
- Breakout for all Ports.
- POT to test ADC.
- Breakout to fix directly on breadboard.
- Breakout +5v,Gnd and Vin.
- Power Supply compatible with DC adapters.
Physical Features
- Dimensions:65mm X 90mm.
- 1.6mm Glass Epoxy, FR4 PCB.
- Wave Soldered
Downloads
Programming and Usage
Using the Board with AVR Studio and Flashing with XploreFlash
{{Box|type=l_green_light|text=->
Step 2:To connect Development board with computer USB driver is required. Windows USB to UART Drivers for CP2102
- For Other Operating system please download from Silicon Labs website.
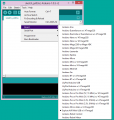
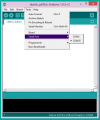
Step 3: Download and install XploreFlash GUI. (XploreFlash GUI is based on AVRDUDESS)
Step 4: Follow the steps on images below to flash the board.


Note: The GUI software will require .NET framework 2.0 or later please download and install it.
Using the Board with Arduino Software
For the board to appear in the arduino software add the following lines in the boards.txt file.
File location:e.g: C:\Program Files\Arduino\hardware\arduino
atmega8.name=Explore AVR Mini USB w/ ATmega8
atmega8.upload.protocol=arduino
atmega8.upload.maximum_size=7168
atmega8.upload.speed=19200
atmega8.bootloader.low_fuses=0xdf
atmega8.bootloader.high_fuses=0xca
atmega8.bootloader.path=atmega8
atmega8.bootloader.file=ATmegaBOOT-prod-firmware-2009-11-07.hex
atmega8.bootloader.unlock_bits=0x3F
atmega8.bootloader.lock_bits=0x0F
atmega8.build.mcu=atmega8
atmega8.build.f_cpu=16000000L
atmega8.build.core=arduino
atmega8.build.variant=standard
1.The board shows up in arduino software
2.Check exact COM port
3.Select the COM port.


{{#seo:
|title=AVR_Development_Boards
|titlemode=append
|keywords=AVR,Atmega8 development board, AVR 28 pin development board, AVR USB development board,Atmega328, Atmega168, AVR Development boards,AVR boards,Mini AVR
|description=AVR Development Boards
}}