
Difference between revisions of "LPC1768: Uploading Hex and Bin files"
| Line 13: | Line 13: | ||
</html><br><br> | </html><br><br> | ||
| − | < | + | <div class="img-responsive"> |
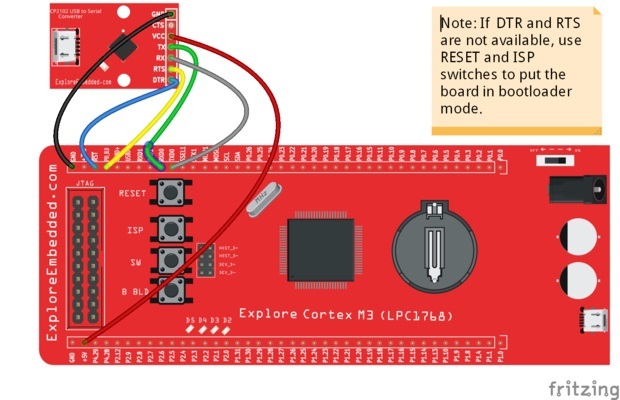
| − | + | https://www.exploreembedded.com/wiki/images/e/ec/Lpc1768_Usb2Serial.jpg | |
| − | </ | + | </div> |
Note: If your converter does not have DTR and RTS lines, "hold down the ISP/PRI_BLD switch, RESET the board(press and release reset switch) and then release the ISP switch ". Now the Boot Contoller will be in ISP/PRI_BLD mode and you can flash the hex file using flash magic.<br><br> | Note: If your converter does not have DTR and RTS lines, "hold down the ISP/PRI_BLD switch, RESET the board(press and release reset switch) and then release the ISP switch ". Now the Boot Contoller will be in ISP/PRI_BLD mode and you can flash the hex file using flash magic.<br><br> | ||
Revision as of 11:55, 8 March 2016
Explorer (talk) 17:50, 7 March 2016 (IST)
Objective
In this tutorial we will be discussing how to upload the .hex and .bin files to Lpc1768 board.
For flashing the hex files, we will be using the flash magic software along with a Usb to Serial converter.
To upload the .bin, no external hardware is required but board should have the secondary boot loader.
Using Flash Magic
You need a USB to Serial(UART) convertor in order to get this working. The neat thing about the NXP controllers is, they come with a UART boot-loader form the factory. Even though we put a USB boot-loader on top it, the serial boot-loader is still there for you.
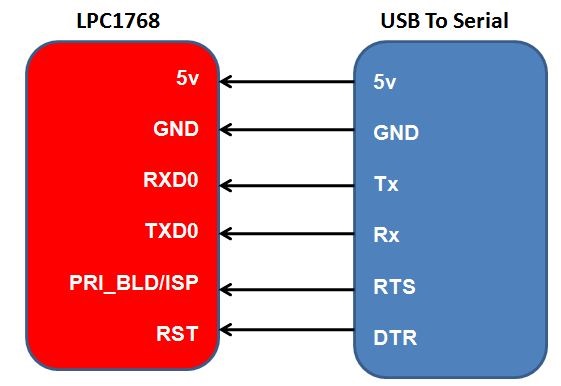
Note: If your converter does not have DTR and RTS lines, "hold down the ISP/PRI_BLD switch, RESET the board(press and release reset switch) and then release the ISP switch ". Now the Boot Contoller will be in ISP/PRI_BLD mode and you can flash the hex file using flash magic.
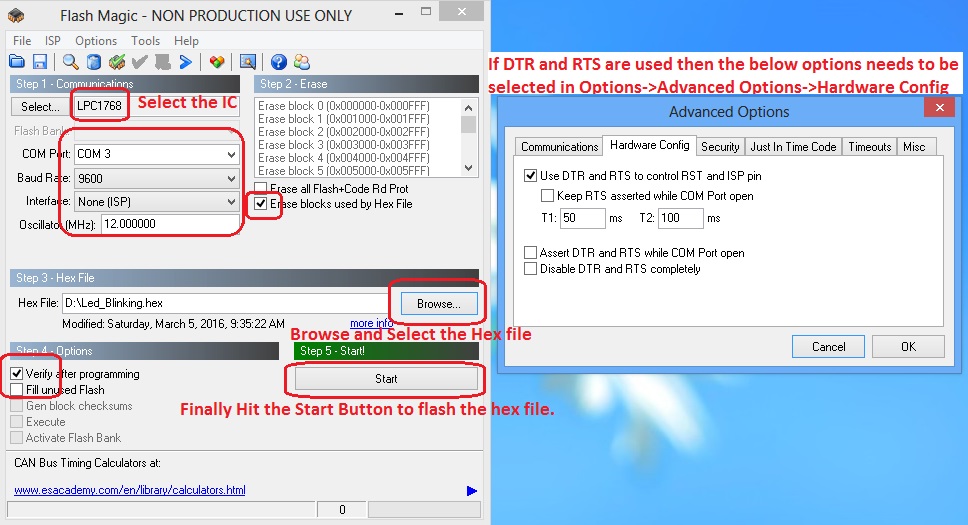
Now open the flash magic software and follow the below steps.
 .
.