Amruta (talk) 11:24, 17 March 2015 (IST)
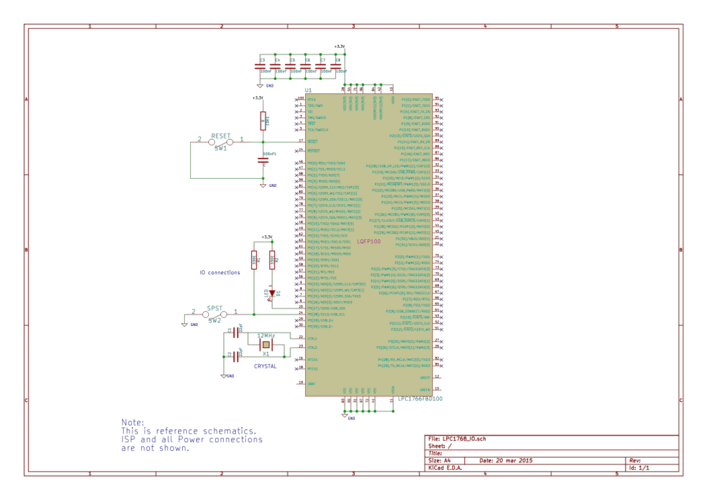
In this tutorial we will be looking at accessing the GPIO of ARM. In this tutorial series we will be using LPC1768 cortex ARM M3. We will be simply reading a switch and making a LED act accordingly.
Contents
Schematic
Code
In this code, we will demonstrate LED and Switch interfacing with the LPC1768.
We will monitor the switch condition and will glow LED when switch is pressed.
#include "lpc17xx.h"   // NXP Library containing all port abd register definations
#include "stdutils.h"  // Explore Embedded library

#define LED		27	 //P0.27
#define SWITCH         28	 //P0.28
int main()
{
        /* Setup and initialize the microcontroller system */
        SystemInit();

	LPC_PINCON->PINSEL2 = 0x00;			   // Configure Pin as GPIO
	util_BitSet(LPC_GPIO0->FIODIR,LED);	   	   // Set pin direction as output
	util_BitClear (LPC_GPIO0->FIODIR,SWITCH);	   // Set pin direction as input

	while(1)
	{
		if (util_IsBitCleared (LPC_GPIO0->FIOPIN,SWITCH))	// check if switch is pressed
			util_BitSet (LPC_GPIO0->FIOSET,LED);	   // turn on LED
		else
			util_BitSet (LPC_GPIO0->FIOCLR,LED);	// turn off LED
	}
}
Basics
lpc17xx header file
This is peripheral access header file for NXP LPC17xx device series. It contains all required register and peripheral definitions which one requires in order to access any peripheral.
If you take a look at this header file, you will notice that all registers associated with a peripheral are clubbed together in a structure. So to access a register we need to use the respective structure
Code Details
SystemInit()
It initializes the microcontroller system. Typically, this function configures the oscillator (PLL) that is part of the microcontroller device.
In-short, it configures and initializes microcontroller for our use.
Register Details
Let's see how to use the different registers...
PINCONNECT Block
Before using any port pin, it is required to configure its function.
The pin connect block allows most pins of the microcontroller to have more than one potential function. It contains Pin Function Select registers and Pin Mode Select registers.
Usually we don't deal with Pin Mode registers unless we are very much familiar with the microcontroller and want to use its internal resistor features. For time being, we will leave Pin Mode register with its default value and let's see details of Pin Function Select register.
- PINSELx (Pin function select register)
There are four alternate functions for each pin. So to select a function for one pin, 2 bits are required. That means 2 PINSEL registers for each port, one for pins 0 to 15 and another for pins 16 to 31.
The PINSEL registers control the functions of device pins as shown below :
| Value | Function |
|---|---|
| 00 | Primary (default) function, typically GPIO port |
| 01 | First alternate function |
| 10 | Second alternate function |
| 11 | Third alternate function |
GPIO Block
The LPC1768 implements portions of five 32-bit General Purpose I/O ports. The registers discussed below represents the enhanced GPIO features available on all of the GPIO ports. Here we will discuss only commonly used GPIO registers.
- FIODIR(Fast GPIO Port Direction control register)
This register individually controls the direction of each port pin.
| Values | Direction |
|---|---|
| 0 | Input |
| 1 | Output |
- FIOPIN (Fast Port Pin value register )
The current state of digital port pins can be read from this register, regardless of pin direction or alternate function selection (as long as pins are not configured as an input to ADC).
Writing to this register places corresponding values on digital port pins
- FIOSET (Fast Port Output Set register ) and FIOCLR (Fast Port Output Clear register )
This register controls the state of output pins. Writing 1s produces highs at the corresponding port pins. Writing 0s has no effect. Reading this register returns the current contents of the port output register not the physical port value.
| Values | FIOSET | FIOCLR |
|---|---|---|
| 0 | No Effect | No Effect |
| 1 | Sets High on Pin | Sets Low on Pin |
- FIOMASK (Fast Mask register )
Writes, sets, clears, and reads to port (done via writes to FIOPIN, FIOSET, and FIOCLR, and reads of FIOPIN) alter or return only the bits enabled by zeros in this register.
As its default value is zero, no need to configure it here.
Another Way to Code
We believe, there is always a easy way to do the things. What we need to do is just put a little more effort in the beginning and the rest part will go easy.
So what is that extra effort here ?
Once go through the peripheral specific header files of NXP, you really don't need to remember any registers.
e.g. lpc17xx_gpio.h for GPIO related functions,
- lpc17xx_uart.h for UART related functions.
New Code
Here we will use the functions instead of accessing registers directly.
lpc17xx_pinsel_gpio.h is Explore Embedded's modified NXP library to make functionality easy.
Just add it to your source code and enjoy the programming.
#include "lpc17xx_pinsel_gpio.h"   // Explore Embedded's modified NXP Library for GPIO and PINSEL

#define LED	      27	 //P0.27
#define SWITCH	      28	 //P0.28

int main()
{
	/* Setup and initialize the microcontroller system */
	SystemInit();

	/*Configure pins as GPIO */
	PINSEL_ConfigPin (PORT_0, PORT_PIN_28,PINSEL_FUNC_0,PINSEL_OPENDRAIN_DISABLE,PINSEL_RESMODE_PULLUP);
	PINSEL_ConfigPin (PORT_0, PORT_PIN_29,PINSEL_FUNC_0,PINSEL_OPENDRAIN_DISABLE,PINSEL_RESMODE_PULLUP);

	GPIO_SetDir (PORT_1,LED,C_PinOutput_U8);		// Set pin direction as output
	GPIO_SetDir (PORT_1,SWITCH,C_PinInput_U8);		// Set pin direction as input

	while(1)
	{
		if (GPIO_ReadPinValue(PORT_0,SWITCH))		// check if switch is pressed
			GPIO_SetValue(PORT_0,LED);				// turn on LED
		else
			GPIO_ClearValue(PORT_0,LED);
	}
}

