
Difference between revisions of "Flashing the Hex file using ds30 bootloader"
| Line 4: | Line 4: | ||
| − | ==Flashing the bootloader== | + | ==Flashing the Hex file using ds30 bootloader== |
| − | [ | + | STEP 1: [http://exploreembedded.com/wiki/File:Ds30LoaderGui.zip '''Download'''] and install the DS30 bootloader gui. |
| − | + | ==Connect the board with USB to Serial shield and connect jumper as shown in images== | |
| − | + | ||
| − | |||
| − | |||
| − | |||
| − | |||
| − | |||
| − | |||
| − | |||
| − | |||
| − | |||
| − | |||
| − | |||
| − | |||
| − | |||
| − | |||
| − | |||
| − | |||
| − | |||
| − | |||
| − | |||
[[File:Capture9.PNG |x300px]] | [[File:Capture9.PNG |x300px]] | ||
[[File:Capture8.PNG |x300px]] | [[File:Capture8.PNG |x300px]] | ||
| Line 46: | Line 26: | ||
Step 4: Click on the write option to flash the hex file,. Images below show the sequence. | Step 4: Click on the write option to flash the hex file,. Images below show the sequence. | ||
| − | < | + | <gallery mode = "packed-overlay"> |
File:DS30 Step2.PNG|...detects bootloader | File:DS30 Step2.PNG|...detects bootloader | ||
File:DS30_Step3.PNG|...finishes flashing. | File:DS30_Step3.PNG|...finishes flashing. | ||
| − | </ | + | </gallery> |
| − | + | ||
| − | + | *[https://www.exploreembedded.com/wiki/images/1/14/PICkit2.zip '''PICKit 2 Programmer'''] | |
| − | + | ||
| − | * [https://www.exploreembedded.com/wiki/images/1/14/PICkit2.zip '''PICKit 2 Programmer'''] | + | |
*[http://exploreembedded.com/wiki/File:Ds30LoaderGui.zip '''DS30 bootloader gui'''] | *[http://exploreembedded.com/wiki/File:Ds30LoaderGui.zip '''DS30 bootloader gui'''] | ||
*[https://www.exploreembedded.com/wiki/File:DS_30_16F877A.rar '''DS30 bootloader HEX File'''] | *[https://www.exploreembedded.com/wiki/File:DS_30_16F877A.rar '''DS30 bootloader HEX File'''] | ||
| − | + | ||
{{DISQUS}} | {{DISQUS}} | ||
Revision as of 10:18, 10 August 2015
Sharana (talk) 13:47, 7 August 2015 (IST)
Flashing the Hex file using ds30 bootloader
STEP 1: Download and install the DS30 bootloader gui.
Connect the board with USB to Serial shield and connect jumper as shown in images

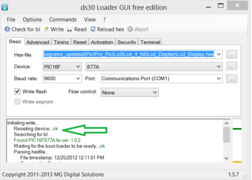
 Step 2:

- Browse the hex file
- Select the appropriate MCU
- Select the baud rate as 9600
- Select the correct com port detected on your computer, when using USB to serial convertor check for exact COM port number in device manager
Step 3: The board uses DTR pin of the CP2102 USB to Serial Convertor to reset the MCU. Set it up as shown in the image below.

Step 4: Click on the write option to flash the hex file,. Images below show the sequence.
...detects bootloader

