Difference between revisions of "Blinky with AVR"
| Line 1: | Line 1: | ||
| − | + | [[User:Sandeep|Sandeep]] ([[User talk:Sandeep|talk]]) 09:51, 5 November 2015 (IST) | |
| + | ---- | ||
[[Category:AVR Tutorials]] | [[Category:AVR Tutorials]] | ||
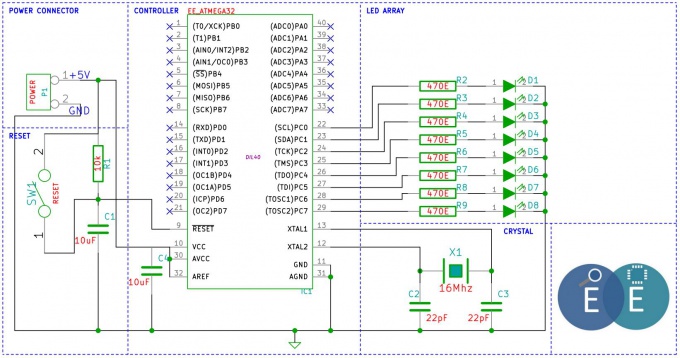
This is the first tutorial with AVR where we will get hands on! Let's do a 'hello world' for Embedded. We will interface a simple LED with one of the port pins. The LED as might know emits light when current is passed through it. It could blow up if we pass more current ( >20mA depending on make and type), hence we put a current limiting resistor. Usually 220, 470 and 1K ohm resistors are found. You can use any of these, it should not be an issue. | This is the first tutorial with AVR where we will get hands on! Let's do a 'hello world' for Embedded. We will interface a simple LED with one of the port pins. The LED as might know emits light when current is passed through it. It could blow up if we pass more current ( >20mA depending on make and type), hence we put a current limiting resistor. Usually 220, 470 and 1K ohm resistors are found. You can use any of these, it should not be an issue. | ||
Revision as of 09:51, 5 November 2015
Sandeep (talk) 09:51, 5 November 2015 (IST)
This is the first tutorial with AVR where we will get hands on! Let's do a 'hello world' for Embedded. We will interface a simple LED with one of the port pins. The LED as might know emits light when current is passed through it. It could blow up if we pass more current ( >20mA depending on make and type), hence we put a current limiting resistor. Usually 220, 470 and 1K ohm resistors are found. You can use any of these, it should not be an issue. Well instead of a single one, we can as-well connect a bunch of these to port and blink them.

