
Difference between revisions of "AVR Hardware and Software Setup"
(Created page with "Category:AVR Tutorials") |
m (Sandeep moved page 4.AVR Hardware and Software Setup to AVR Hardware and Software Setup: clean names) |
||
| (30 intermediate revisions by 2 users not shown) | |||
| Line 1: | Line 1: | ||
| + | {{Box|type=l_green_light|text=[[User:Sandeep|Sandeep]] ([[User talk:Sandeep|talk]]) 04:46, 23 September 2014 (UTC)}} | ||
[[Category:AVR Tutorials]] | [[Category:AVR Tutorials]] | ||
| + | [[File:AVR_tools_SW_HW.JPG|x250px|Hardware and SW Tools]] | ||
| + | In this tutorial we will look at the basic setup required to get started with AVR series of microcontrollers. There are two aspects to it, the software and the hardware. Fortunately, we for AVR there are free software tools available and even some of it is open-source! In this entire tutorial series we will be demonstrating the hardware on aspects on Ultra AVR Development board and also on breadboard and Starter AVR development board wherever possible. Having said that we will release all the schematics and code for you to hack and build on your own. | ||
| + | |||
| + | =Software= | ||
| + | {{Box|type=l_green_light|text= | ||
| + | Let’s talk about software first: | ||
| + | # [http://www.atmel.com/tools/atmelstudio.aspx Atmel Studio 6.2: ] This is complete software suite from Atmel; it is an integrated development Environment that allows you to write C/C++ programs, complies with a free AVRGCC compiler and produces hex files. You can download it [http://www.atmel.com/tools/atmelstudio.aspx here]. Choose the download option according to your existing setup. | ||
| + | # The Programming Software: The programming SW is required to transfer hex file to the target MCU. There are various options available depending on the programmer you’re using. In this tutorial series we will be using [http://exploreembedded.com/wiki/index.php?title=Using_XploreFlash_For_USBasp_based_Programmer Xplore Flash]. There are other software that you could also try | ||
| + | ## [http://extremeelectronics.co.in/avr-tutorials/gui-software-for-usbasp-based-usb-avr-programmers/ Extreme Burner] | ||
| + | ## [http://khazama.com/project/programmer/ Khazama] | ||
| + | }} | ||
| + | ==Setting up Atmel Studio 6:== | ||
| + | * The first section '''Creating a new project''' describes, a fresh new project without any additional configurations. | ||
| + | * The second section show '''importing libraries''', this would be helpful if you're trying to use library files created by Explore Embedded or anyone else and importing them in your projects. | ||
| + | * The third section show '''very important additional configurations''' that you need to make in order to compile and run the programs the right way. | ||
| + | |||
| + | ===Creating a new project=== | ||
| + | <gallery mode="packed-overlay"> | ||
| + | File:Image001.png|Step 1 | ||
| + | File:Image002.png|Step 2 | ||
| + | File:Image003.png|Step 2 | ||
| + | File:Image004.png|Step 3 | ||
| + | File:Image005.png|Step 4 | ||
| + | File:Image006.png|Step 5 | ||
| + | File:Image007.png|Step 6 | ||
| + | </gallery> | ||
| + | |||
| + | ===Importing Library files=== | ||
| + | Steps below show how to set up AVR studio the right way and import a Explore Embedded Library files | ||
| + | |||
| + | <gallery mode="packed-overlay"> | ||
| + | File:Image001.png|Step 1 | ||
| + | File:Image002.png|Step 2 | ||
| + | File:Image003.png|Step 2 | ||
| + | File:Image004.png|Step 2 | ||
| + | File:Image005.png|Step 3 | ||
| + | File:Image006.png|Step 4 | ||
| + | File:Image007.png|Step 5 | ||
| + | File:Image008.png|Step 6 | ||
| + | File:Image009.png|Step 7 | ||
| + | File:Image010.png|Step 8 | ||
| + | File:Image011.png|Step 9 | ||
| + | </gallery> | ||
| + | {{Box|type=l_green_light|text= | ||
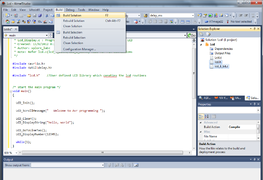
| + | * '''Step 1:''''' Open the Avr Atmel Studio-6 and select the new project from File Menu as shown below.'' | ||
| + | * '''Step 2:'' '''Browse to your project folder and provide the project name and click on Ok.''''' ''' | ||
| + | * '''Step 3: '''Once the project is saved a new dialog box “Device Selection” opens, Select Atmega32 and click OK. | ||
| + | * '''Step 4'': '''Once the project is successfully created the below window opens with the initil .c file .'' | ||
| + | ** ''Note: The initial file name will be same as project name.'' | ||
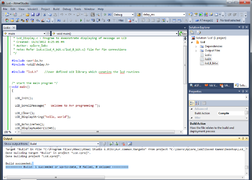
| + | * '''Step 5: '''Write your program using the library functions and save it. | ||
| + | * '''Note: '''Include the respective header files before calling any library functions.''' ''' | ||
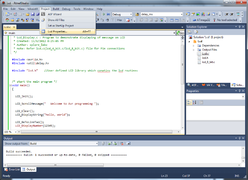
| + | * '''Step 6: '''Add the library files (.c,.h) to the project as shown below. | ||
| + | * '''Note:''' Copy the library files into the project folder before including them into the project | ||
| + | * '''Step 7: '''Add the Source (.c) and header( .h) files by browsing to the project folder. | ||
| + | * '''Step 8: '''The included library files can be seen in Solution Explorer on the right side. | ||
| + | * '''Step 9: '''Compile the project by clicking on Build Solution from Build menu (or press F7). Project complies if there are no errors. If there are any errors fix them and re-compile. | ||
| + | }} | ||
| + | <gallery mode="packed-overlay"> | ||
| + | File:Image012.png|Step 10 | ||
| + | File:Image013.png|Step 11 | ||
| + | File:Image014.png|Step 12 | ||
| + | File:Image015.png|Step 13 | ||
| + | File:Image016.png|Step 14 | ||
| + | File:Image017.png|Step 15 | ||
| + | File:Image018.png|Step 16 | ||
| + | </gallery> | ||
| + | ===Additional Configuration=== | ||
| + | {{Box|type=l_green_light|text= | ||
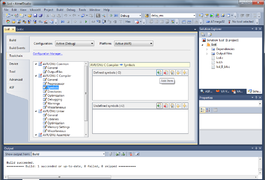
| + | * '''Step 10: '''Configure the Controller Freq by selecting the project properties from Project menu.''' ''' | ||
| + | ** '''Note: '''As the Inbuilt delay routines as used the freq needs to be specified to generate accurate delays | ||
| + | * '''Step 11: '''Select the Symbols from Tool Chain menu and Click on Add Item in Defined Symbols(-D) box. | ||
| + | * '''Step 12: '''Provide the Controller (Target Board)''' '''frequency as '''F_CPU=xxx Hz .'''In this case it is 11.0592Mhz. | ||
| + | * '''Step 13: Configuring the optimization levels:''' Select the Optimization from Tool Chain menu. Select the required optimization level from drop down. Refer WinAvr/GCC documents for more optimization details. | ||
| + | * '''Step 14: Selecting the target tool chain: '''Select the Advanced option on the left side, now click the link shown in blue color Tools->Options->Tool chain ->Flavor Configuration.''' ''' | ||
| + | * '''Step 15: '''From the drop down select WinAVR and set it as Default tool chain by clicking on “Set As Default”.''' ''' | ||
| + | ** '''Note: '''Above two Steps ( 14 & 15) needs to be performed for the first time, ie till the WinAVR is configured as default Tool chain . | ||
| + | * '''Step 16:''' Finally recompile after all configurations. Hex file will be generated with the project name in the selected | ||
| + | ** '''Project->Debug folder'''. | ||
| + | *Once the hex file is generated check the steps under [[Using XploreFlash]] to transfer it to target MCU. | ||
| + | }} | ||
| + | =Programming the AVR Microcontrollers= | ||
| + | AVR microcontrollers can be programmed in the following ways. | ||
| + | *'''SPI''': Most development boards have a either of two pin breakouts. This uses Micrcontrollers '''SPI''' lines to flash the hex file. Note that it requires a external programmer like the '''USBasp''' . Check our [[AVR_USBasp_Programmer]] | ||
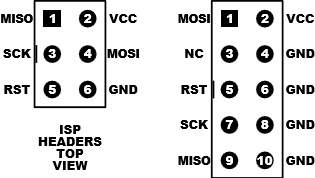
| + | [[File:Isp headers.png]] | ||
| + | *'''Bootloader''': Most AVR micrcontrollers have bootloader, the bootloader has tiny program which moniters the serial port of the micrcontroller and checks if there is a command from the computer to program the internal flash of the micrcontroller. This elimates the need of a external programmer. Our [[Starter_AVR_USB]] and [[Mini_AVR_USB]] are examples of such development boards which do not need an external programmer to transfer the hex file from the computer to the microcontroller. | ||
| + | |||
| + | =Hardware Tools= | ||
| + | {{Box|type=l_green_light|text= | ||
| + | We will be using the following hardware tools in the entire tutorial series. | ||
| + | *[[AVR Development Kit]]: This Kit includes MCU as well as programmer with a lot of peripherals. | ||
| + | *[[Explore Starter Kit for AVR]]: This kit does not require a programmer, it comes with boot-loader. No soldering is required to experiment with it. | ||
| + | *[[AVR USBasp Programmer]]: Can also be used to transfer hex file to your custom development board. | ||
| + | }} | ||
| + | |||
| + | = Video Tutorials = | ||
| + | <html> | ||
| + | <div class="embed-responsive embed-responsive-16by9"> | ||
| + | <iframe class="embed-responsive-item"src="https://www.youtube.com/embed/TN5gJDKSeaE" frameborder="0" allowfullscreen></iframe> | ||
| + | </div> | ||
| + | </html> | ||
| + | |||
| + | {{DISQUS}} | ||
Latest revision as of 09:59, 24 March 2016
 In this tutorial we will look at the basic setup required to get started with AVR series of microcontrollers. There are two aspects to it, the software and the hardware. Fortunately, we for AVR there are free software tools available and even some of it is open-source! In this entire tutorial series we will be demonstrating the hardware on aspects on Ultra AVR Development board and also on breadboard and Starter AVR development board wherever possible. Having said that we will release all the schematics and code for you to hack and build on your own.
Contents
Software
Let’s talk about software first:
- Atmel Studio 6.2: This is complete software suite from Atmel; it is an integrated development Environment that allows you to write C/C++ programs, complies with a free AVRGCC compiler and produces hex files. You can download it here. Choose the download option according to your existing setup.
- The Programming Software: The programming SW is required to transfer hex file to the target MCU. There are various options available depending on the programmer you’re using. In this tutorial series we will be using Xplore Flash. There are other software that you could also try
Setting up Atmel Studio 6:
- The first section Creating a new project describes, a fresh new project without any additional configurations.
- The second section show importing libraries, this would be helpful if you're trying to use library files created by Explore Embedded or anyone else and importing them in your projects.
- The third section show very important additional configurations that you need to make in order to compile and run the programs the right way.
Creating a new project
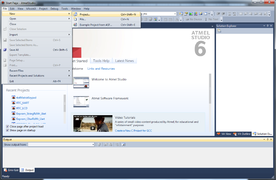
Step 1
Step 2

Step 2
Step 3
Step 4

Step 5
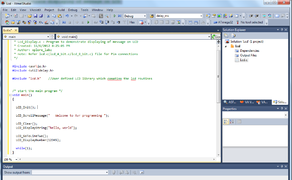
Step 6
Importing Library files
Steps below show how to set up AVR studio the right way and import a Explore Embedded Library files
Step 1
Step 2
Step 2
Step 2
Step 3
Step 4
Step 5
Step 6
Step 7
Step 8
Step 9
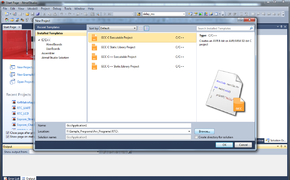
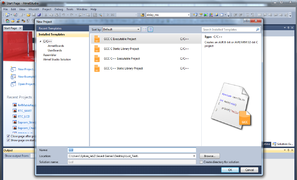
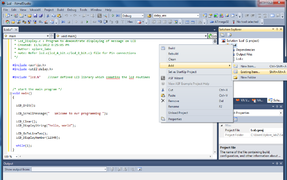
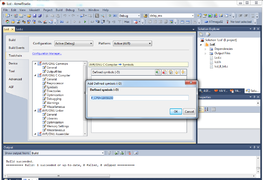
* Step 1: Open the Avr Atmel Studio-6 and select the new project from File Menu as shown below.- Step 2: Browse to your project folder and provide the project name and click on Ok.
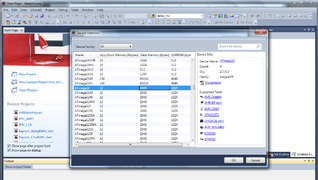
- Step 3: Once the project is saved a new dialog box “Device Selection” opens, Select Atmega32 and click OK.
- Step 4: Once the project is successfully created the below window opens with the initil .c file .
- Note: The initial file name will be same as project name.
- Step 5: Write your program using the library functions and save it.
- Note: Include the respective header files before calling any library functions.
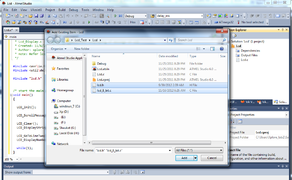
- Step 6: Add the library files (.c,.h) to the project as shown below.
- Note: Copy the library files into the project folder before including them into the project
- Step 7: Add the Source (.c) and header( .h) files by browsing to the project folder.
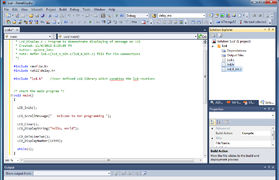
- Step 8: The included library files can be seen in Solution Explorer on the right side.
- Step 9: Compile the project by clicking on Build Solution from Build menu (or press F7). Project complies if there are no errors. If there are any errors fix them and re-compile.
Step 10
Step 11
Step 12
Step 13
Step 14
Step 15
Step 16
Additional Configuration
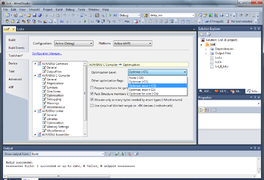
* Step 10: Configure the Controller Freq by selecting the project properties from Project menu.- Note: As the Inbuilt delay routines as used the freq needs to be specified to generate accurate delays
- Step 11: Select the Symbols from Tool Chain menu and Click on Add Item in Defined Symbols(-D) box.
- Step 12: Provide the Controller (Target Board) frequency as F_CPU=xxx Hz .In this case it is 11.0592Mhz.
- Step 13: Configuring the optimization levels: Select the Optimization from Tool Chain menu. Select the required optimization level from drop down. Refer WinAvr/GCC documents for more optimization details.
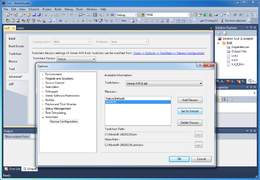
- Step 14: Selecting the target tool chain: Select the Advanced option on the left side, now click the link shown in blue color Tools->Options->Tool chain ->Flavor Configuration.
- Step 15: From the drop down select WinAVR and set it as Default tool chain by clicking on “Set As Default”.
- Note: Above two Steps ( 14 & 15) needs to be performed for the first time, ie till the WinAVR is configured as default Tool chain .
- Step 16: Finally recompile after all configurations. Hex file will be generated with the project name in the selected
- Project->Debug folder.
- Once the hex file is generated check the steps under Using XploreFlash to transfer it to target MCU.
Programming the AVR Microcontrollers
AVR microcontrollers can be programmed in the following ways.
- SPI: Most development boards have a either of two pin breakouts. This uses Micrcontrollers SPI lines to flash the hex file. Note that it requires a external programmer like the USBasp . Check our AVR_USBasp_Programmer
- Bootloader: Most AVR micrcontrollers have bootloader, the bootloader has tiny program which moniters the serial port of the micrcontroller and checks if there is a command from the computer to program the internal flash of the micrcontroller. This elimates the need of a external programmer. Our Starter_AVR_USB and Mini_AVR_USB are examples of such development boards which do not need an external programmer to transfer the hex file from the computer to the microcontroller.
Hardware Tools
We will be using the following hardware tools in the entire tutorial series.- AVR Development Kit: This Kit includes MCU as well as programmer with a lot of peripherals.
- Explore Starter Kit for AVR: This kit does not require a programmer, it comes with boot-loader. No soldering is required to experiment with it.
- AVR USBasp Programmer: Can also be used to transfer hex file to your custom development board.
Video Tutorials


