Difference between revisions of "8 Lets measure the light in the room with LDR"
(Created page with "Category:Arduino Tutorials 680px") |
|||
| (4 intermediate revisions by the same user not shown) | |||
| Line 1: | Line 1: | ||
[[Category:Arduino Tutorials]] | [[Category:Arduino Tutorials]] | ||
[[File:Arduino Interface LDR.JPG|680px]] | [[File:Arduino Interface LDR.JPG|680px]] | ||
| + | ====Code==== | ||
| + | <syntaxhighlight> | ||
| + | /* | ||
| + | Lets measure the light in the room with LDR | ||
| + | Turns on an LED on , then off , repeatedly according to the Light. | ||
| + | */ | ||
| + | |||
| + | // Pin 13 has an LED connected on most Arduino boards. | ||
| + | // LDR is connected to analog input A0 as shown in Diagram. | ||
| + | // give it a name: | ||
| + | int led = 13; | ||
| + | // the setup routine runs once when you press reset: | ||
| + | void setup() { | ||
| + | // initialize the digital pin as an output. | ||
| + | pinMode(led, OUTPUT); | ||
| + | } | ||
| + | // the loop routine runs over and over again forever: | ||
| + | void loop() { | ||
| + | digitalWrite(led, HIGH); // turn the LED on (HIGH is the voltage level) | ||
| + | delay(1000); // wait for a second | ||
| + | digitalWrite(led, LOW); // turn the LED off by making the voltage LOW | ||
| + | delay(1000); // wait for a second | ||
| + | } | ||
| + | </syntaxhighlight> | ||
Latest revision as of 16:53, 15 September 2014
Code
/*
  Lets measure the light in the room with LDR
  Turns on an LED on , then off , repeatedly according to the Light.
  */

// Pin 13 has an LED connected on most Arduino boards.
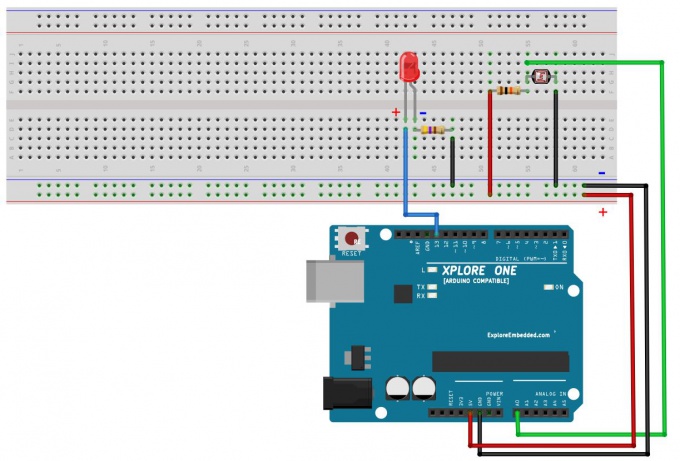
// LDR is connected to analog input A0 as shown in Diagram.
// give it a name:
int led = 13;
// the setup routine runs once when you press reset:
void setup() {
  // initialize the digital pin as an output.
  pinMode(led, OUTPUT);
}
// the loop routine runs over and over again forever:
void loop() {
  digitalWrite(led, HIGH);   // turn the LED on (HIGH is the voltage level)
  delay(1000);               // wait for a second
  digitalWrite(led, LOW);    // turn the LED off by making the voltage LOW
  delay(1000);               // wait for a second
}

