Difference between revisions of "8051 Library Usage Guide"
| Line 2: | Line 2: | ||
*''Below example demonstrates the step by step procedure to include the libraries into any applications.'' | *''Below example demonstrates the step by step procedure to include the libraries into any applications.'' | ||
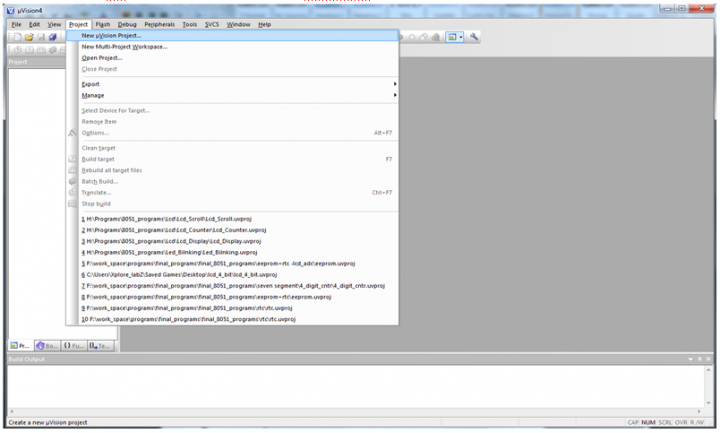
'''Step 1:''' ''Open the Keil software and select the New Microvision project from Project Menu as shown below.'' | '''Step 1:''' ''Open the Keil software and select the New Microvision project from Project Menu as shown below.'' | ||
| − | [[File:1Microvision_Project.png | + | [[File:1Microvision_Project.png|720x480px]] |
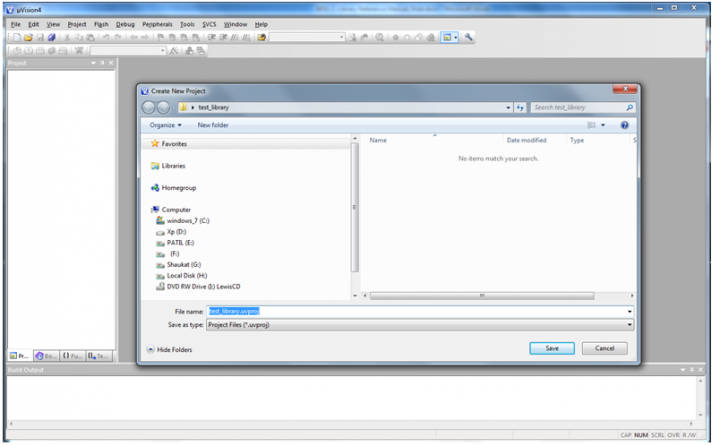
'''Step 2:''' ''Browse to your project folder and provide the project name and click on save.'' | '''Step 2:''' ''Browse to your project folder and provide the project name and click on save.'' | ||
| − | [[File:2Project_Folder.png | + | [[File:2Project_Folder.png|720x480px]] |
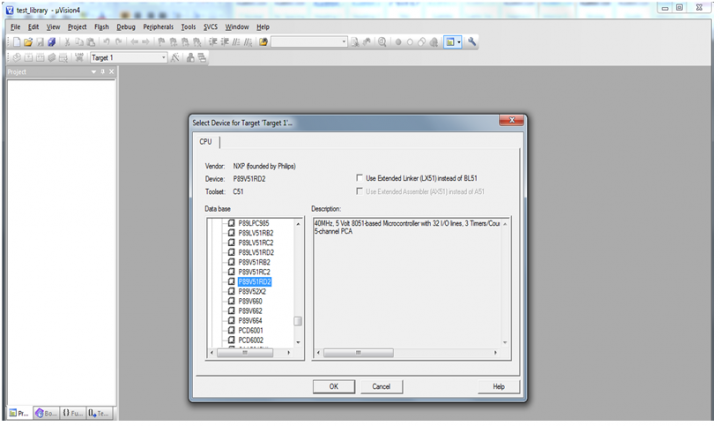
'''Step 3:''' ''Once the project is saved a new dialog box “Select Device for Target” opens, Select the controller(Atmel:At89s52/NXP:P89v51rd2) and click on OK.'' | '''Step 3:''' ''Once the project is saved a new dialog box “Select Device for Target” opens, Select the controller(Atmel:At89s52/NXP:P89v51rd2) and click on OK.'' | ||
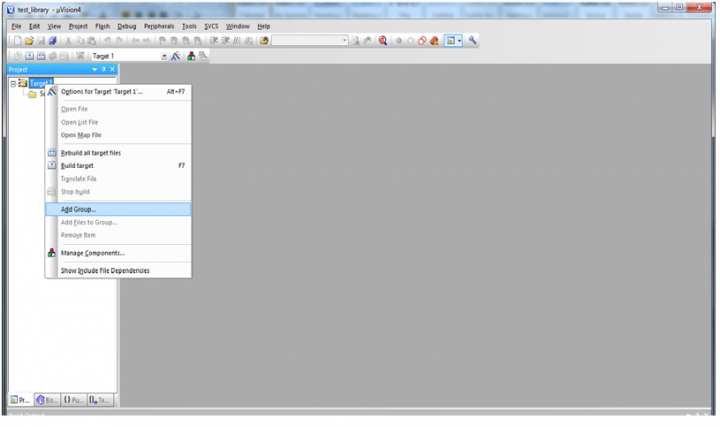
| Line 19: | Line 19: | ||
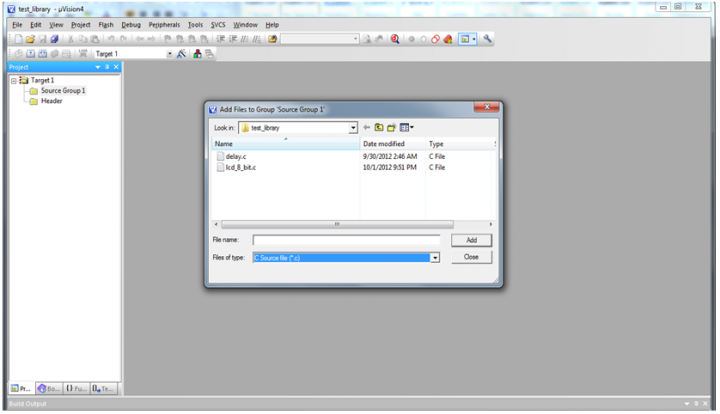
'''Step 6:''' ''Add the .c files by selecting “C Source files” from “Files of type drop down”. '' | '''Step 6:''' ''Add the .c files by selecting “C Source files” from “Files of type drop down”. '' | ||
| − | [[File:6C_SourceFiles.png]] | + | [[File:6C_SourceFiles.png|720x480px]] |
'''Step 7:''' ''Add the header( .h) files by selecting “Text file(.txt, .h, .inc)” from “Files of type” drop down.'' | '''Step 7:''' ''Add the header( .h) files by selecting “Text file(.txt, .h, .inc)” from “Files of type” drop down.'' | ||
| − | [[File:7Add_HeaderFiles.png]] | + | [[File:7Add_HeaderFiles.png|720x480px]] |
| − | [[File:7.1AddFiles_toHeader.png]] | + | [[File:7.1AddFiles_toHeader.png|720x480px]] |
'''Step 8:''' ''After including the library files, create a new .c file to write the main program.'' | '''Step 8:''' ''After including the library files, create a new .c file to write the main program.'' | ||
| − | [[File:8Create_NewCFile.png]] | + | [[File:8Create_NewCFile.png|720x480px]] |
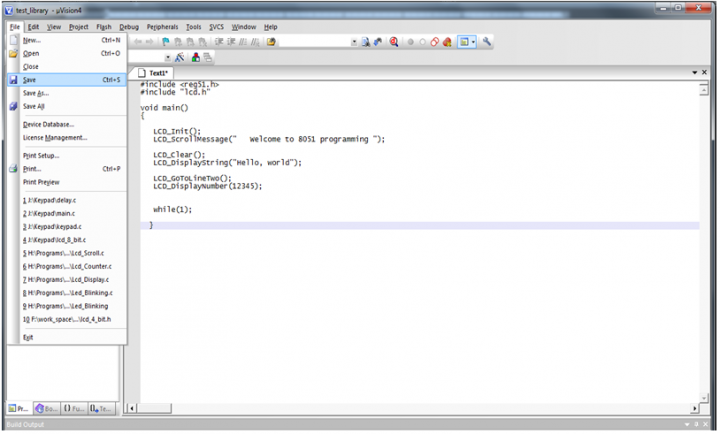
'''Step 9:''' ''Write your program using the library functions and save it.''<br\> | '''Step 9:''' ''Write your program using the library functions and save it.''<br\> | ||
''Note:'' | ''Note:'' | ||
*''Include the respective header files before calling any library functions. '' | *''Include the respective header files before calling any library functions. '' | ||
| − | [[File:9Write_Program.png]] | + | [[File:9Write_Program.png|720x480px]] |
'''Step 10:''' ''Provide the suitable file name(main.c) and save it in the same project folder.'' | '''Step 10:''' ''Provide the suitable file name(main.c) and save it in the same project folder.'' | ||
| − | [[File:10Suitable_FileName.png]] | + | [[File:10Suitable_FileName.png|720x480px]] |
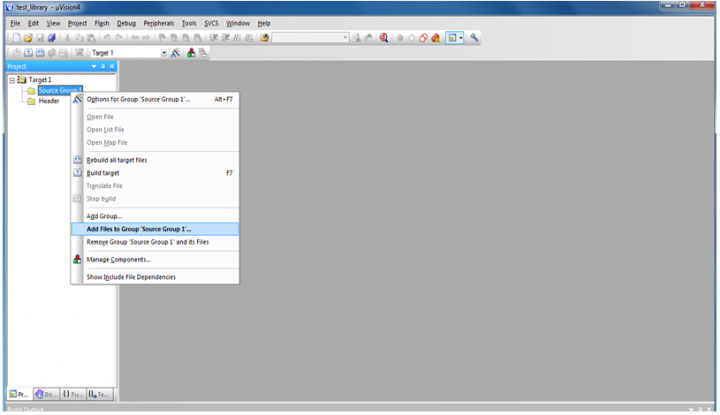
'''Step 11:''' ''Include your source file to the project.'' | '''Step 11:''' ''Include your source file to the project.'' | ||
| − | [[File:11Include_SourceFiles.png]] | + | [[File:11Include_SourceFiles.png|720x480px]] |
| − | [[File:11.1AddFile_SrcGrp.png]] | + | [[File:11.1AddFile_SrcGrp.png|720x480px]] |
'''Step 12:''' ''Configure the project to generate the hex file after compilation.'' | '''Step 12:''' ''Configure the project to generate the hex file after compilation.'' | ||
| − | [[File:12Configure_Project.png]] | + | [[File:12Configure_Project.png|720x480px]] |
'''Step 13:''' ''Select the output menu and check the Create Hex File option to generate the hex file.'' | '''Step 13:''' ''Select the output menu and check the Create Hex File option to generate the hex file.'' | ||
| − | [[File:13Check_CreateHexFile.png]] | + | [[File:13Check_CreateHexFile.png|720x480px]] |
'''Step 14:''' ''Compile the project by clicking on Build target (or press F7). Project complies if there are no errors. If there are any errors fix them and re-compile.'' | '''Step 14:''' ''Compile the project by clicking on Build target (or press F7). Project complies if there are no errors. If there are any errors fix them and re-compile.'' | ||
| − | [[File:14Compile_Project.png]] | + | [[File:14Compile_Project.png|720x480px]] |
'''Step 15:''' ''Once the project is built(compiled), hex file will be generated with the message as shown below. If the hex file is not generated then follow Step 12.'' | '''Step 15:''' ''Once the project is built(compiled), hex file will be generated with the message as shown below. If the hex file is not generated then follow Step 12.'' | ||
| − | [[File:15Built_Completed.png]] | + | [[File:15Built_Completed.png|720x480px]] |
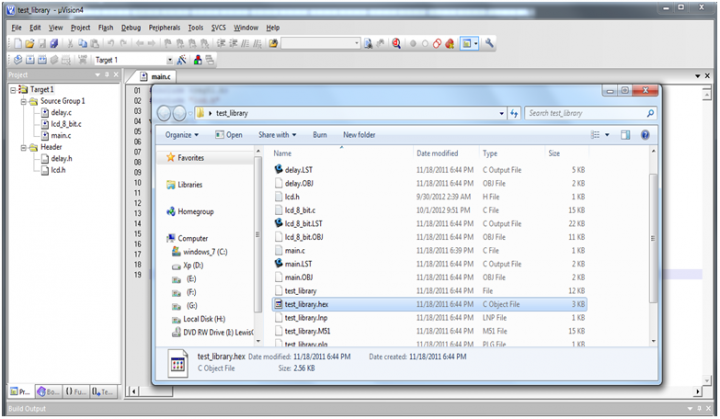
'''Step 16:''' ''Hex file will be generated with the project name in the selected project folder.'' | '''Step 16:''' ''Hex file will be generated with the project name in the selected project folder.'' | ||
| − | [[File:16HexFile_Generated.png]] | + | [[File:16HexFile_Generated.png|720x480px]] |
Revision as of 13:33, 4 December 2013
Libray usage guide
- Below example demonstrates the step by step procedure to include the libraries into any applications.
Step 1: Open the Keil software and select the New Microvision project from Project Menu as shown below.
Step 2: Browse to your project folder and provide the project name and click on save.
Step 3: Once the project is saved a new dialog box “Select Device for Target” opens, Select the controller(Atmel:At89s52/NXP:P89v51rd2) and click on OK.
Step 4: Once the project is created add a new header group to include the library header files.
Step 5: Add the library files to the project .c files to Source group and .h files to header group.<br\> Note:
- Copy the library files into the project folder before including them into the project.
Step 6: Add the .c files by selecting “C Source files” from “Files of type drop down”.
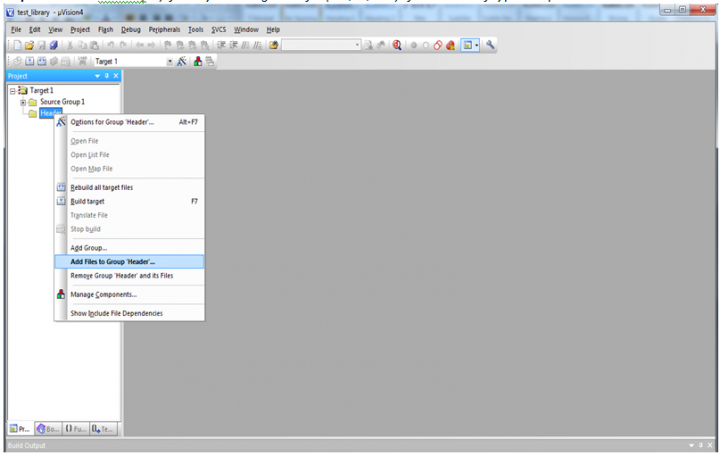
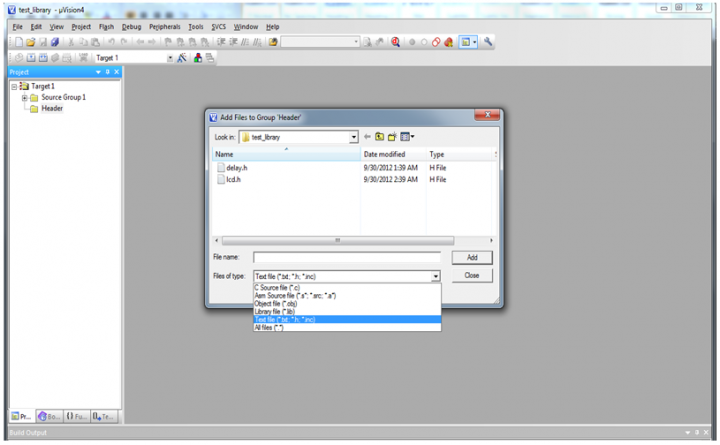
Step 7: Add the header( .h) files by selecting “Text file(.txt, .h, .inc)” from “Files of type” drop down.
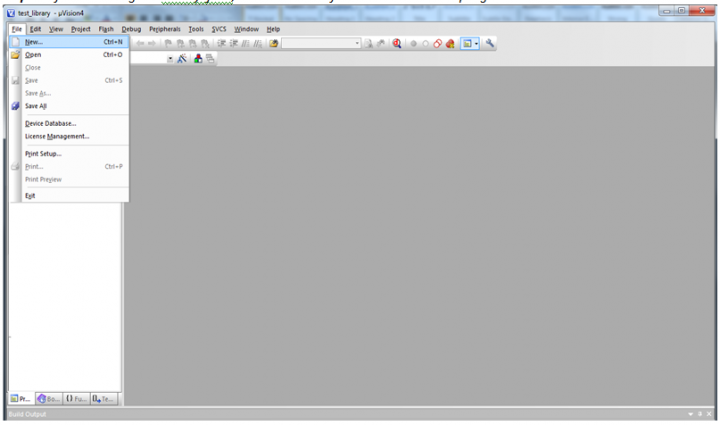
Step 8: After including the library files, create a new .c file to write the main program.
Step 9: Write your program using the library functions and save it.<br\> Note:
- Include the respective header files before calling any library functions.
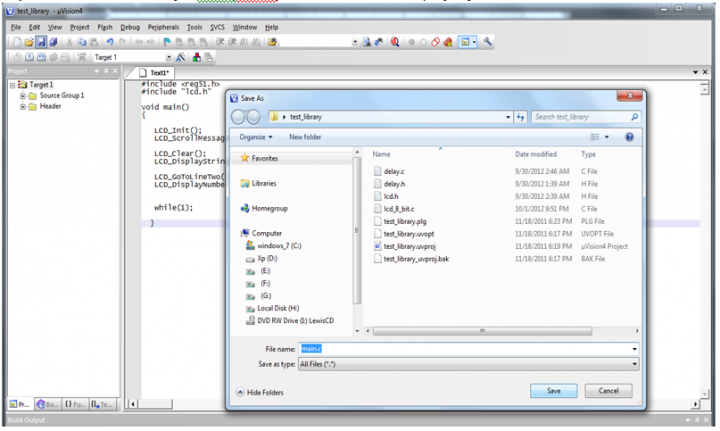
Step 10: Provide the suitable file name(main.c) and save it in the same project folder.
Step 11: Include your source file to the project.
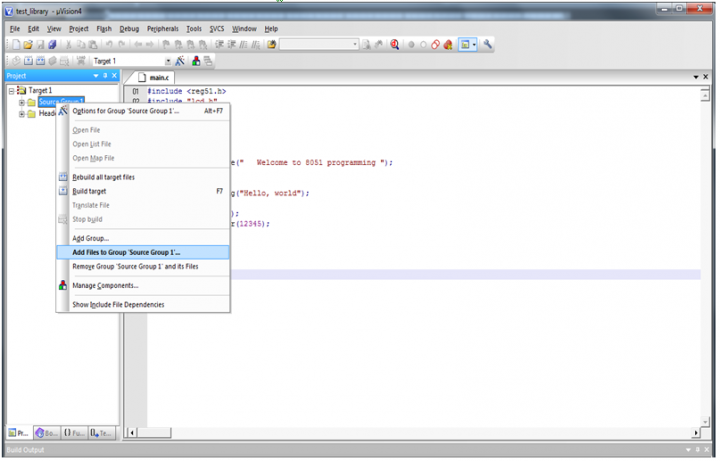
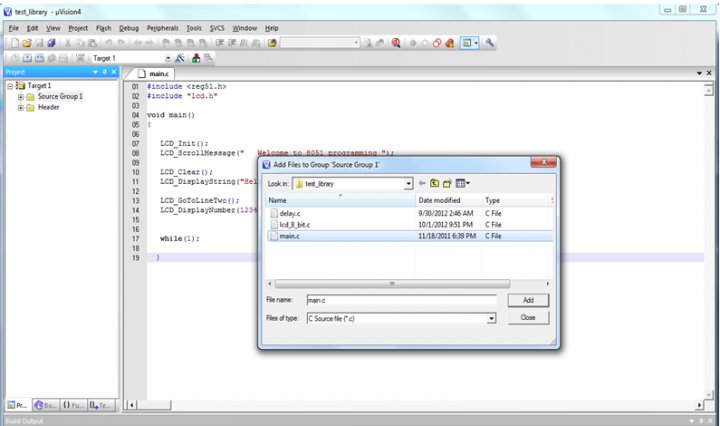
Step 12: Configure the project to generate the hex file after compilation.
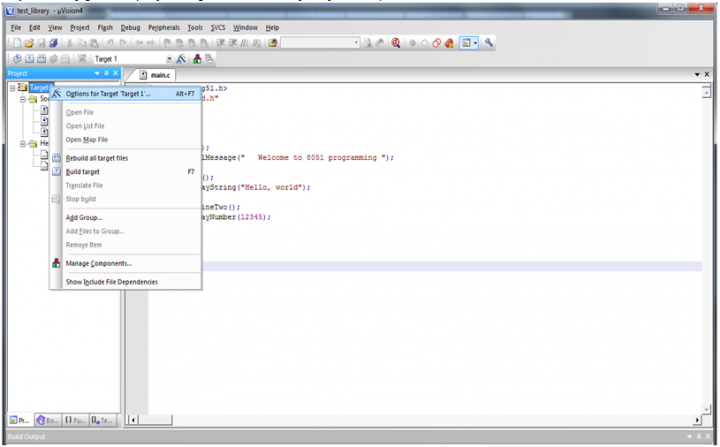
Step 13: Select the output menu and check the Create Hex File option to generate the hex file.
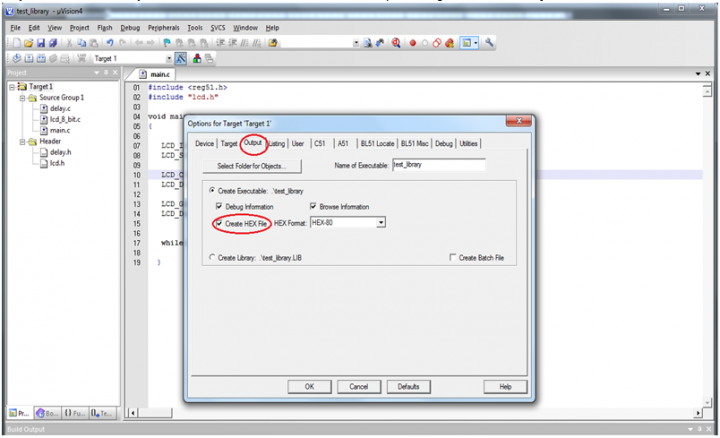
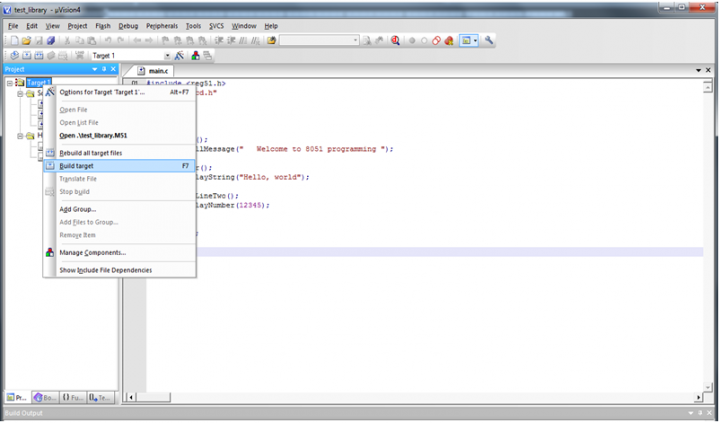
Step 14: Compile the project by clicking on Build target (or press F7). Project complies if there are no errors. If there are any errors fix them and re-compile.
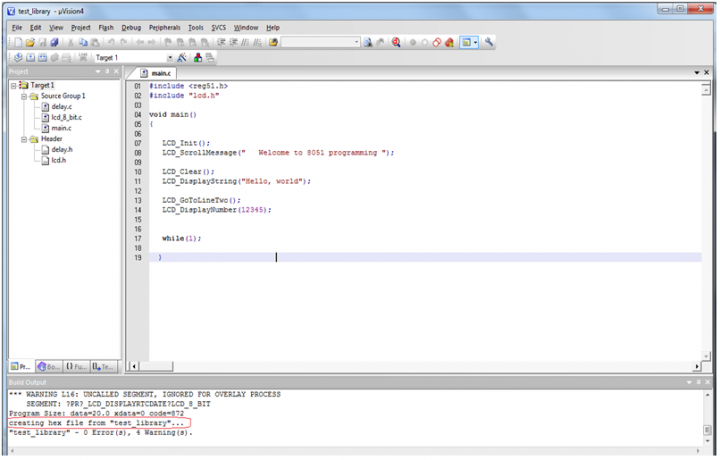
Step 15: Once the project is built(compiled), hex file will be generated with the message as shown below. If the hex file is not generated then follow Step 12.
Step 16: Hex file will be generated with the project name in the selected project folder.
