A simple IOT demo with Explore ESP8266
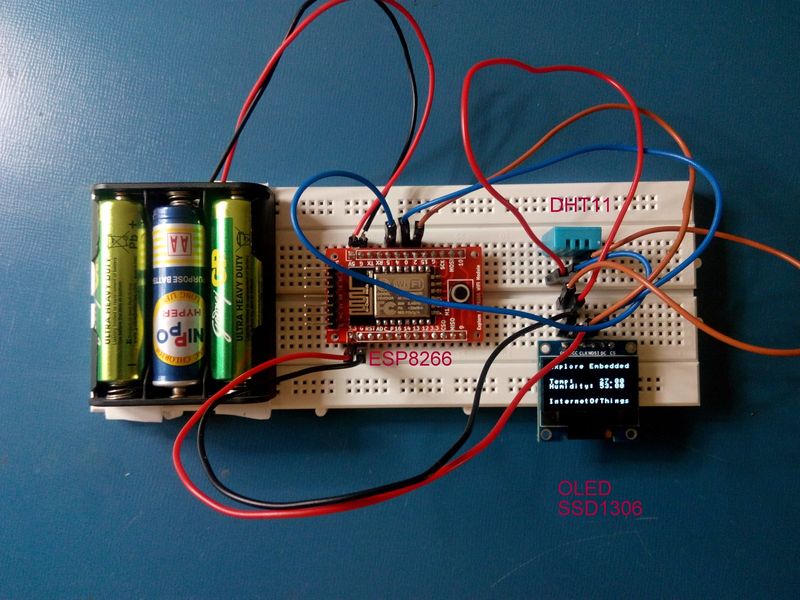
We were invited today to give a seminar on "How to get started with Embedded Systems" in a local Engineering college. With very little time on hand, wanted to quickly show the capabilities of ESP8266. So I decided to make a temperature humidity logger. With Thingspeak.com, it was extremely easy to log data and even trigger tweets!
If you've not setup ESP8266 support for arduino, checkout the tutorial below: Arduino Support for ESP8266 with simple test code
Contents
[hide]Components/Boards Used
1 | Explore ESP8266 Wi-Fi Module | ![]() |
2 | OLED Display Module 128X64 | ![]() |
3 | DHT11 | ![]() |
Arduino code for ESP8266
#include <DHT.h> | |
#include <Wire.h> | |
#include <ESP8266WiFi.h> | |
#include "font.h" | |
#define offset 0x00 // SDD1306 // offset=0 for SSD1306 controller | |
//#define offset 0x02 // SH1106 // offset=2 for SH1106 controller | |
#define OLED_address 0x3c | |
String apiKey = "things_speak_api_key"; | |
char ssid[20] = "wifi ssid"; | |
char password[20] = "wifi password"; | |
char TempValue[15]; | |
String str; | |
const char* server = "api.thingspeak.com"; | |
#define DHTPIN 5 // what pin we're connected to | |
DHT dht(DHTPIN, DHT11,15); | |
WiFiClient client; | |
void setup() { | |
Serial.begin(115200); // for debugging | |
Wire.begin(0,2); // Initialize I2C and OLED Display | |
init_OLED(); | |
reset_display(); | |
clear_display(); | |
delay(10); | |
sendStrXY("Connecting to ",0,0); | |
sendStrXY(ssid, 3, 0); | |
// Setup the Internet | |
WiFi.begin(ssid, password); | |
int pos = 0; | |
while (WiFi.status() != WL_CONNECTED) { | |
delay(500); | |
pos++; | |
sendStrXY(".", 5, pos); | |
} | |
sendStrXY("connected", 5, 0); | |
clear_display(); | |
delay(100); | |
//Setup the display Screen | |
sendStrXY("Explore Embedded" ,0,0); | |
sendStrXY("Temp:",3,0); | |
sendStrXY("Humidity:",4,0); | |
sendStrXY("InternetOfThings",7,0); | |
} | |
//String TempValue; | |
void loop() { | |
float h = dht.readHumidity(); | |
float t = dht.readTemperature(); | |
char tvalue[5], hvalue[5]; | |
if (isnan(h) || isnan(t)) { | |
Serial.println("Failed to read from DHT sensor!"); | |
return; | |
} | |
str = String(t); | |
str.toCharArray(tvalue,15); | |
sendStrXY(tvalue,3,10); | |
str = String(h); | |
str.toCharArray(hvalue,15); | |
sendStrXY(hvalue,4,10); | |
if (client.connect(server,80)) { // "184.106.153.149" or api.thingspeak.com | |
String postStr = apiKey; | |
postStr +="&field1="; | |
postStr += String(t); | |
postStr +="&field2="; | |
postStr += String(h); | |
postStr += "\r\n\r\n"; | |
client.print("POST /update HTTP/1.1\n"); | |
client.print("Host: api.thingspeak.com\n"); | |
client.print("Connection: close\n"); | |
client.print("X-THINGSPEAKAPIKEY: "+apiKey+"\n"); | |
client.print("Content-Type: application/x-www-form-urlencoded\n"); | |
client.print("Content-Length: "); | |
client.print(postStr.length()); | |
client.print("\n\n"); | |
client.print(postStr); | |
Serial.print("Temperature: "); | |
Serial.print(t); | |
Serial.print(" degrees Celcius Humidity: "); | |
Serial.print(h); | |
Serial.println("% send to Thingspeak"); | |
} | |
client.stop(); | |
Serial.println("Waiting..."); | |
// thingspeak needs minimum 15 sec delay between updates | |
delay(20000); | |
} |
Data logging on Thingspeak
Downloads
- Complete Arduino code
References and Credits
- https://hackaday.io/project/6132-esp8266oled this projected helped interfacing OLED with ESP8266
- Thanks to ESP8266 Arduino Community for porting Arduino
- DHT11 code library

A simple IOT demo with Explore ESP8266
We were invited today to give a seminar on "How to get started with Embedded Systems" in a local Engineering college. With very little time on hand, wanted to quickly show the capabilities of ESP8266...

Arduino Support for ESP8266 with simple test code
ESP8266 packs a lot of punch. It is not just a WiFi module, it also has a decent micro-controller in built. Now the best part is the community has made programming this inbuilt micro-controller extremely...