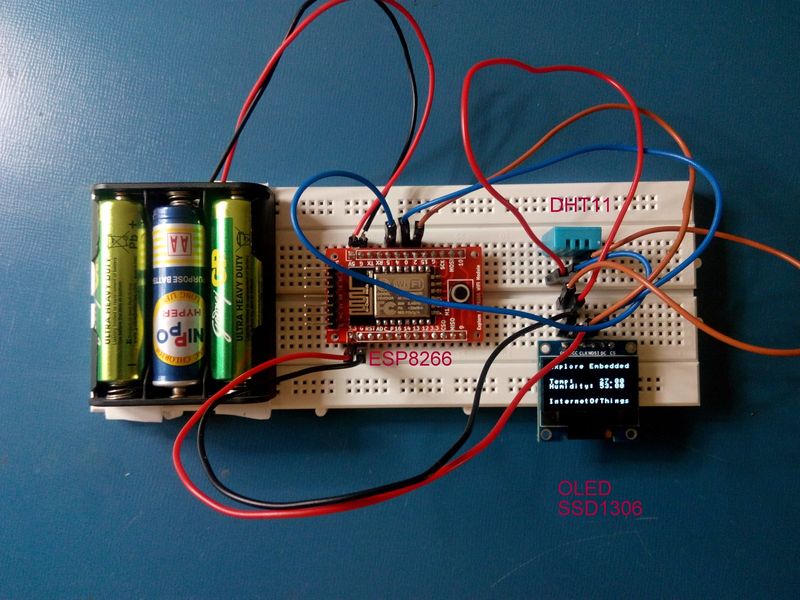
A simple IOT demo with Explore ESP8266
Sandeep (talk) 16:49, 27 August 2015 (IST)
We were invited today to give a seminar on "How to get started with Embedded Systems" in a local Engineering college. With very little time on hand, wanted to quickly show the capabilities of ESP8266. So I decided to make a temperature humidity logger. With Thingspeak.com, it was extremely easy to log data and even trigger tweets!
Contents
[hide]Components/Boards Used
1 | Explore ESP8266 Wi-Fi Module | ![]() |
2 | OLED Display Module 128X64 | ![]() |
3 | DHT11 | ![]() |
Arduino code for ESP8266
This file contains bidirectional Unicode text that may be interpreted or compiled differently than what appears below. To review, open the file in an editor that reveals hidden Unicode characters.
Learn more about bidirectional Unicode characters
#include <DHT.h> | |
#include <Wire.h> | |
#include <ESP8266WiFi.h> | |
#include "font.h" | |
#define offset 0x00 // SDD1306 // offset=0 for SSD1306 controller | |
//#define offset 0x02 // SH1106 // offset=2 for SH1106 controller | |
#define OLED_address 0x3c | |
String apiKey = "things_speak_api_key"; | |
char ssid[20] = "wifi ssid"; | |
char password[20] = "wifi password"; | |
char TempValue[15]; | |
String str; | |
const char* server = "api.thingspeak.com"; | |
#define DHTPIN 5 // what pin we're connected to | |
DHT dht(DHTPIN, DHT11,15); | |
WiFiClient client; | |
void setup() { | |
Serial.begin(115200); // for debugging | |
Wire.begin(0,2); // Initialize I2C and OLED Display | |
init_OLED(); | |
reset_display(); | |
clear_display(); | |
delay(10); | |
sendStrXY("Connecting to ",0,0); | |
sendStrXY(ssid, 3, 0); | |
// Setup the Internet | |
WiFi.begin(ssid, password); | |
int pos = 0; | |
while (WiFi.status() != WL_CONNECTED) { | |
delay(500); | |
pos++; | |
sendStrXY(".", 5, pos); | |
} | |
sendStrXY("connected", 5, 0); | |
clear_display(); | |
delay(100); | |
//Setup the display Screen | |
sendStrXY("Explore Embedded" ,0,0); | |
sendStrXY("Temp:",3,0); | |
sendStrXY("Humidity:",4,0); | |
sendStrXY("InternetOfThings",7,0); | |
} | |
//String TempValue; | |
void loop() { | |
float h = dht.readHumidity(); | |
float t = dht.readTemperature(); | |
char tvalue[5], hvalue[5]; | |
if (isnan(h) || isnan(t)) { | |
Serial.println("Failed to read from DHT sensor!"); | |
return; | |
} | |
str = String(t); | |
str.toCharArray(tvalue,15); | |
sendStrXY(tvalue,3,10); | |
str = String(h); | |
str.toCharArray(hvalue,15); | |
sendStrXY(hvalue,4,10); | |
if (client.connect(server,80)) { // "184.106.153.149" or api.thingspeak.com | |
String postStr = apiKey; | |
postStr +="&field1="; | |
postStr += String(t); | |
postStr +="&field2="; | |
postStr += String(h); | |
postStr += "\r\n\r\n"; | |
client.print("POST /update HTTP/1.1\n"); | |
client.print("Host: api.thingspeak.com\n"); | |
client.print("Connection: close\n"); | |
client.print("X-THINGSPEAKAPIKEY: "+apiKey+"\n"); | |
client.print("Content-Type: application/x-www-form-urlencoded\n"); | |
client.print("Content-Length: "); | |
client.print(postStr.length()); | |
client.print("\n\n"); | |
client.print(postStr); | |
Serial.print("Temperature: "); | |
Serial.print(t); | |
Serial.print(" degrees Celcius Humidity: "); | |
Serial.print(h); | |
Serial.println("% send to Thingspeak"); | |
} | |
client.stop(); | |
Serial.println("Waiting..."); | |
// thingspeak needs minimum 15 sec delay between updates | |
delay(20000); | |
} |
Data logging on Thingspeak
Downloads
- Complete Arduino code
References and Credits
- https://hackaday.io/project/6132-esp8266oled this projected helped interfacing OLED with ESP8266
- Thanks to ESP8266 Arduino Community for porting Arduino
- DHT11 code library