Difference between revisions of "Setting Up Keil5 For ExploreM3"
| Line 1: | Line 1: | ||
[[Category:Explore M3 Bare Metal]] | [[Category:Explore M3 Bare Metal]] | ||
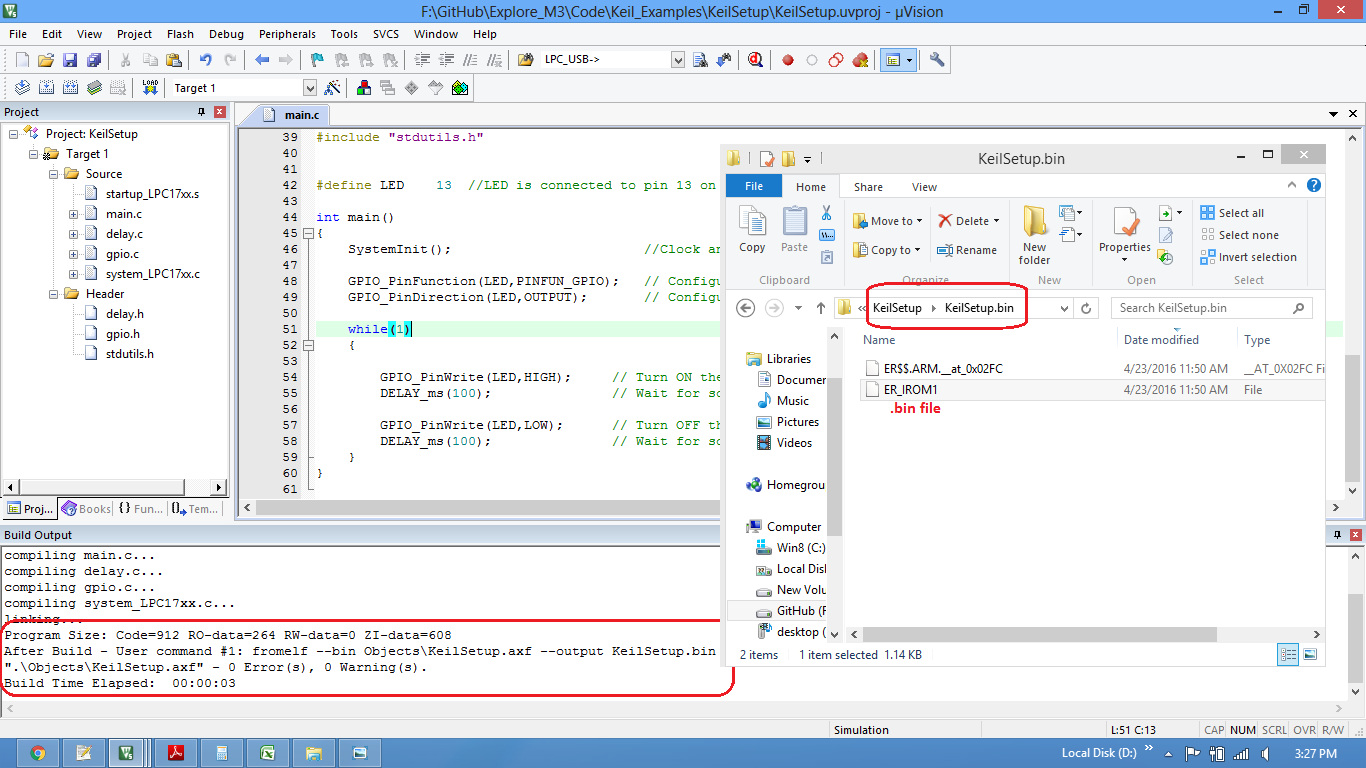
| − | + | In this tutorial we will see how to setup a keil5 project to generate .bin file for Explore M3(LPC1768)<br> | |
| − | + | ||
| − | In this tutorial we will see how to setup a keil5 project to generate .bin file for Explore M3(LPC1768) | + | |
Check this link to setup keil4 from generating .bin file. | Check this link to setup keil4 from generating .bin file. | ||
| − | |||
[[File:Keil5_Setup00.png]]<br><br> | [[File:Keil5_Setup00.png]]<br><br> | ||
| − | Keil5 software can be downloaded form Keil website. Along with Keil5 you need to install Legacy support for ARM Cortex-M devices. | + | Keil5 software can be downloaded form Keil website. Along with Keil5 you need to install Legacy support for ARM Cortex-M devices. Once the software's are installed, follow the below steps to setup Keil project. |
| − | Once the | + | |
| Line 21: | Line 17: | ||
[[File:Keil5_Setup03.png]]<br><br> | [[File:Keil5_Setup03.png]]<br><br> | ||
| − | <b>Step4:</b> | + | <b>Step4:</b>As LPC1768 needs the startup code, click on <b>Yes</b> option to include the <b>LPC17xx Startup</b> file.<br> |
[[File:Keil5_Setup04.png]]<br><br> | [[File:Keil5_Setup04.png]]<br><br> | ||
| − | <b>Step5:</b> | + | <b>Step5:</b> Create a new file to write the program.<br> |
[[File:Keil5_Setup05.png]]<br><br> | [[File:Keil5_Setup05.png]]<br><br> | ||
| − | <b>Step6 | + | <b>Step6:</b> Type the code or Copy paste the below code snippet and save the file as main.c<br> |
| − | + | [[File:Keil5_Setup06.png]] | |
| − | + | ||
| − | + | ||
| − | [[File: | + | |
<html> | <html> | ||
<script src="https://gist.github.com/SaheblalBagwan/cb2cf78aadc724737d79.js"></script> | <script src="https://gist.github.com/SaheblalBagwan/cb2cf78aadc724737d79.js"></script> | ||
| Line 37: | Line 30: | ||
<br> | <br> | ||
| − | <b> | + | <b>Step7:</b> Now we need to add the files to the project.<br> |
| + | [[File:Keil5_Setup07.png]]<> | ||
| + | |||
| + | |||
| + | <b>Step8:</b> Rename the Source Group to <b>Source</b>.<br> | ||
| + | Create a new group called <b>Header</b> to include header files. | ||
[[File:Keil5_Setup08.png]]<br><br> | [[File:Keil5_Setup08.png]]<br><br> | ||
| − | <b>Step9:</b> Add | + | |
| + | <b>Step9:</b> Selcet Source and click on Add Files to add the source files.</b> folder. | ||
[[File:Keil5_Setup09.png]]<br><br> | [[File:Keil5_Setup09.png]]<br><br> | ||
| − | <b>Step10:</b> Add the | + | |
| + | <b>Step10:</b> Add the recently saved file to the project.<br> | ||
[[File:Keil5_Setup10.png]]<br><br> | [[File:Keil5_Setup10.png]]<br><br> | ||
| − | <b>Step11:</b> | + | |
| + | <b>Step11:</b> Add the library source files from <b>00-libfiles</b> folder. | ||
[[File:Keil5_Setup11.png]]<br><br> | [[File:Keil5_Setup11.png]]<br><br> | ||
| − | <b>Step12:</b> | + | |
| + | <b>Step12:</b> All the .c files are visible under source group.<br> | ||
[[File:Keil5_Setup12.png]]<br><br> | [[File:Keil5_Setup12.png]]<br><br> | ||
| + | |||
=Setup Bin File Generation= | =Setup Bin File Generation= | ||
| − | <b>Step13:</b> | + | <b>Step13:</b> Similarly select Header and click on Add Files to add the header files.<br> |
[[File:Keil5_Setup13.png]]<br><br> | [[File:Keil5_Setup13.png]]<br><br> | ||
| − | <b>Step14:</b> Set IROM1 start address as 0x2000. Bootloader will be stored from 0x0000-0x2000 so application should start from 0x2000<br> | + | |
| + | <b>Step14:</b> Add the library header files from <b>00-libfiles</b> folder. | ||
| + | [[File:Keil5_Setup14.png]]<br><br> | ||
| + | |||
| + | |||
| + | |||
| + | <b>Step15:</b> The .h files are visible under header group.<br> | ||
| + | [[File:Keil5_Setup15.png]]<br><br> | ||
| + | |||
| + | |||
| + | <b>Step16:</b> The IDE is not able to locate the library files as shown in line 37.<br> | ||
| + | Click on <b>Options for Target</b> to add the libfile path and also to configure the ROM,RAM address. | ||
| + | [[File:Keil5_Setup16.png]]<br><br> | ||
| + | |||
| + | |||
| + | |||
| + | <b>Step16:</b> The IDE is not able to locate the library files as shown in line 37.<br> | ||
| + | [[File:Keil5_Setup16.png]]<br><br> | ||
| + | |||
| + | |||
| + | <b>Step17:</b> Select C/C++ options to add the libfile path.<br> | ||
| + | [[File:Keil5_Setup17.png]]<br><br> | ||
| + | |||
| + | |||
| + | <b>Step18:</b> Setup the Compiler Include Path.<br> | ||
| + | [[File:Keil5_Setup18.png]]<br><br> | ||
| + | |||
| + | |||
| + | <b>Step19a:</b> Browse and select the folder containing libfiles.<br> | ||
| + | [[File:Keil5_Setup19.png]]<br><br> | ||
| + | |||
| + | |||
| + | <b>Step19b:</b>Relative path is added to include paths.<br> | ||
| + | [[File:Keil5_Setup19b.png]]<br><br> | ||
| + | |||
| + | |||
| + | |||
| + | <b>Step20:</b> Set IROM1 start address as 0x2000. Bootloader will be stored from 0x0000-0x2000 so application should start from 0x2000<br> | ||
| + | [[File:Keil5_Setup20.png]]<br><br> | ||
| + | |||
| + | |||
| + | <b>Step21:</b> Write the command to generate the <b>.bin</b> file from <b>.axf</b> file<br> | ||
| + | Command: fromelf --bin Objects\KeilSetup.axf --output KeilSetup.bin<br> | ||
[[File:Keil5_Setup21.png]]<br><br> | [[File:Keil5_Setup21.png]]<br><br> | ||
| − | |||
| − | |||
| − | |||
| − | <b> | + | <b>Step22:</b> Now enable the linker option to use the IROM1 address from target settings<br> |
| − | [[File: | + | [[File:Keil5_Setup22.png]]<br><br> |
| − | |||
| − | |||
| − | <b> | + | <b>Step23:</b> .Bin file is generated after a rebuild.<br> |
| − | [[File: | + | Check the project folder for the generated .Bin<ER_ROM1> file. <br> |
| + | [[File:Keil5_Setup23.png]]<br> | ||
<br><br> | <br><br> | ||
Revision as of 16:26, 23 April 2016
In this tutorial we will see how to setup a keil5 project to generate .bin file for Explore M3(LPC1768)
Check this link to setup keil4 from generating .bin file.

Keil5 software can be downloaded form Keil website. Along with Keil5 you need to install Legacy support for ARM Cortex-M devices. Once the software's are installed, follow the below steps to setup Keil project.
Keil Setup Steps
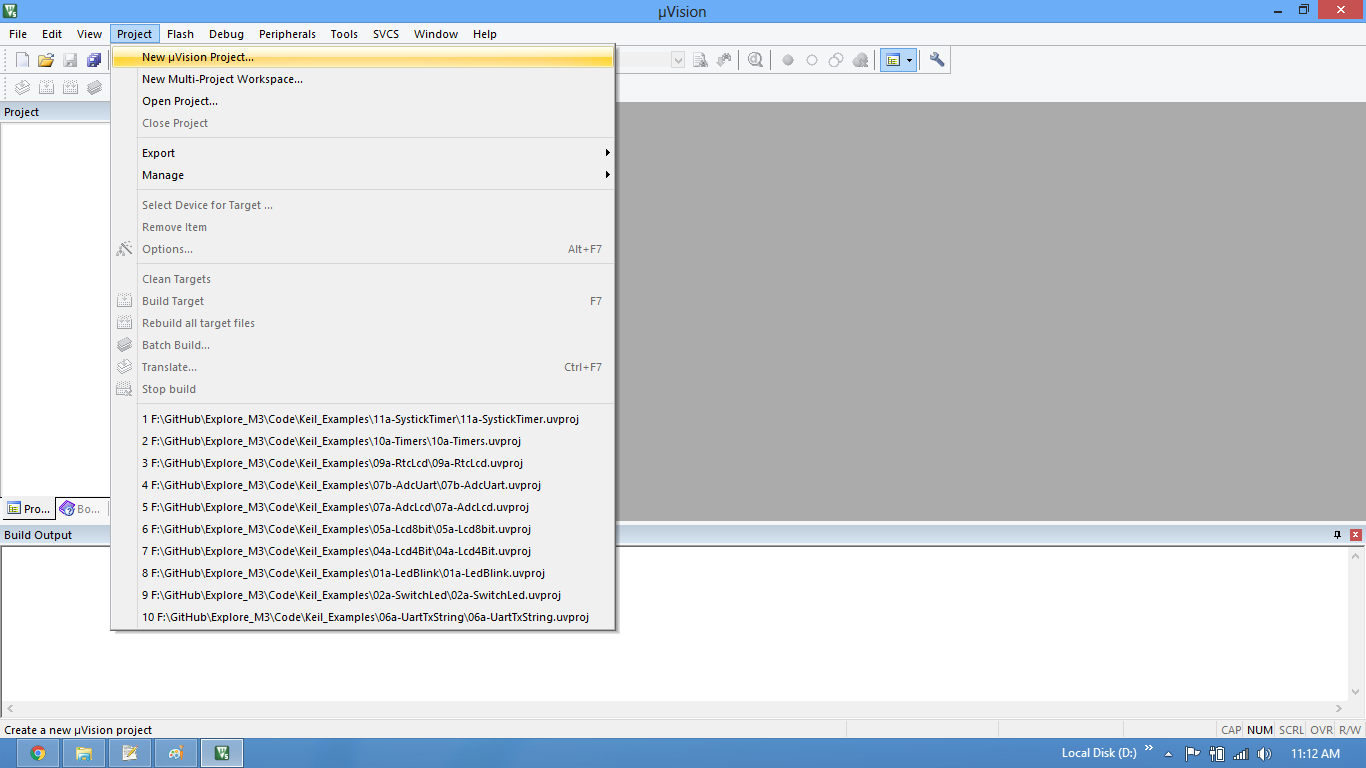
Step1: Open the Keil software and select the New Microvision project from Project Menu as shown below.
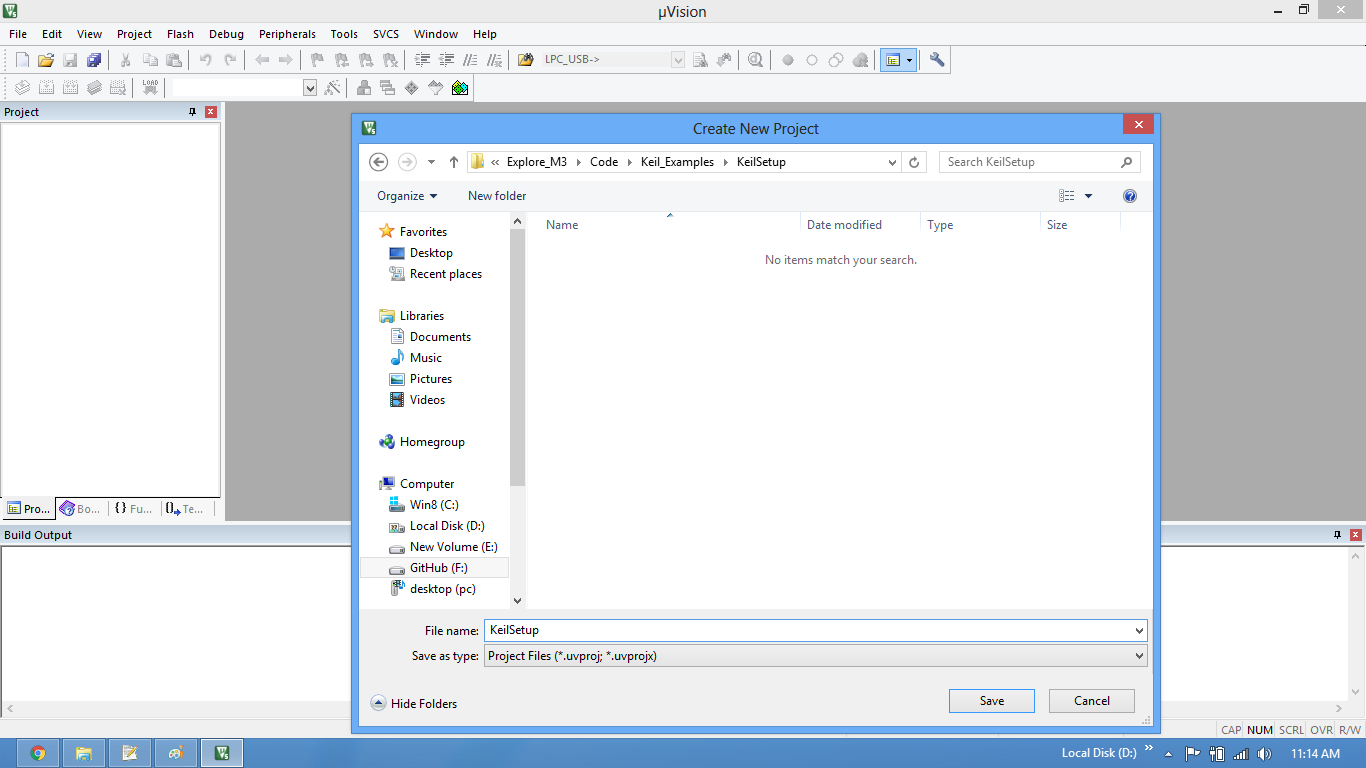
Step2: Browse to your project folder and provide the project name and click on save.
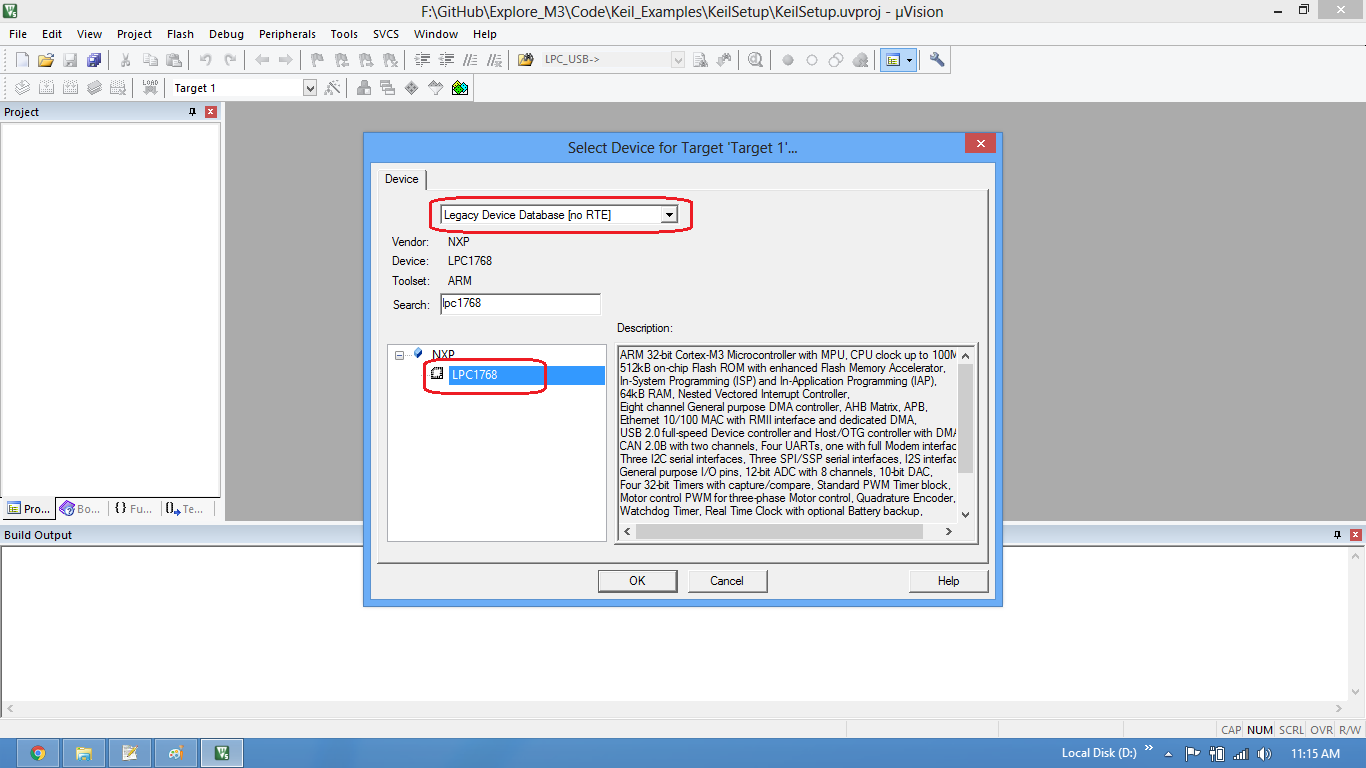
Step3: Once the project is saved a new pop up “Select Device for Target” opens, Select the controller(NXP:LPC1768) and click on OK.
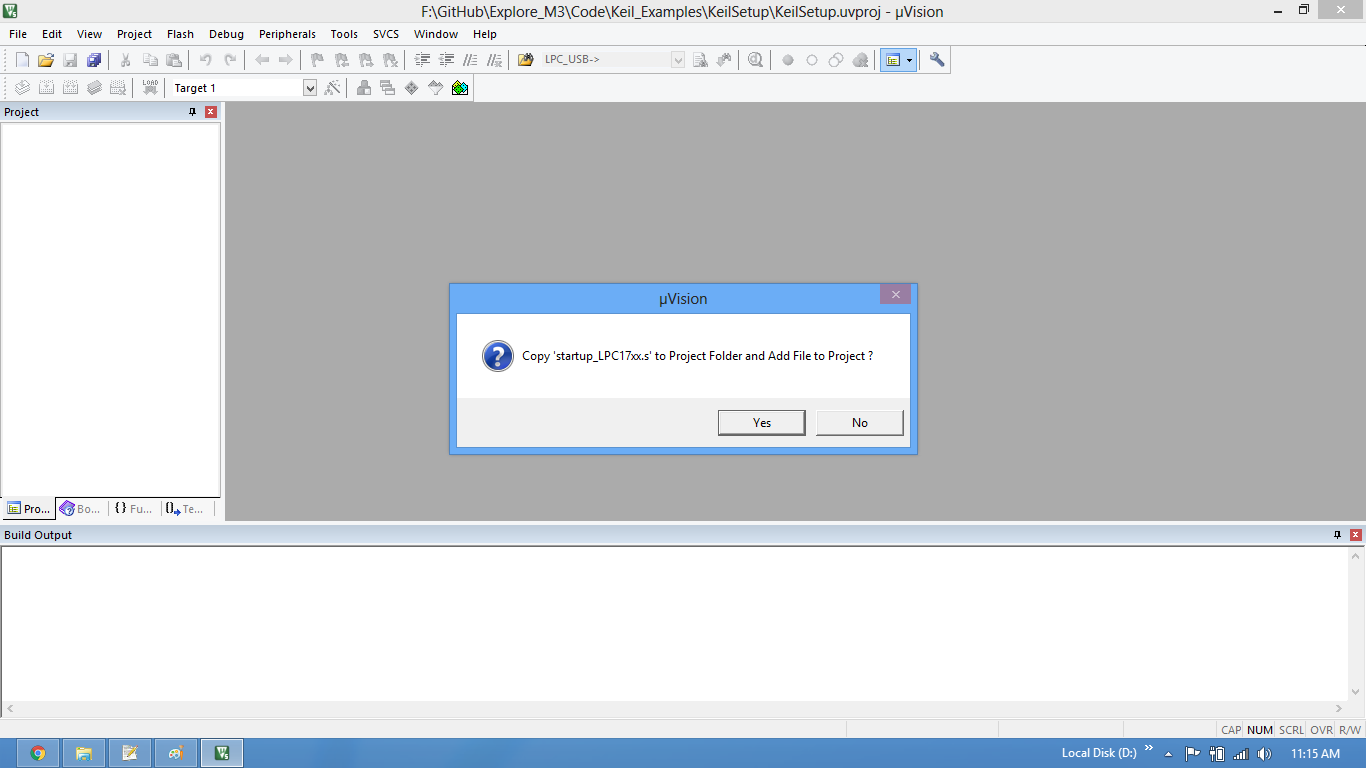
Step4:As LPC1768 needs the startup code, click on Yes option to include the LPC17xx Startup file.
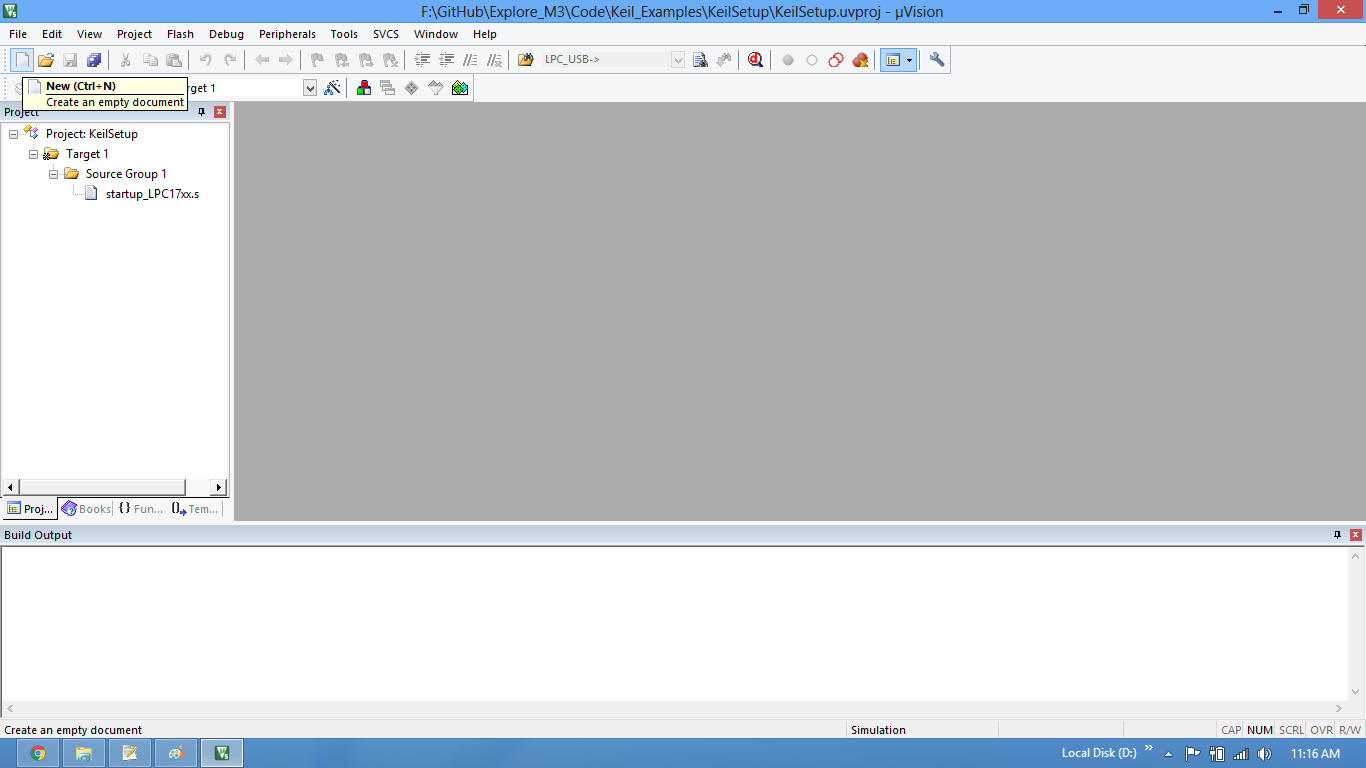
Step5: Create a new file to write the program.
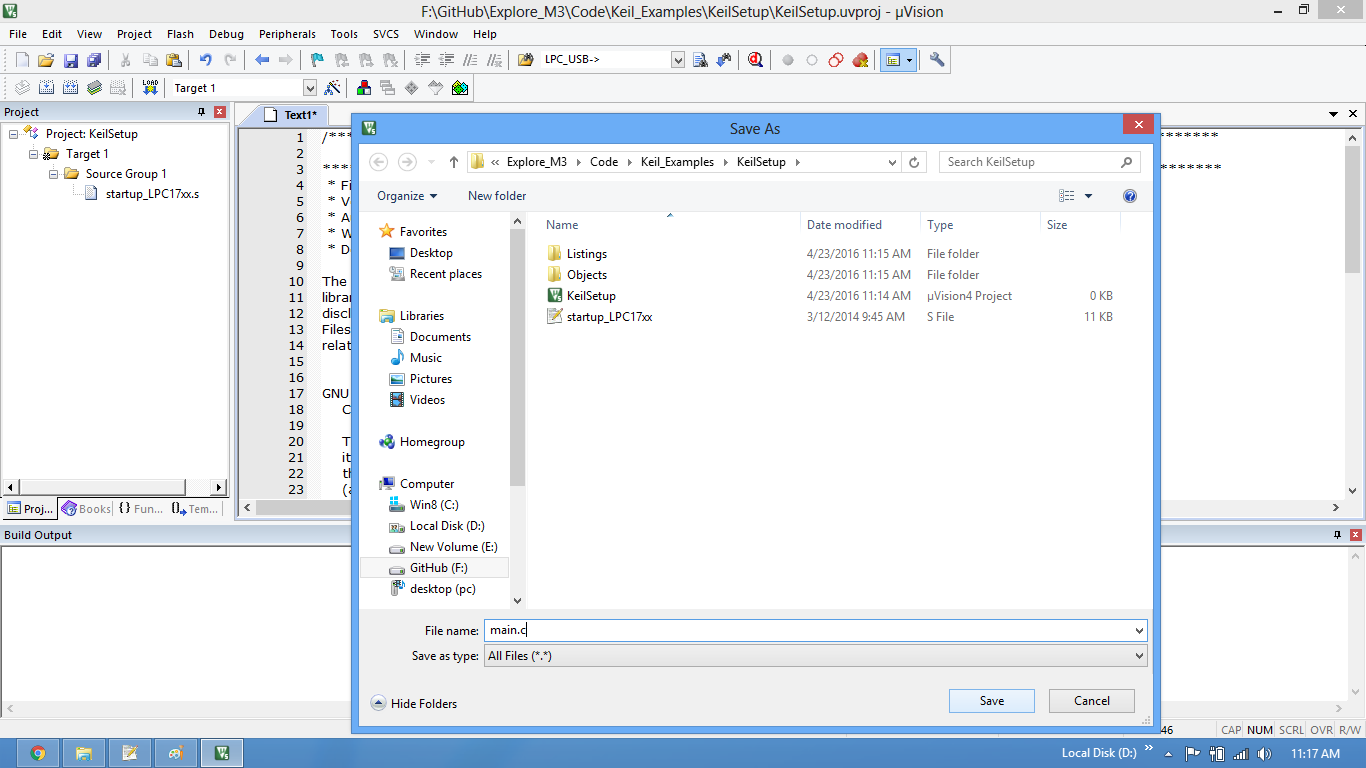
Step6: Type the code or Copy paste the below code snippet and save the file as main.c
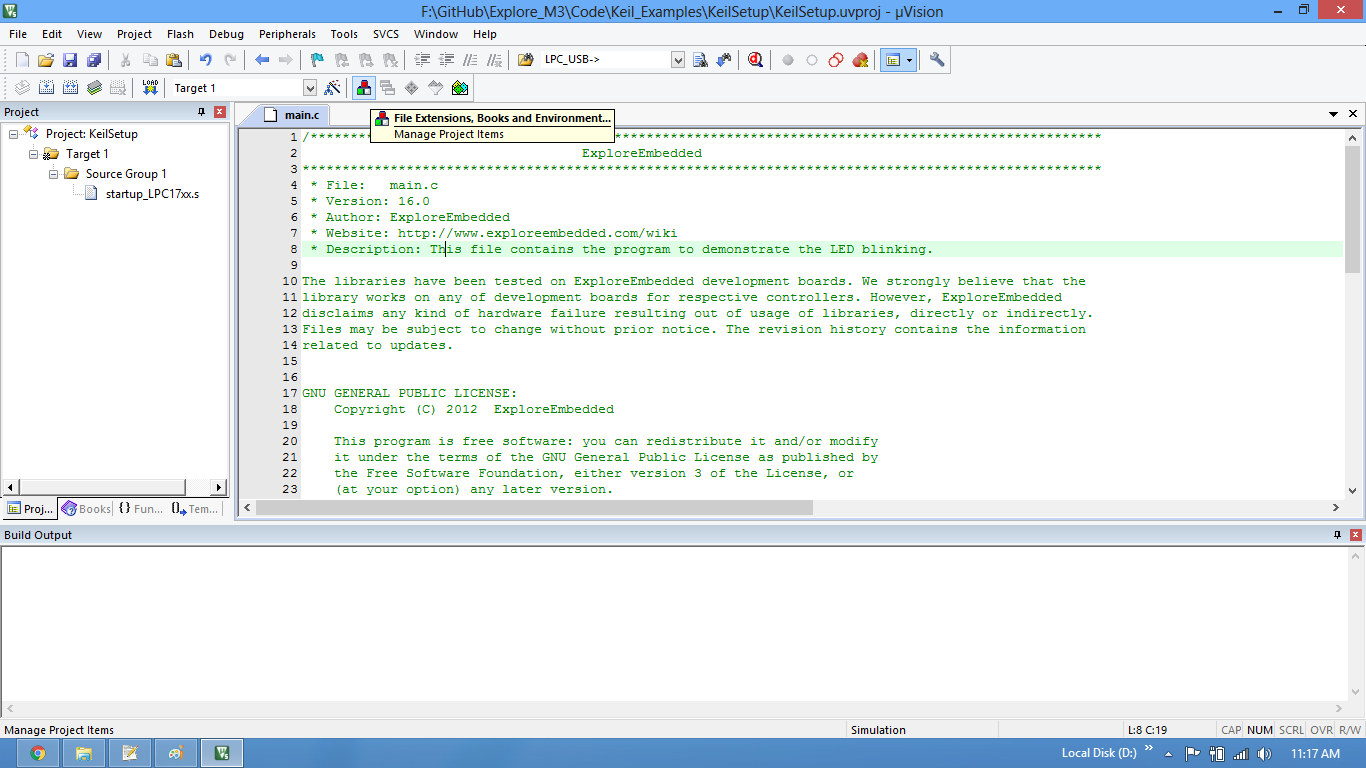
Step7: Now we need to add the files to the project.
 <>
<>
Step8: Rename the Source Group to Source.
Create a new group called Header to include header files.
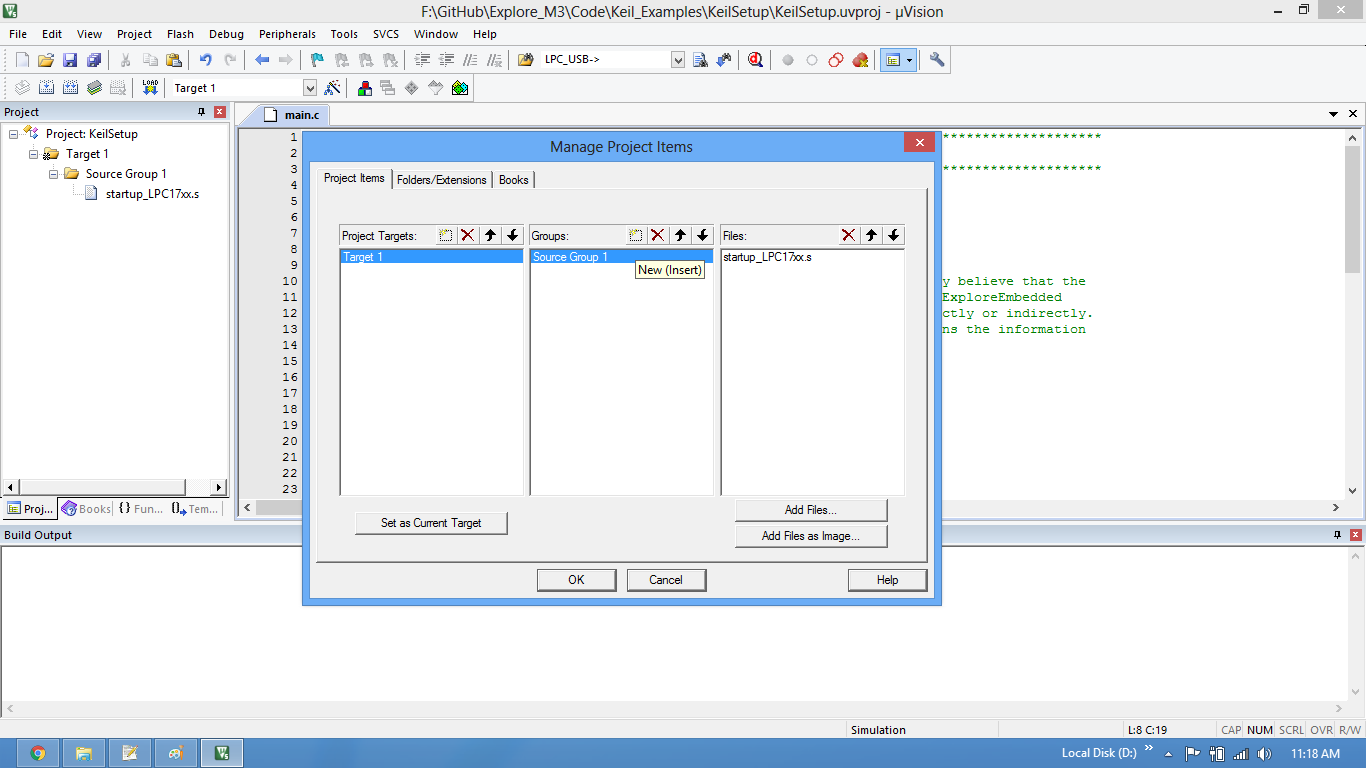
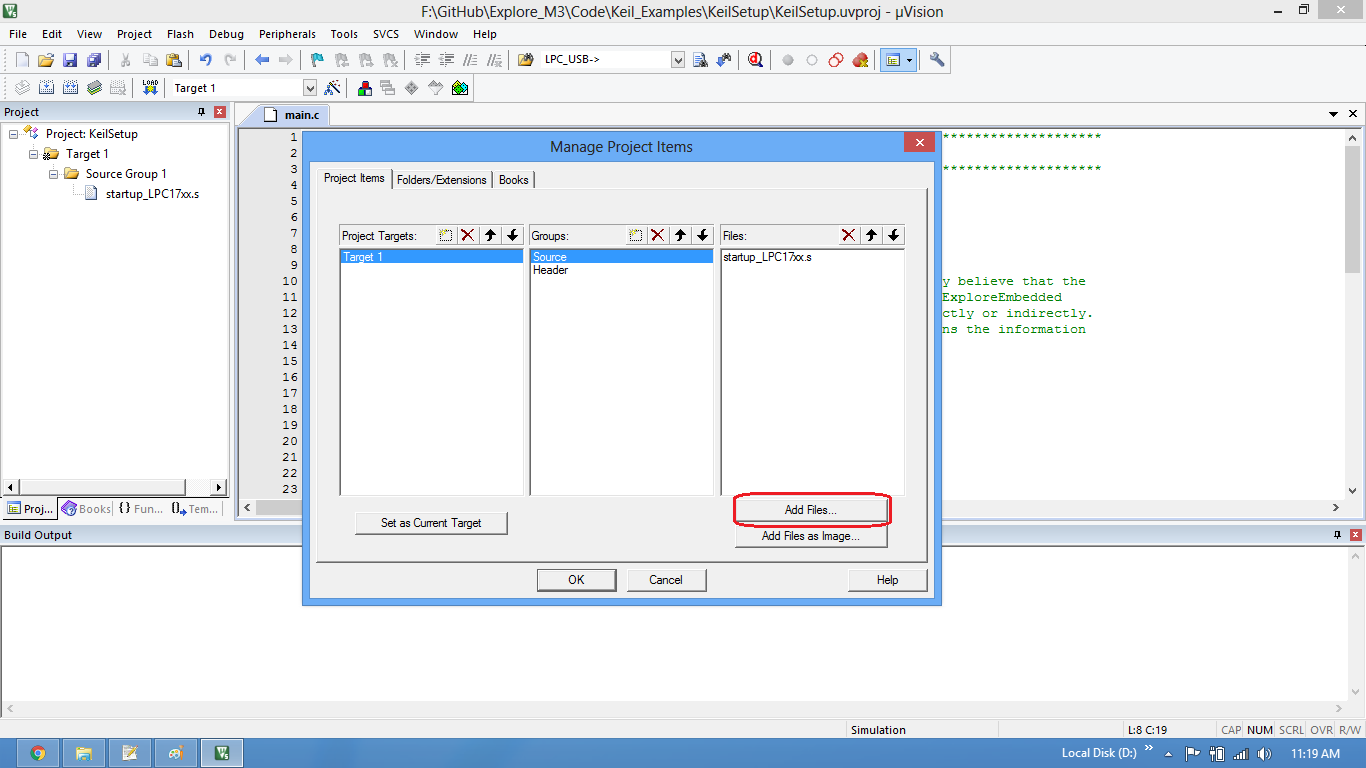
Step9: Selcet Source and click on Add Files to add the source files.</b> folder.
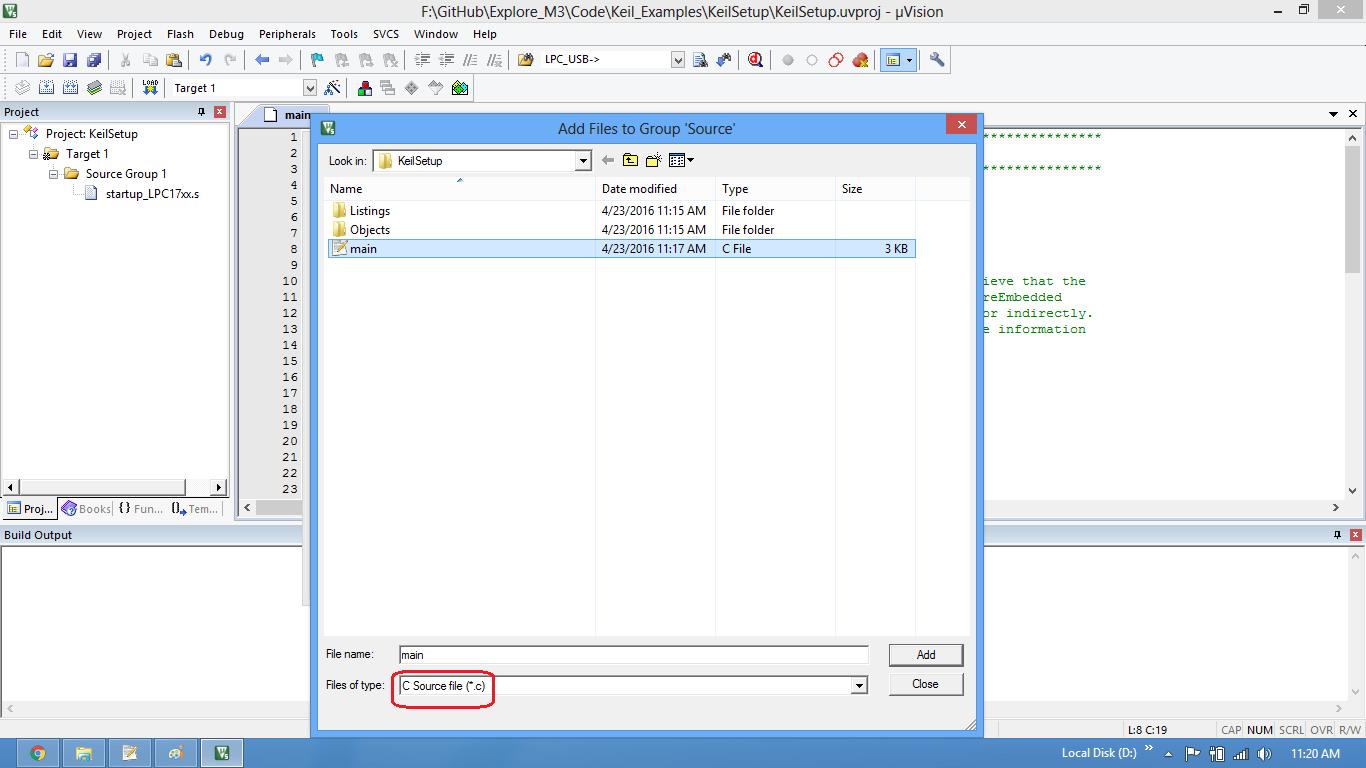
Step10: Add the recently saved file to the project.
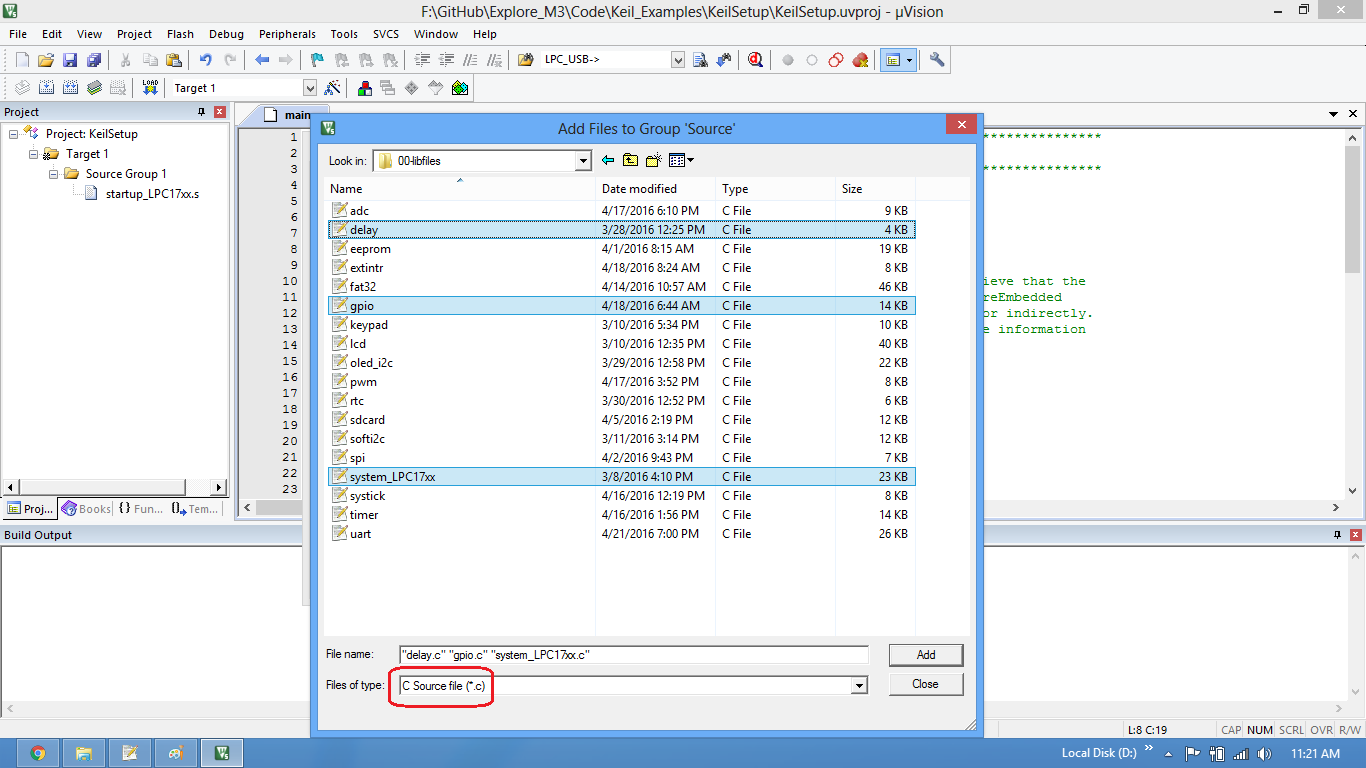
Step11: Add the library source files from 00-libfiles folder.
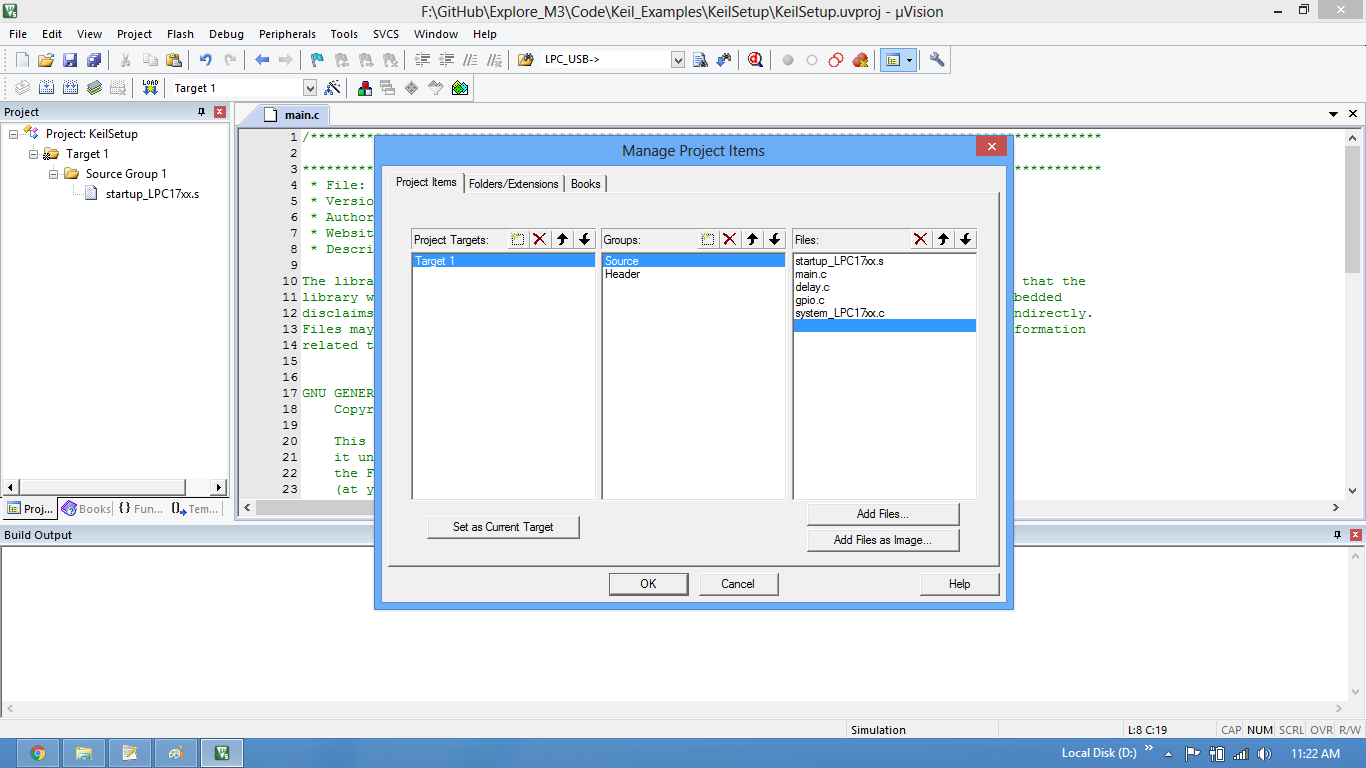
Step12: All the .c files are visible under source group.
Setup Bin File Generation
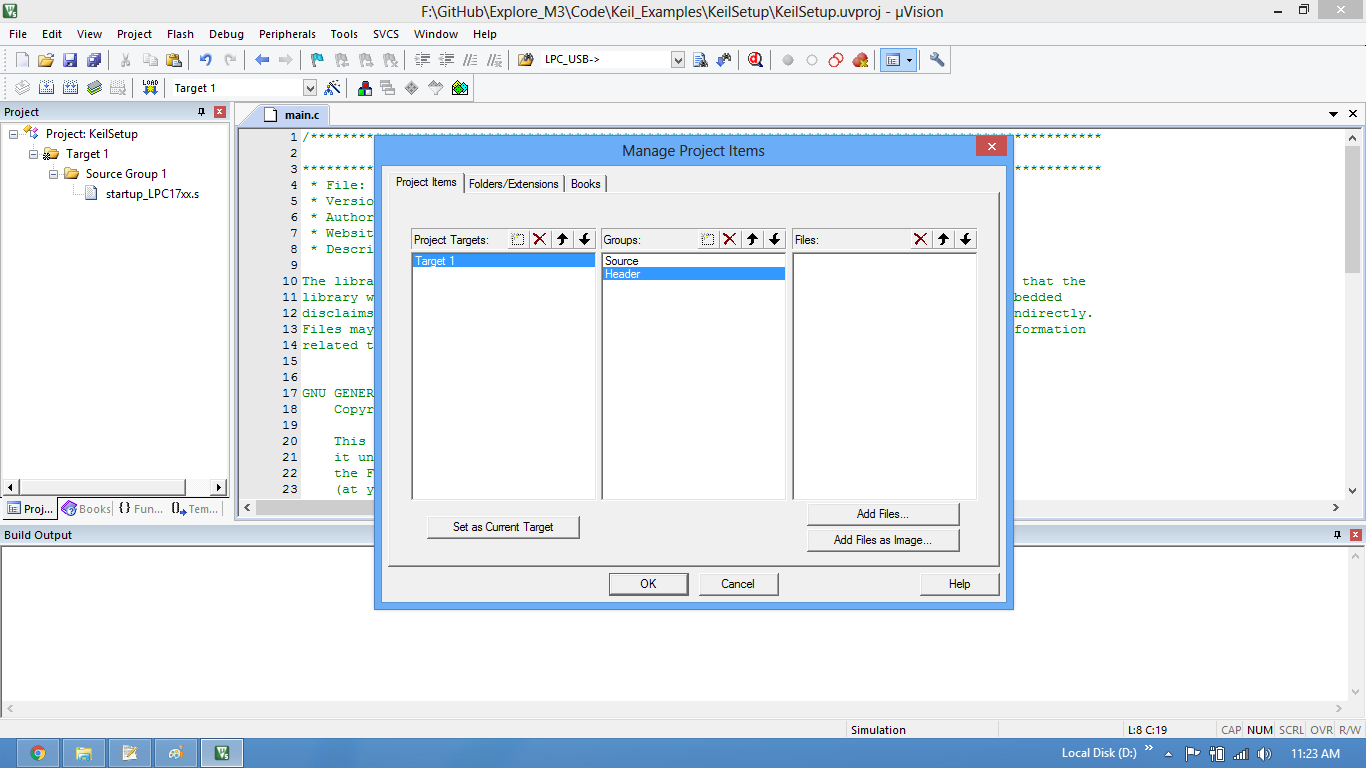
Step13: Similarly select Header and click on Add Files to add the header files.
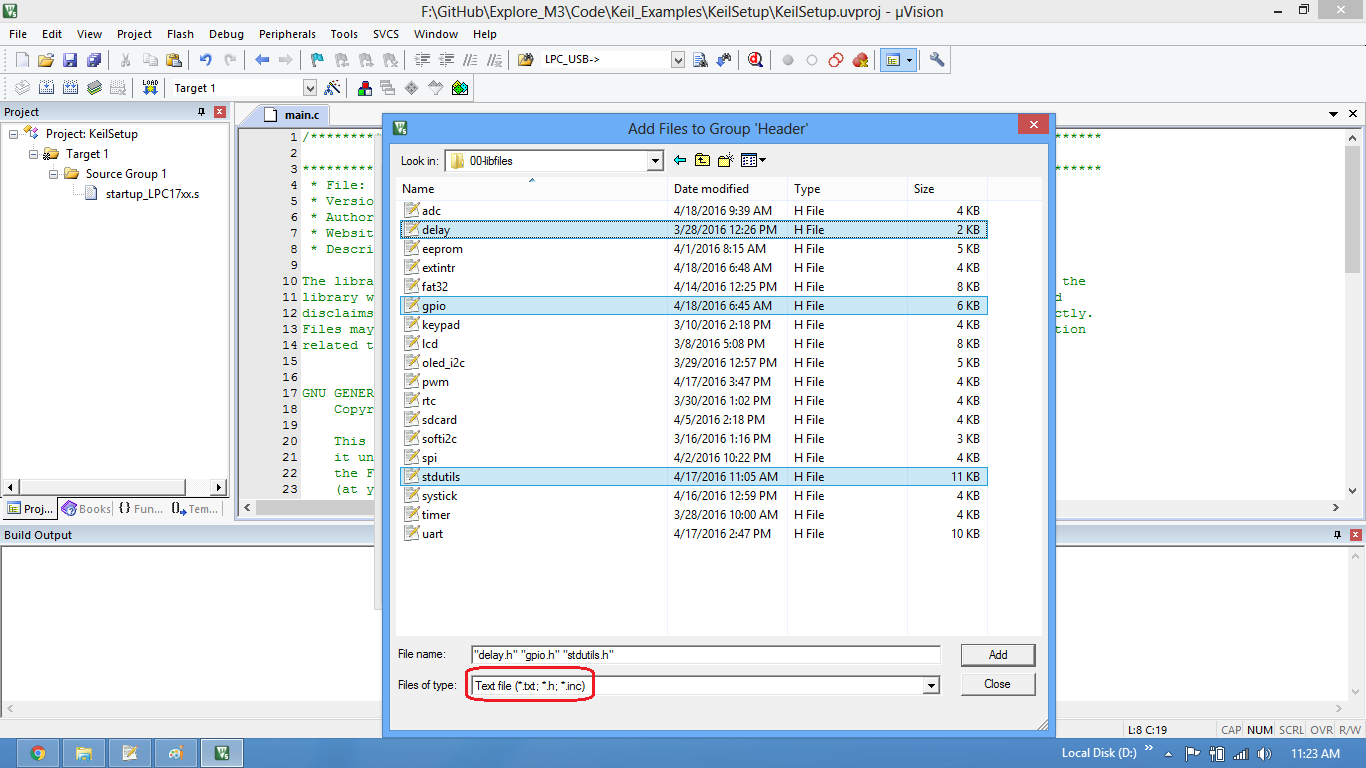
Step14: Add the library header files from 00-libfiles folder.
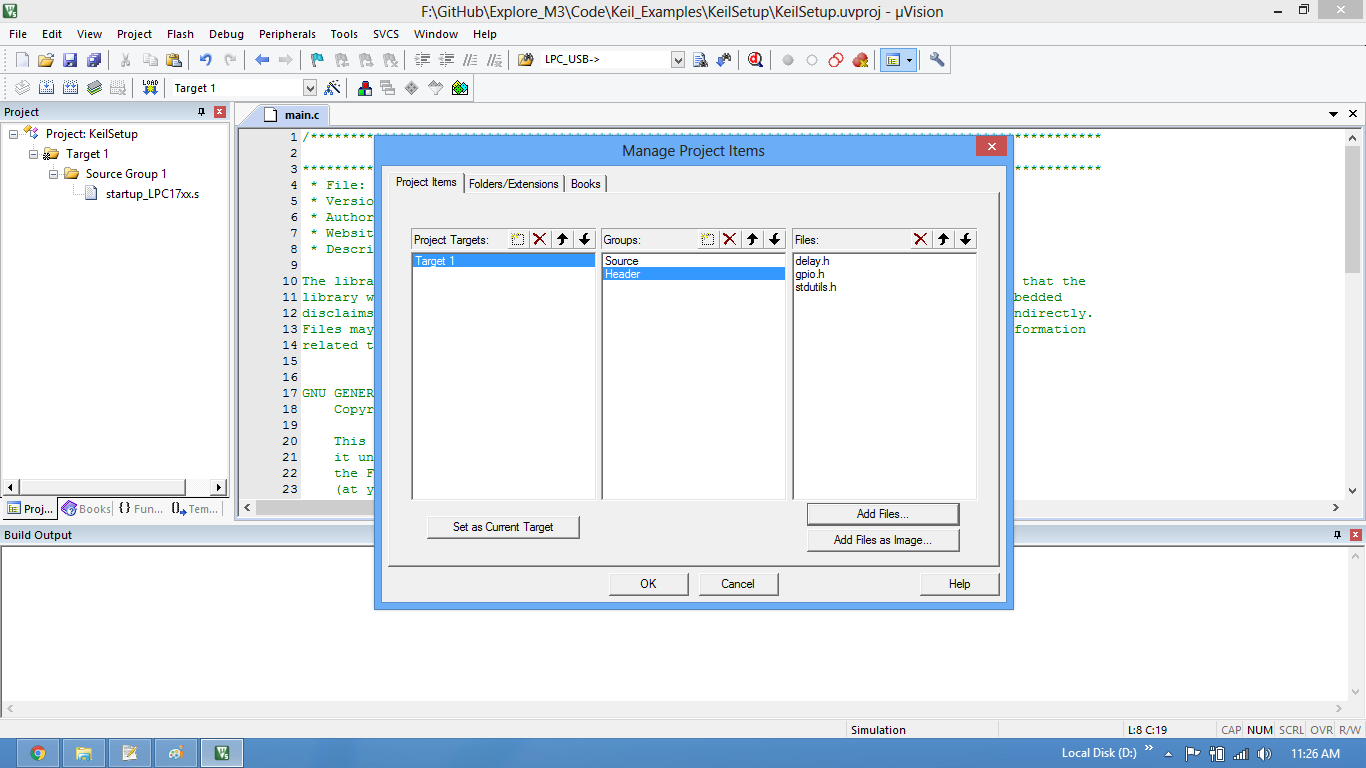
Step15: The .h files are visible under header group.
Step16: The IDE is not able to locate the library files as shown in line 37.
Click on Options for Target to add the libfile path and also to configure the ROM,RAM address.

Step16: The IDE is not able to locate the library files as shown in line 37.

Step17: Select C/C++ options to add the libfile path.
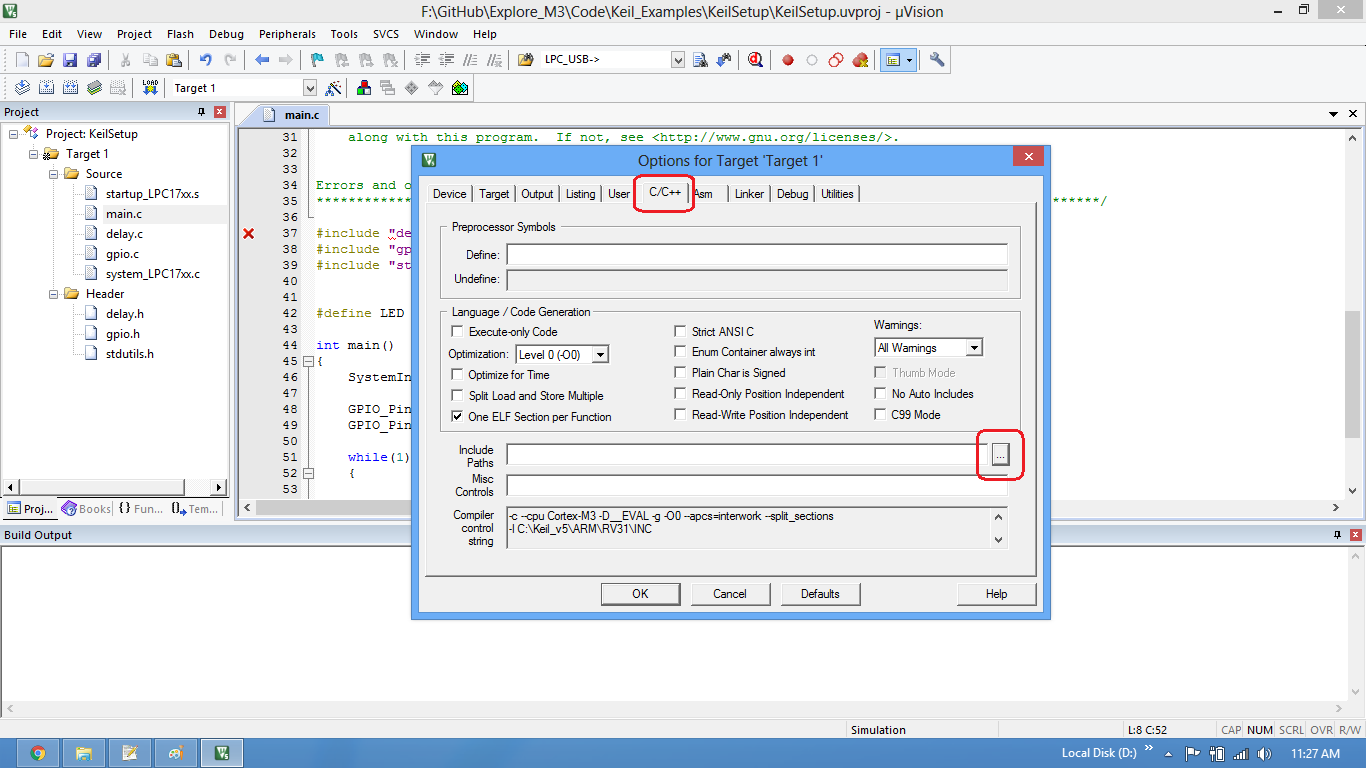
Step18: Setup the Compiler Include Path.
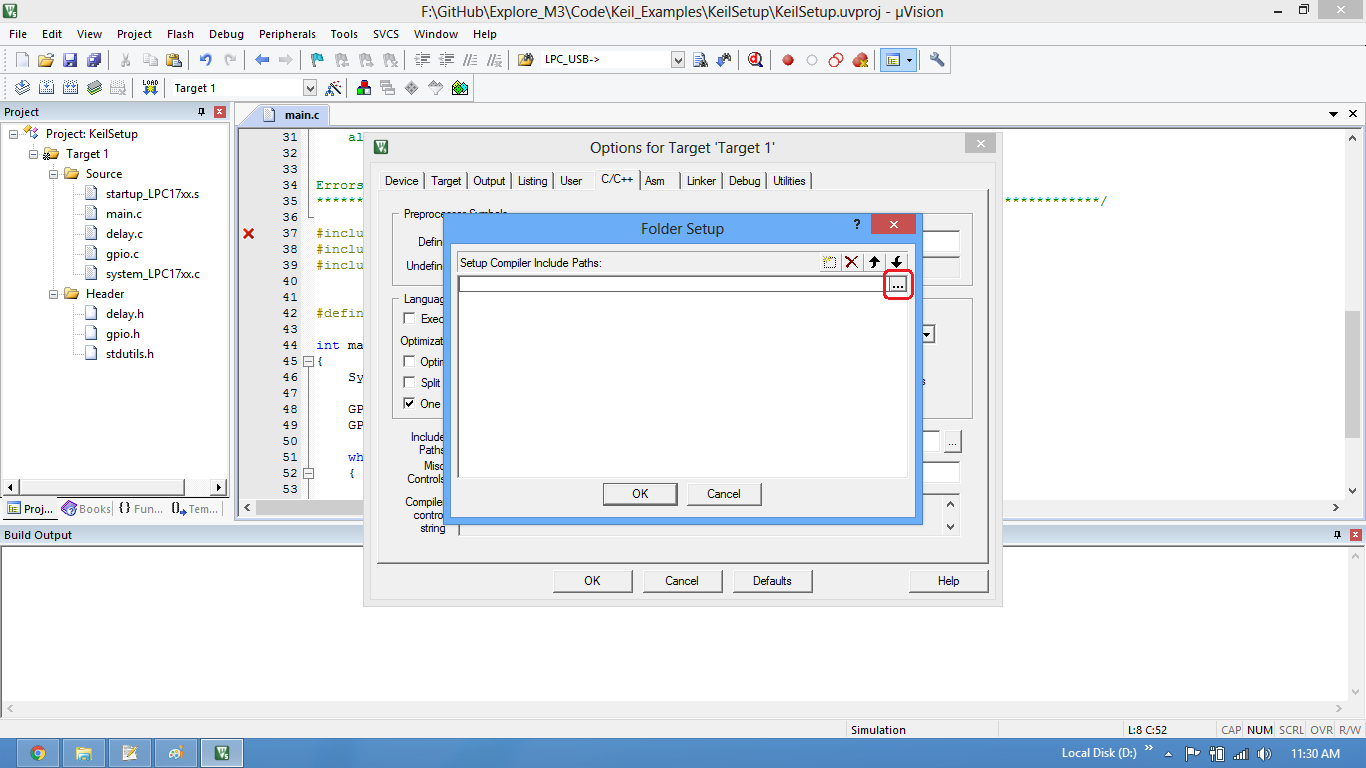
Step19a: Browse and select the folder containing libfiles.
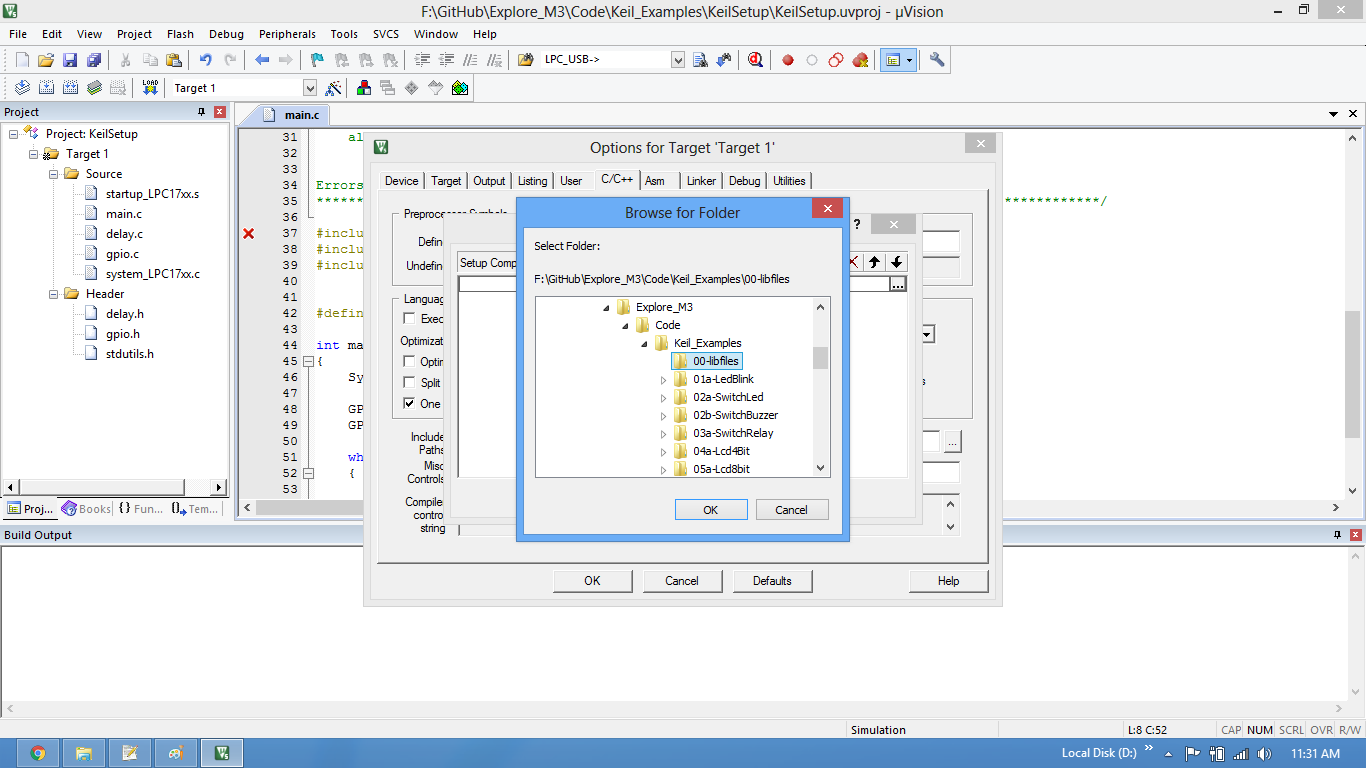
Step19b:Relative path is added to include paths.
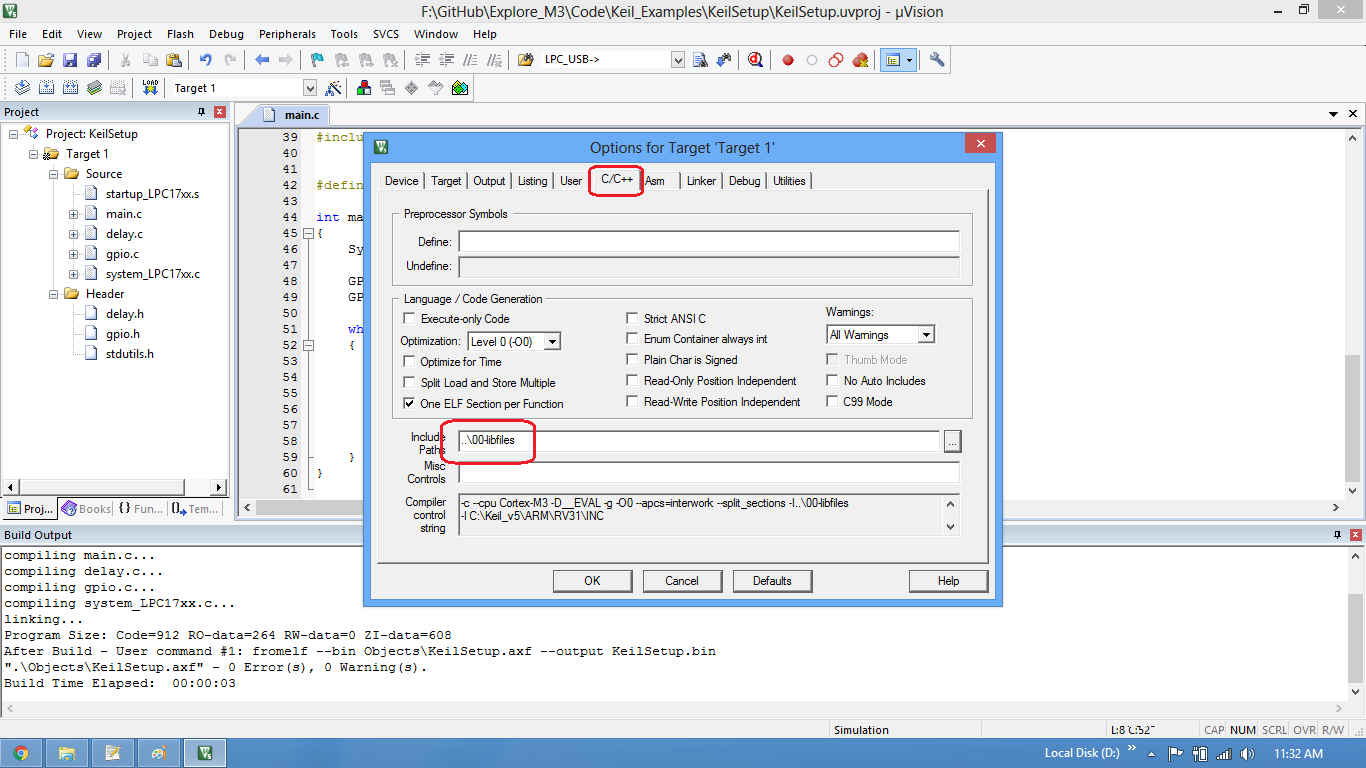
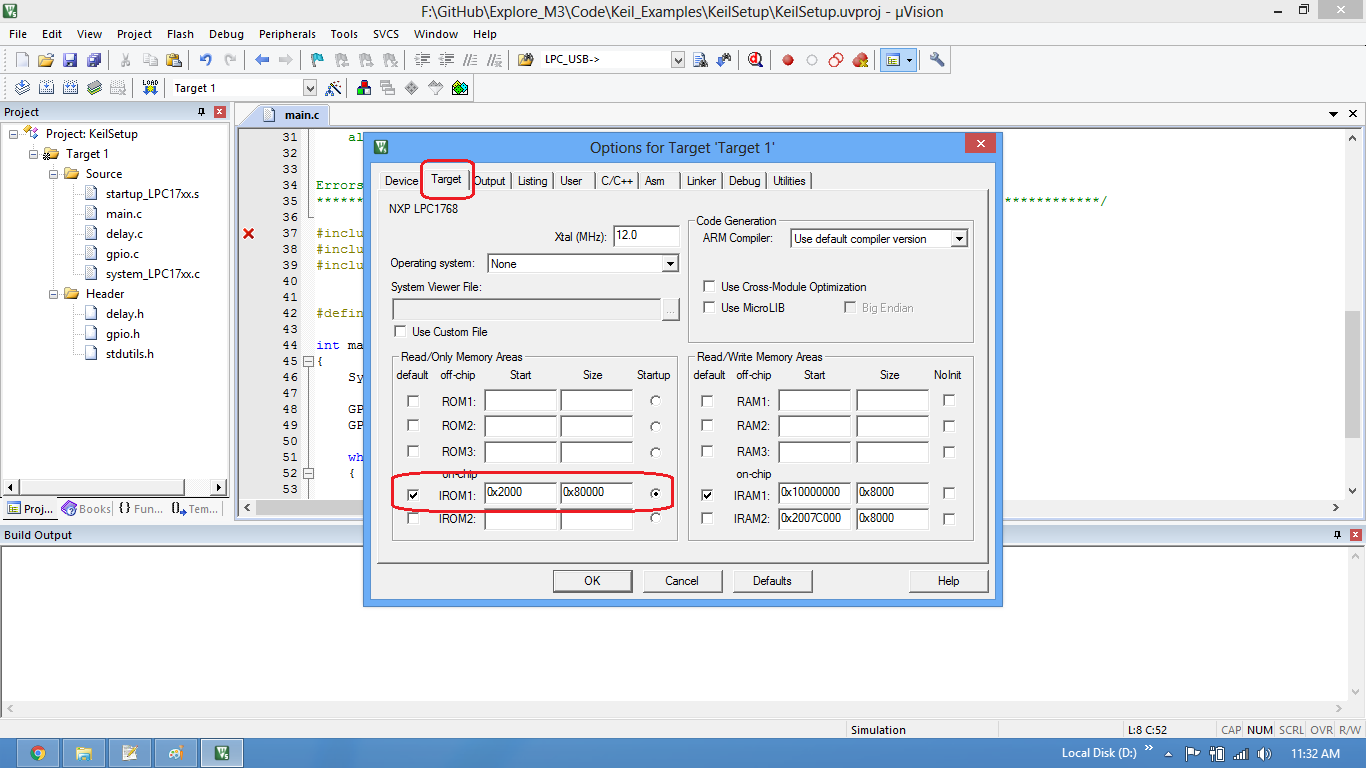
Step20: Set IROM1 start address as 0x2000. Bootloader will be stored from 0x0000-0x2000 so application should start from 0x2000
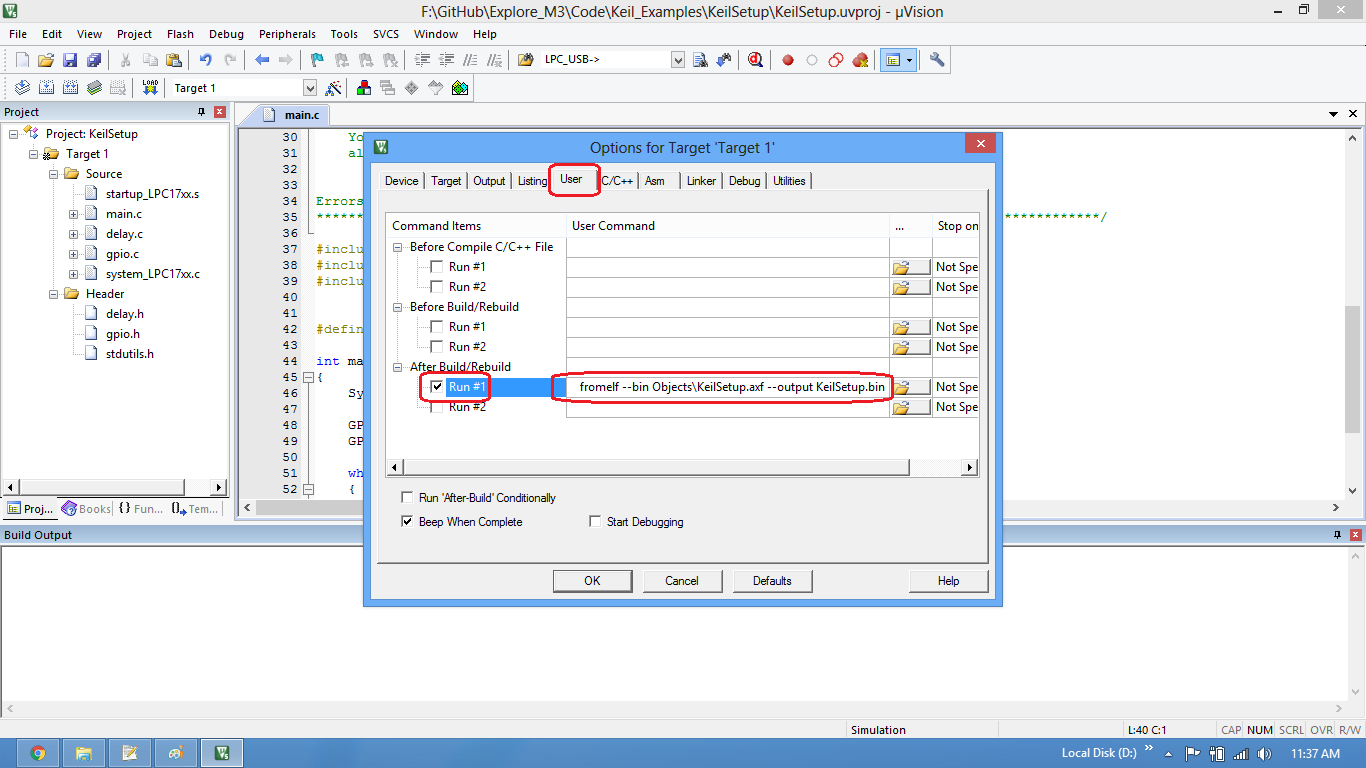
Step21: Write the command to generate the .bin file from .axf file
Command: fromelf --bin Objects\KeilSetup.axf --output KeilSetup.bin
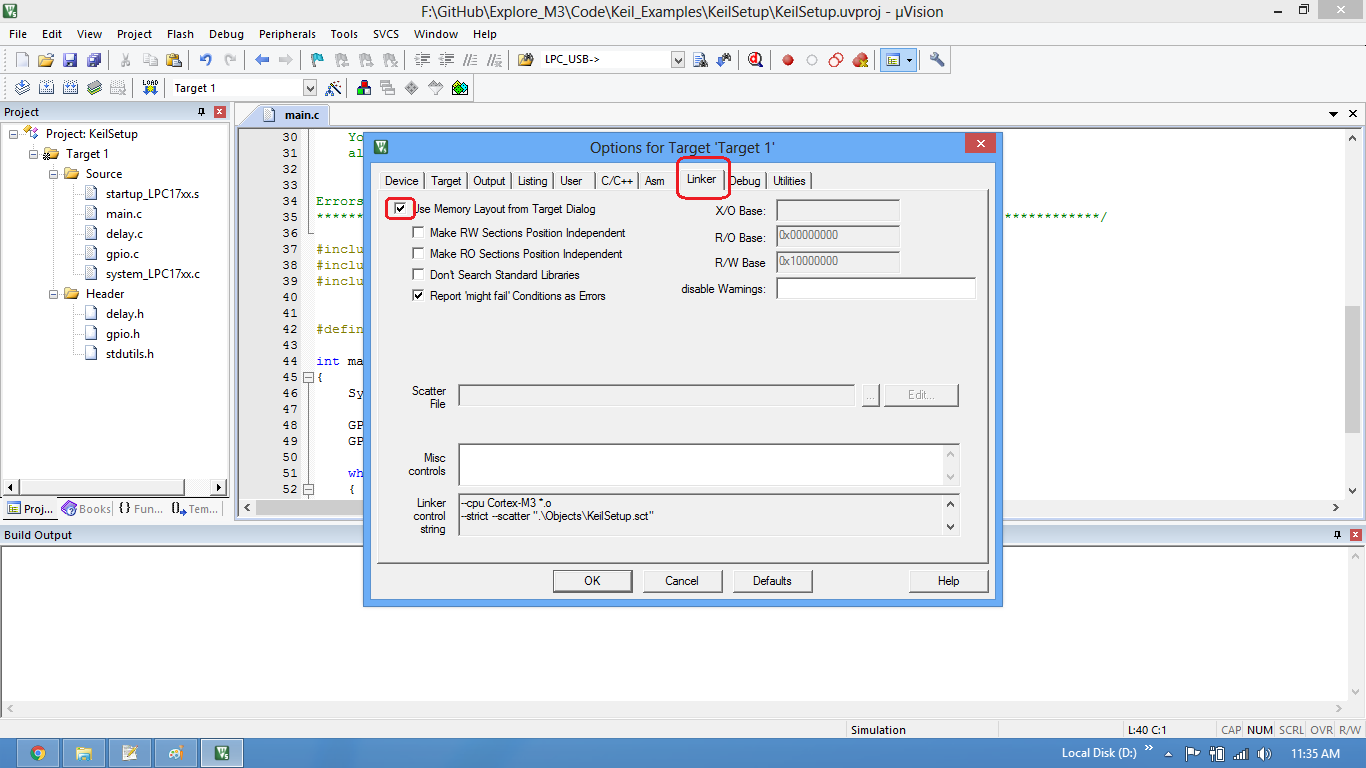
Step22: Now enable the linker option to use the IROM1 address from target settings
Step23: .Bin file is generated after a rebuild.
Check the project folder for the generated .Bin<ER_ROM1> file.
Uploading the Bin file
After generating the .bin file check this tutorial for Uploading Hex and Bin files..
Downloads
Have a opinion, suggestion , question or feedback about the article let it out here!

