Difference between revisions of "Setting up oneMicro Atmega32"
(Created page with "=Flashing the hex file= In this tutorial series we are using [http://exploreembedded.com/wiki/index.php?title=Using_XploreFlash_For_USBasp_based_Programmer Xplore Flash] to tr...") |
|||
| Line 1: | Line 1: | ||
| + | In this tutorial we will look at setting up the oneMicro ATmega32 board, install driver and flash the hex file. | ||
| + | =Hook up= | ||
| + | Simply connect the board to the computer using a micro-usb cable and you're ready to go. | ||
| + | https://www.exploreembedded.com/blog/wp-content/uploads/img-collections/onemicro-atmega32/dsc09607_3-001.jpg | ||
=Flashing the hex file= | =Flashing the hex file= | ||
In this tutorial series we are using [http://exploreembedded.com/wiki/index.php?title=Using_XploreFlash_For_USBasp_based_Programmer Xplore Flash] to transfer the hex file to the target MCU. | In this tutorial series we are using [http://exploreembedded.com/wiki/index.php?title=Using_XploreFlash_For_USBasp_based_Programmer Xplore Flash] to transfer the hex file to the target MCU. | ||
Revision as of 18:06, 8 September 2016
In this tutorial we will look at setting up the oneMicro ATmega32 board, install driver and flash the hex file.
Hook up
Simply connect the board to the computer using a micro-usb cable and you're ready to go.

Flashing the hex file
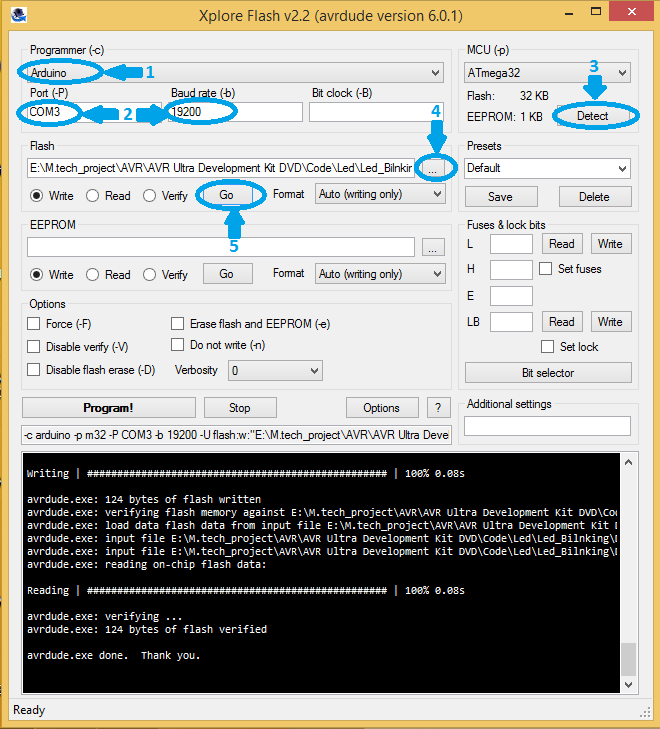
In this tutorial series we are using Xplore Flash to transfer the hex file to the target MCU. Steps below show how to trasfer the hex file to the MCU using Xplore Flash.
- Open the Xplore Flash and select programmer as Arduino .
- Connect the board to the computer and set baud rate 19200 .
- Click on "detect" ,it will detect the MCU as ATmega32.
- After detecting the MCU browse the hex file .
- Then just click on Go. it will erases, Flashes and verifies the hex file.

