Difference between revisions of "Xplore Flash for At89s52"
m (Explorer moved page A2.8051 Interfacing:Hex Keypad to Xplore Flash for At89s52) |
|||
| Line 1: | Line 1: | ||
[[Category:8051 tutorials]] | [[Category:8051 tutorials]] | ||
| + | In this tutorial, we will see how to use XploreFlash for flashing the hex files to AT89s52.<br> | ||
| + | First, we will see how to install the XploreFlash software along with UsbAsp drivers and then continue with flashing the controller. | ||
| − | + | =Installing UsbAsp Drivers= | |
| + | Download the UsbAsp drivers from this link and follow the below steps.<br> | ||
| + | In case your are using <b>Windows7/Vista/Xp</b>, skip the first 7 steps and directly jump to step8.<br> | ||
| − | + | Windows 8 and above do not allow the installation of drivers that are not digitally signed. This needs to be disabled by following the below steps.<br> | |
| − | + | <b>STEP 1:</b>Go to Advanced Start Options by searching the same in Windows Start Menu. | |
| − | + | [[FILE:UsbAsp Setup Steps.png ]] <br> | |
| − | + | ||
| − | + | ||
| − | + | ||
| − | + | <b>STEP 2:</b> Click on Restart Now in Advanced Start Up options. | |
| − | + | [[FILE:UsbAsp Setup Steps 1.png]] <br> | |
| + | <b>STEP 3:</b> Now choose the Troubleshoot option. | ||
| + | [[FILE:UsbAsp Setup Steps 2.jpg]] <br> | ||
| + | <b>STEP 4:</b> Click on Advanced Options. | ||
| + | [[FILE:UsbAsp Setup Steps 3.jpg]] <br> | ||
| − | + | <b>STEP 5:</b> Click on StartUp Settings. | |
| − | + | [[FILE:UsbAsp Setup Steps 4.jpg]] <br> | |
| − | + | ||
| − | + | ||
| − | + | ||
| − | + | <b>STEP 6:</b> Now Click on Restart and wait till the PC restarts. | |
| + | [[FILE:UsbAsp Setup Steps 5.jpg]] <br> | ||
| − | + | <b>STEP 7:</b> Once the PC restarts, Press 7/F7 to disable <b>Driver Signature Enforcement</b>. | |
| − | + | [[FILE:UsbAsp Setup Steps 6.jpg]] <br> | |
| − | + | ||
| − | + | ||
| − | + | ||
| − | + | ||
| − | + | ||
| − | + | ||
| − | + | ||
| − | [ | + | |
| − | + | <b>STEP 8:</b> Now Connect the Usbasp programmer to the system and it will be listed under other devices in device manager. | |
| − | + | [[FILE:UsbAsp Setup Steps 7.PNG]] <br> | |
| − | + | ||
| − | + | ||
| − | + | ||
| − | < | + | |
| − | + | ||
| − | + | ||
| − | + | <b>STEP 9:</b> Right Click and choose <b>Update Driver Software</b> | |
| − | + | [[FILE:UsbAsp Setup Steps 8.png]] <br> | |
| + | <b>STEP 10:</b>Now browse and select the folder where the drivers are stored. | ||
| + | [[FILE:UsbAsp Setup Steps 9.PNG]] <br> | ||
| − | / | + | <b>STEP 11:</b> After selecting the driver folder, click on Next to install the drivers. |
| − | + | [[FILE:UsbAsp Setup Steps 10.PNG]] <br> | |
| − | + | ||
| − | + | ||
| − | + | ||
| − | + | ||
| − | + | <b>STEP 12: Click on <b>Install This Software Anyway</b> | |
| − | + | [[FILE:UsbAsp Setup Steps 11.PNG]] <br> | |
| − | + | <b>STEP 13:</b> Once the installion is successful, below message will be displayed. | |
| + | [[FILE:UsbAsp Setup Steps 12.PNG]] <br> | ||
| − | + | <b>STEP 14:</b> Now the device will be listed under libusb-win32 devices. | |
| − | + | [[FILE:UsbAsp Setup Steps 13.PNG]] <br> | |
| − | + | =Using XploreFlash(AVR Dudes)= | |
| − | + | ||
| − | + | ||
| − | + | ||
| − | + | <b>STEP 1:</b> | |
| − | + | Run the Xplore Flash(Avr Dudes) software and <br> | |
| − | + | #Select the UsbAsp programmer from the dropdown as shown below.<br> | |
| − | + | #Select the AT89S52 controller from the drop down.<br> | |
| + | #Check the write option to flash the .hex file to the controller.<br> | ||
| + | [[File:XploreFlash 01.png ]] <br> | ||
| − | </ | + | <b>STEP 2:</b> Browse and Select the .hex file to be flashed. |
| + | [[File:XploreFlash 02.png]] <br> | ||
| − | + | <b>STEP 3:</b> Finally hit the GO button to flash the .hex file. | |
| − | + | [[File:XploreFlash 03.png]] <br> | |
| − | + | ||
| − | [ | + | |
| − | <br | + | |
| − | + | <b>STEP 4:</b> Flashing status will be displayed in the conosle window. | |
| − | + | [[File:XploreFlash 04.PNG]] <br> | |
| − | + | ||
Revision as of 10:09, 19 August 2016
In this tutorial, we will see how to use XploreFlash for flashing the hex files to AT89s52.
First, we will see how to install the XploreFlash software along with UsbAsp drivers and then continue with flashing the controller.
Installing UsbAsp Drivers
Download the UsbAsp drivers from this link and follow the below steps.
In case your are using Windows7/Vista/Xp, skip the first 7 steps and directly jump to step8.
Windows 8 and above do not allow the installation of drivers that are not digitally signed. This needs to be disabled by following the below steps.
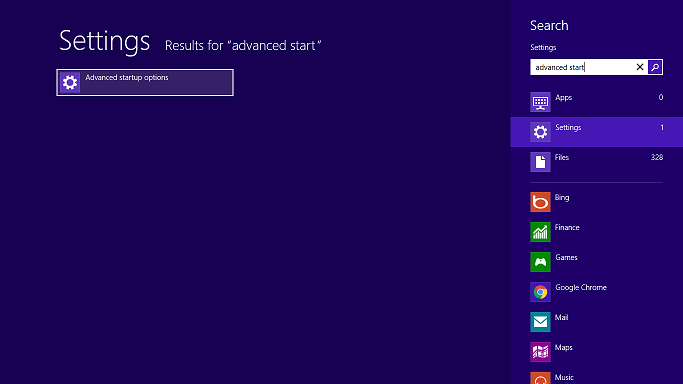
STEP 1:Go to Advanced Start Options by searching the same in Windows Start Menu.
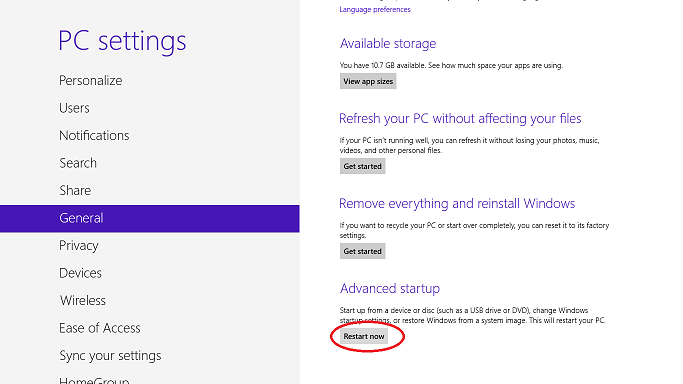
STEP 2: Click on Restart Now in Advanced Start Up options.
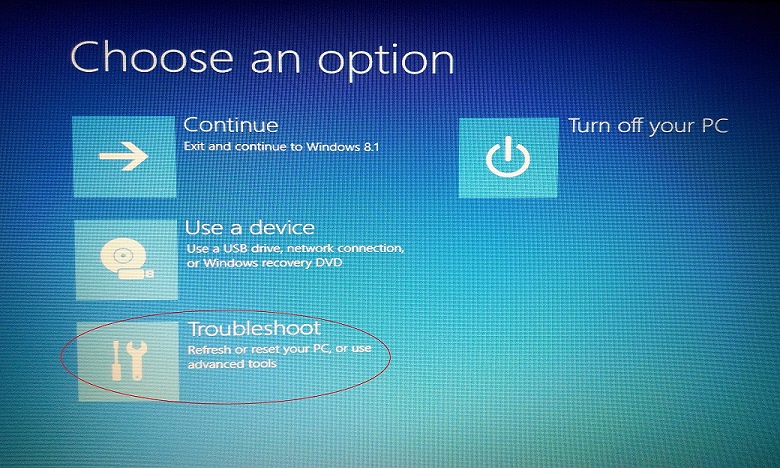
STEP 3: Now choose the Troubleshoot option.
STEP 4: Click on Advanced Options.
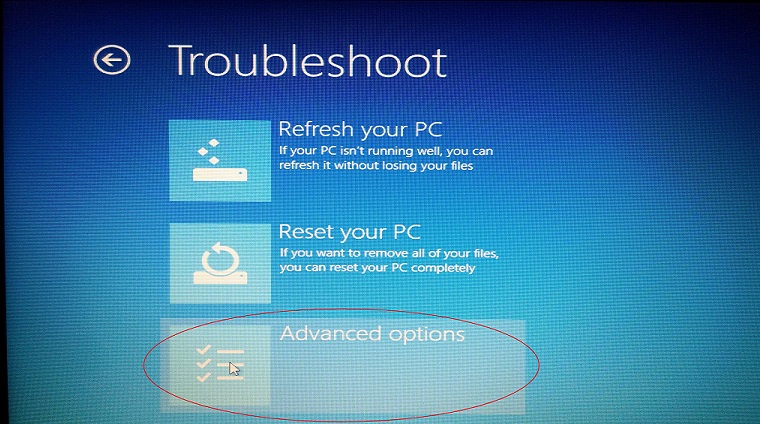
STEP 5: Click on StartUp Settings.
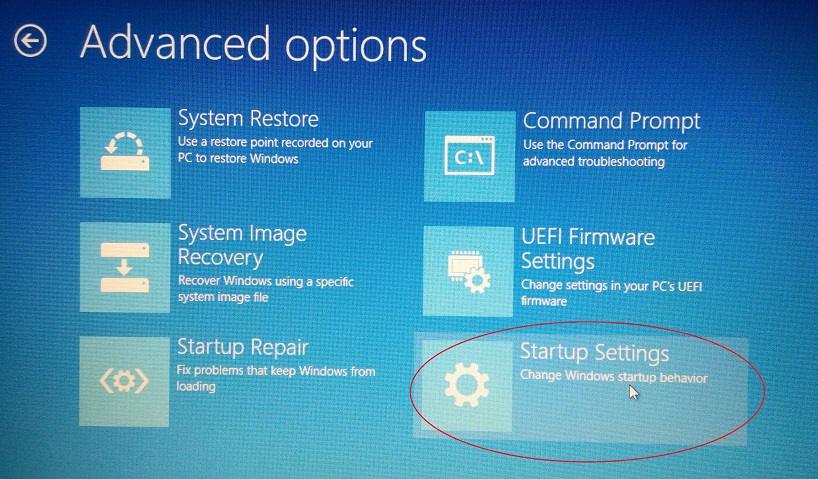
STEP 6: Now Click on Restart and wait till the PC restarts.
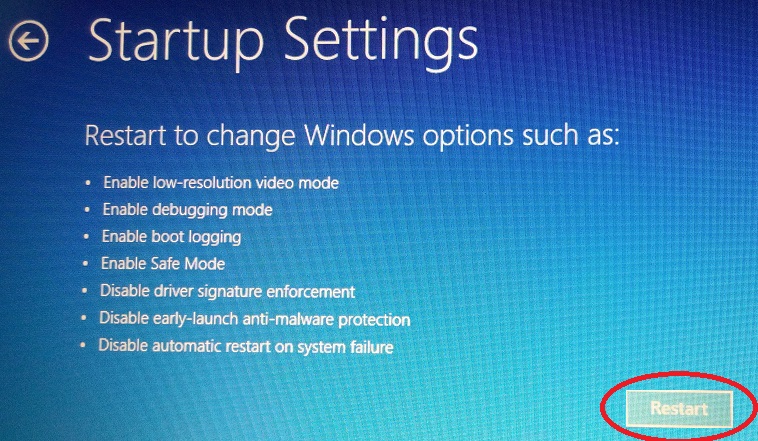
STEP 7: Once the PC restarts, Press 7/F7 to disable Driver Signature Enforcement.
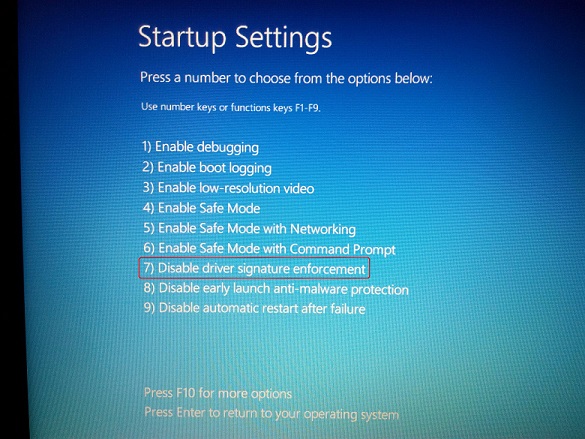
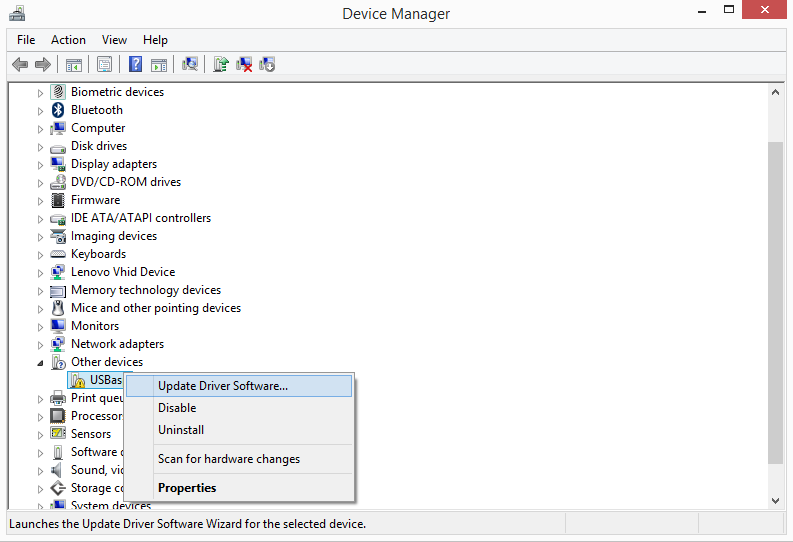
STEP 8: Now Connect the Usbasp programmer to the system and it will be listed under other devices in device manager.

STEP 9: Right Click and choose Update Driver Software
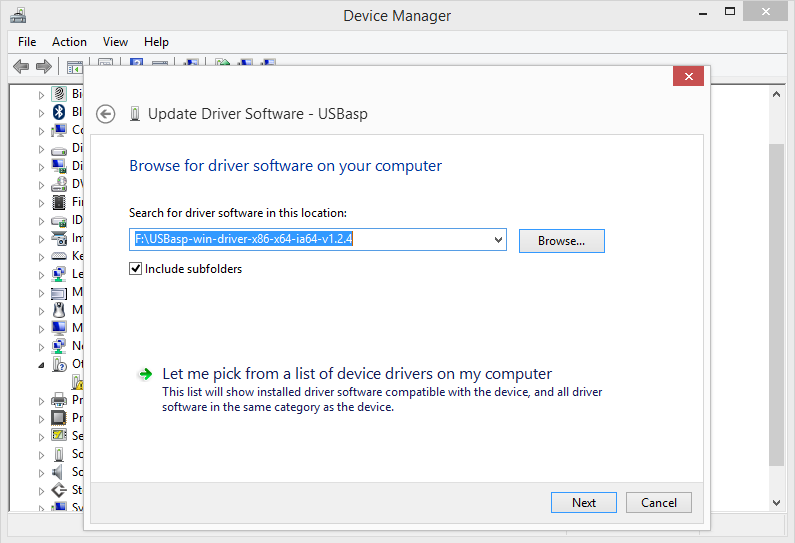
STEP 10:Now browse and select the folder where the drivers are stored.

STEP 11: After selecting the driver folder, click on Next to install the drivers.
STEP 12: Click on <b>Install This Software Anyway

STEP 13: Once the installion is successful, below message will be displayed.

STEP 14: Now the device will be listed under libusb-win32 devices.

Using XploreFlash(AVR Dudes)
STEP 1:
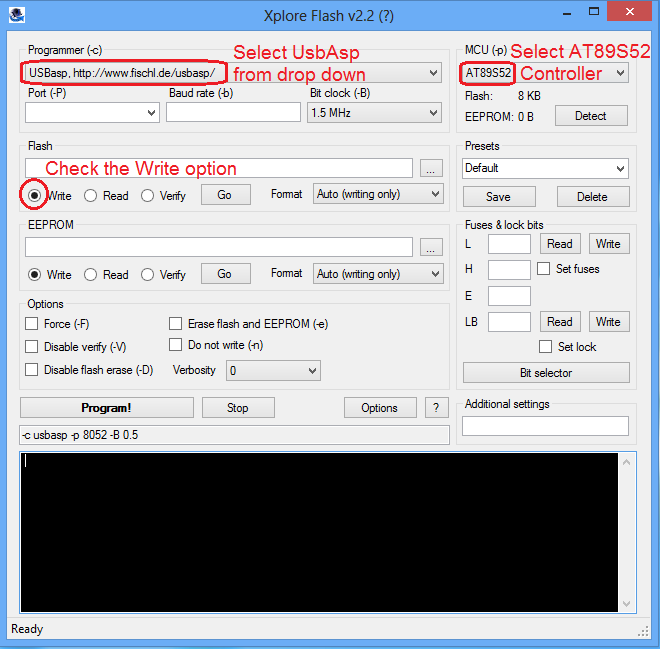
Run the Xplore Flash(Avr Dudes) software and
- Select the UsbAsp programmer from the dropdown as shown below.
- Select the AT89S52 controller from the drop down.
- Check the write option to flash the .hex file to the controller.
STEP 2: Browse and Select the .hex file to be flashed.
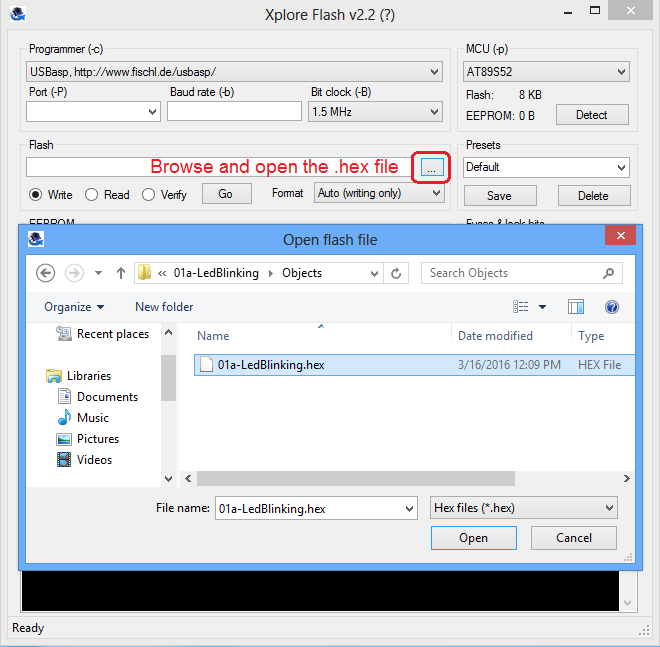
STEP 3: Finally hit the GO button to flash the .hex file.
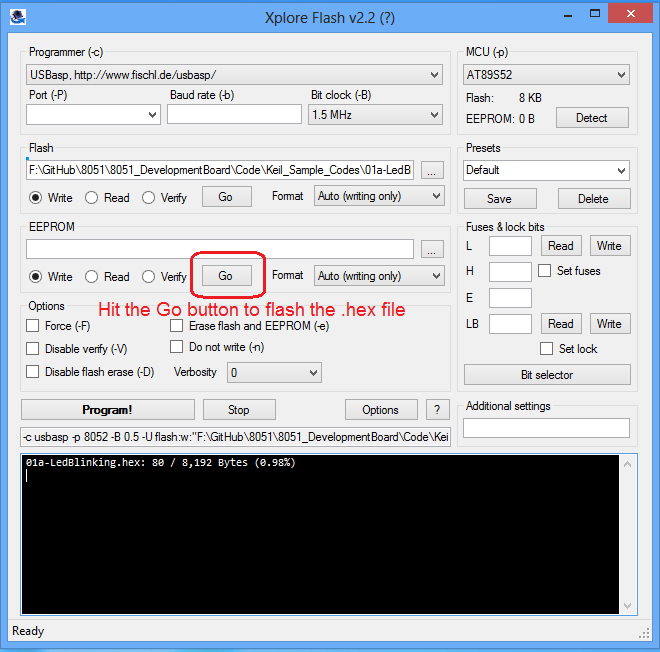
STEP 4: Flashing status will be displayed in the conosle window.


