Difference between revisions of "Serial Communication with PIC16F877A"
| Line 113: | Line 113: | ||
It may be advantageous to use the high baud rate (BRGH = 1) even for slower baud clocks. | It may be advantageous to use the high baud rate (BRGH = 1) even for slower baud clocks. | ||
| − | This is because the FOSC/(16 (X + 1)) equation can reduce the baud rate error in some cases. | + | This is because the FOSC/(16 (X + 1)) equation can reduce the baud rate error in some cases. Below table shows the list of standard BaudRates and the SPBRG values. |
| + | [[FILE:Pic16f877a_BaudRates.png]] | ||
=Init= | =Init= | ||
Revision as of 11:35, 5 May 2016
In this tutorial we are going to discuss the serial/UART communication using PIC16F877A.
PIC16F877A comes with inbuilt USART which can be used for Synchronous/Asynchronous communication. We will be discussing only the UART. After understating the basics of PIC16F877A UART module, We will see how to use the ExploreEmbedded libraries to communicate with any of the UART devices.
Contents
UART Registers
The below table shows the registers associated with PIC16F877A UART.
| Register | Description |
|---|---|
| TXSTA | Transmit Status And Control Register |
| RCSTA | Receive Status And Control Register |
| SPBRG | USART Baud Rate Generator |
UART Register Configuration
Now lets see how to configure the individual registers for UART communication.
| TXSTA | |||||||
| 7 | 6 | 5 | 4 | 3 | 2 | 1 | 0 |
| CSRC | TX9 | TXEN | SYNC | - | BRGH | TRMT | TX9D |
CSRC: Clock Source Select bit
Asynchronous mode:Don’t care.
TX9: 9-bit Transmit Enable bit
1 = Selects 9-bit transmission
0 = Selects 8-bit transmission
TXEN: Transmit Enable bit
1 = Transmit enabled
0 = Transmit disabled
SYNC: USART Mode Select bit
1 = Synchronous mode
0 = Asynchronous mode
BRGH: High Baud Rate Select bit
1 = High speed
0 = Low speed
TRMT: Transmit Shift Register Status bit
1 = TSR empty
0 = TSR full
TX9D: 9th bit of Transmit Data, can be Parity bit
| RCSTA | |||||||
| 7 | 6 | 5 | 4 | 3 | 2 | 1 | 0 |
| SPEN | RX9 | SREN | CREN | ADDEN | FERR | OERR | RX9D |
SPEN: Serial Port Enable bit
1 = Serial port enabled (configures RC7/RX/DT and RC6/TX/CK pins as serial port pins)
0 = Serial port disabled
RX9: 9-bit Receive Enable bit
1 = Selects 9-bit reception
0 = Selects 8-bit reception
SREN: Single Receive Enable bit
Asynchronous mode:Don’t care.
CREN: Continuous Receive Enable bit
Asynchronous mode:
1 = Enables continuous receive
0 = Disables continuous receive
ADDEN: Address Detect Enable bit
Asynchronous mode 9-bit (RX9 = 1):
1 = Enables address detection, enables interrupt and load of the receive buffer when RSR is set
0 = Disables address detection, all bytes are received and ninth bit can be used as parity bit
FERR: Framing Error bit
1 = Framing error (can be updated by reading RCREG register and receive next valid byte)
0 = No framing error
OERR: Overrun Error bit
1 = Overrun error (can be cleared by clearing bit CREN)
0 = No overrun error
RX9D: 9th bit of Received Data (can be parity bit but must be calculated by user firmware)
Baud Rate Calculation
The main criteria for UART communication is its baud rate. Both the devices Rx/Tx should be set to same baud rate for successful communication.
This can be achieved by SPBRG register. SPBRG is a 8-bit register which controls the baud rate generation.
Given the desired baud rate and FOSC, the nearest integer value for the SPBRG register can be calculated using the below formula.
- BRGH = 1 High Speed
$$SPBRG = (Fosc / (16 * BaudRate)) - 1$$
- BRGH = 0 Low Speed
$$SPBRG = (Fosc / (64 * Baud rate)) - 1$$
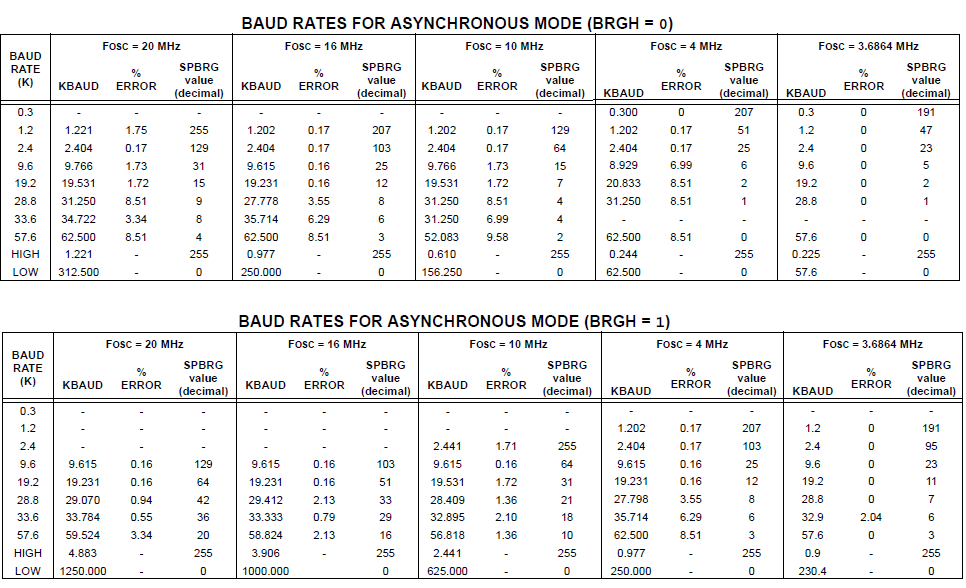
It may be advantageous to use the high baud rate (BRGH = 1) even for slower baud clocks.
This is because the FOSC/(16 (X + 1)) equation can reduce the baud rate error in some cases. Below table shows the list of standard BaudRates and the SPBRG values.


