Difference between revisions of "Led Blink with Explore M3"
| Line 2: | Line 2: | ||
Blinking an LED is fun for a newbie, a setup test for a Embedded Developer and for this tutorial it getting started with Explore M3 and answering some basic questions like, ''where did it come from?'' which are usually ignored if it is programming just with Arduino. | Blinking an LED is fun for a newbie, a setup test for a Embedded Developer and for this tutorial it getting started with Explore M3 and answering some basic questions like, ''where did it come from?'' which are usually ignored if it is programming just with Arduino. | ||
| − | I would recommend you to go through [[Explore_M3_Introduction|the board introduction]] and [[Arduino_Setup_for_Explore_M3|setup tutorial]] before proceeding with this one. | + | =The Example= |
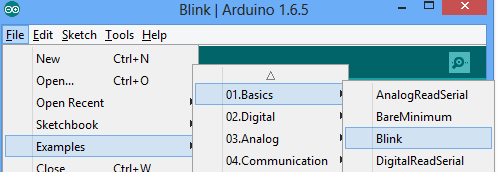
| − | + | I would recommend you to go through [[Explore_M3_Introduction|the board introduction]] and [[Arduino_Setup_for_Explore_M3|setup tutorial]] before proceeding with this one. Explore M3 has an on board blue led connected to pin 13. So there is no physical hookup required for tutorial.Even the code, as you might now is there in the IDE. You may select as shown below: | |
| − | Explore M3 has an on board blue led connected to pin 13. So there is no physical hookup required for tutorial.Even the code, as you might now is there in the IDE. You may select as shown below: | + | |
[[File:Blink m3.png|none]] | [[File:Blink m3.png|none]] | ||
| Line 23: | Line 22: | ||
} | } | ||
</syntaxhighlight> | </syntaxhighlight> | ||
| + | =The demo= | ||
| + | =A few questions= | ||
Revision as of 13:43, 25 April 2016
Blinking an LED is fun for a newbie, a setup test for a Embedded Developer and for this tutorial it getting started with Explore M3 and answering some basic questions like, where did it come from? which are usually ignored if it is programming just with Arduino.
The Example
I would recommend you to go through the board introduction and setup tutorial before proceeding with this one. Explore M3 has an on board blue led connected to pin 13. So there is no physical hookup required for tutorial.Even the code, as you might now is there in the IDE. You may select as shown below:
The code in all its glory!
// the setup function runs once when you press reset or power the board
void setup() {
  // initialize digital pin 13 as an output.
  pinMode(13, OUTPUT);
}

// the loop function runs over and over again forever
void loop() {
  digitalWrite(13, HIGH);   // turn the LED on (HIGH is the voltage level)
  delay(100);              // wait for a second
  digitalWrite(13, LOW);    // turn the LED off by making the voltage LOW
  delay(100);              // wait for a second
}

