Difference between revisions of "AVR Library Usage Guide"
| Line 1: | Line 1: | ||
*''Below example demonstrates the step by step procedure to include the libraries into any applications.'' | *''Below example demonstrates the step by step procedure to include the libraries into any applications.'' | ||
'''Step 1:''' ''Open the Avr AtmelStudio-6 and select the New project from File Menu as shown below.'' | '''Step 1:''' ''Open the Avr AtmelStudio-6 and select the New project from File Menu as shown below.'' | ||
| − | [[File:1Open_AvrAtmel. | + | [[File:1Open_AvrAtmel.png|720x480px]] |
'''Step 2:''' ''Browse to your project folder and provide the project name and click on Ok.'' | '''Step 2:''' ''Browse to your project folder and provide the project name and click on Ok.'' | ||
| − | [[File:2Give_ProjName. | + | [[File:2Give_ProjName.png|720x480px]] |
| − | [[File:2.1Give_ProjName. | + | [[File:2.1Give_ProjName.png|720x480px]] |
| − | [[File:2.2Give_ProjName. | + | [[File:2.2Give_ProjName.png|720x480px]] |
'''Step 3:''' ''Once the project is saved a new dialog box “Device Selection” opens, Select Atmega32 and click OK.'' | '''Step 3:''' ''Once the project is saved a new dialog box “Device Selection” opens, Select Atmega32 and click OK.'' | ||
| − | [[File:3Device_Selection. | + | [[File:3Device_Selection.png|720x480px]] |
'''Step 4:''' ''Once the project is successfully created the below window opens with the initil .c file .''<br\> | '''Step 4:''' ''Once the project is successfully created the below window opens with the initil .c file .''<br\> | ||
''Note:'' | ''Note:'' | ||
*''The initial file name will be same as project name.'' | *''The initial file name will be same as project name.'' | ||
| − | [[File:4Initial_CFile. | + | [[File:4Initial_CFile.png|720x480px]] |
| − | '''Step 5:''' ''Write your program using the library functions and save it. | + | '''Step 5:''' ''Write your program using the library functions and save it.<br\> |
| − | Note: Include the respective header files before calling any library functions. | + | ''Note:'' |
| + | *''Include the respective header files before calling any library functions.'' | ||
| + | [[File:5Write_program.png|720x480px]] | ||
| + | |||
| + | '''Step 6:''' ''Add the library files(.c,.h) to the project as shown below.'' | ||
| + | ''Note:'' | ||
| + | *''Copy the library files into the project folder before including them into the project.'' | ||
| + | [[File:6Add_LibraryFiles.png|720x480px]] | ||
| + | |||
| + | '''Step 7:''' ''Add the Source(.c) and header( .h) files by browsing to the project folder.'' | ||
| + | [[File:7Include_srcHeaderfile.png|720x480px]] | ||
| + | |||
| + | '''Step 8:''' ''The included library files can be seen in Solution Explorer on the right side.'' | ||
| + | [[File:8Include_LibraryFiles.png|720x480px]] | ||
| + | |||
| + | '''Step 9:''' ''Compile the project by clicking on Build Solution from Build menu (or press F7). Project complies if there are no errors. If there are any errors fix them and re-compile.'' | ||
| + | [[File:9Compile_Project.png|720x480px]] | ||
| + | |||
| + | [[File:9.1Build_Project.png|720x480px]] | ||
| + | |||
| + | '''Step 10:''' ''Configure the Controller Freq by selecting the project properties from Project menu.''<br\> | ||
| + | ''Note:'' | ||
| + | *''As the Inbuilt delay routines as used the freq needs to be specified to generate accurate delays.'' | ||
| + | [[File:10Configure_Frequency.png|720x480px]] | ||
| + | |||
| + | '''Step 11:''' ''Select the Symbols from Tool Chain menu and Click on Add Item in Defined Symbols(-D) box.'' | ||
| + | [[File:11Select_Symbol.png|720x480px]] | ||
| + | |||
| + | '''Step 12:''' ''Provide the Controller (Target Board) frequency as F_CPU=xxx Hz .In this case it is 11.0592Mhz.'' | ||
| + | [[File:12TargetBoard_Frqncy.png|720x480px]] | ||
| + | |||
| + | '''Step 13:''' ''Configuring the optimization levels: Select the Optimization from ToolChain menu. Select the required optimization level from drop down. Refer WinAvr/Gcc documents for more optimization details.'' | ||
| + | [[File:13Configure_Optimization.png|720x480px]] | ||
| + | |||
| + | '''Step 14:''' ''Seletcting the targed tool chain : Select the Advanced option on the left side, now click the link shown in blue colour”Tools->Options->Toochain ->Flavour Configuretion“.'' | ||
| + | [[File:14Target_ToolChain.png|720x480px]] | ||
| + | |||
| + | '''Step 15:''' ''From the drop down select WinAVR and set it as Default toolchain by clicking on “Set As Default”.'' | ||
| + | [[File:15Select_WinAVR.png|720x480px]]<br\> | ||
| + | ''Note:'' | ||
| + | *''Above two Steps( 14 & 15) needs to be performed for the first time, ie till the WinAVR is configured as default Toolchain .'' | ||
| + | |||
| + | '''Step 16:''' ''Finally recompile after all configurations. Hex file will be generated with the project name in the selected '''Project->Debug folder.''' '' | ||
| + | [[File:16Recompile_Project.png|720x480px]] | ||
Latest revision as of 12:23, 6 December 2013
- Below example demonstrates the step by step procedure to include the libraries into any applications.
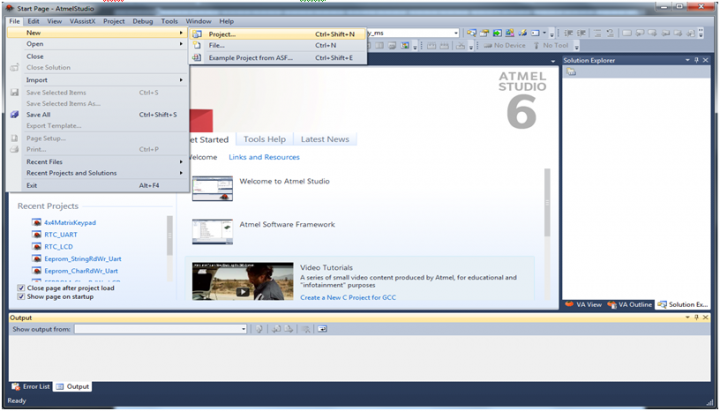
Step 1: Open the Avr AtmelStudio-6 and select the New project from File Menu as shown below.
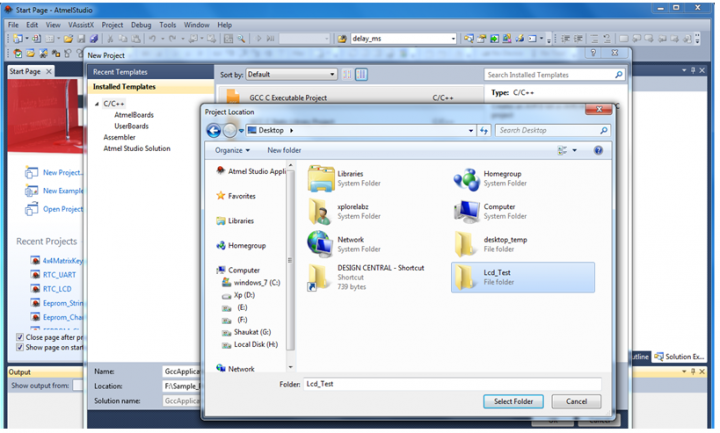
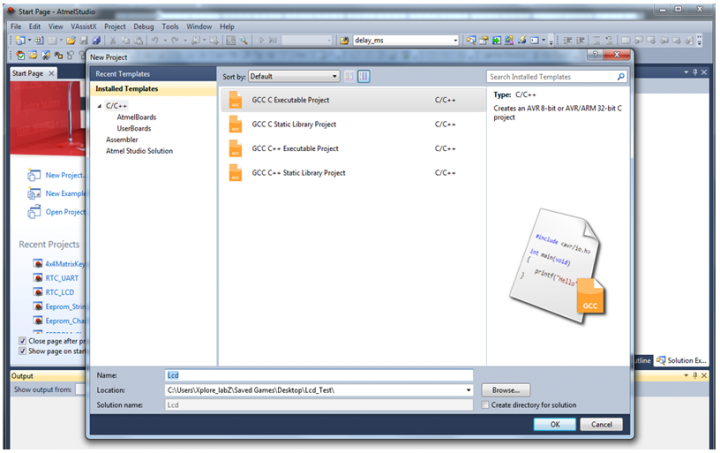
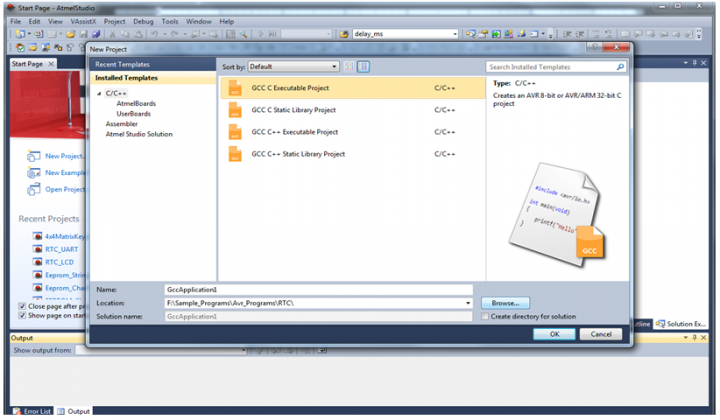
Step 2: Browse to your project folder and provide the project name and click on Ok.
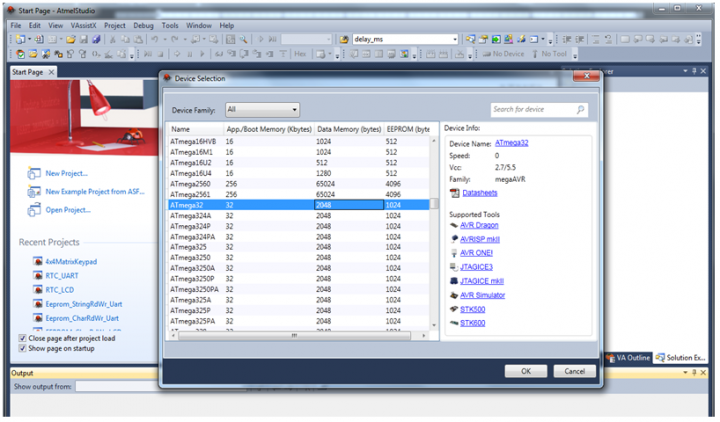
Step 3: Once the project is saved a new dialog box “Device Selection” opens, Select Atmega32 and click OK.
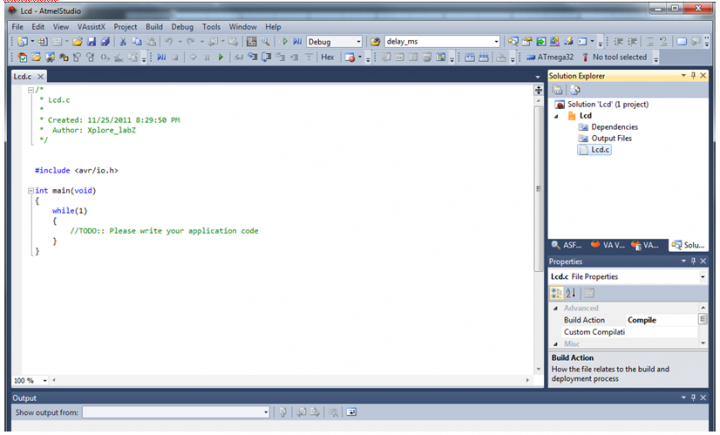
Step 4: Once the project is successfully created the below window opens with the initil .c file .<br\> Note:
- The initial file name will be same as project name.
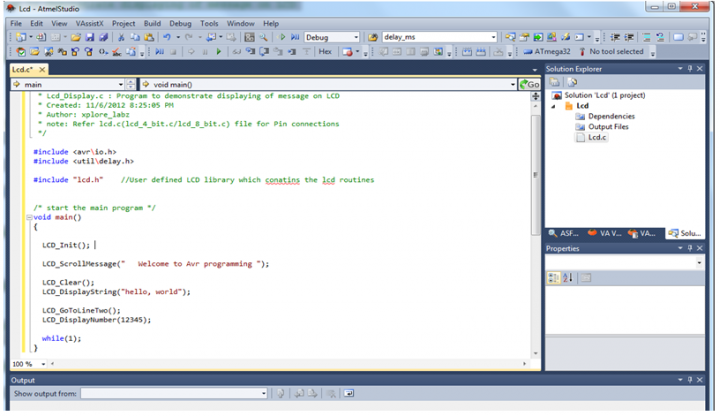
Step 5: Write your program using the library functions and save it.<br\> Note:
- Include the respective header files before calling any library functions.
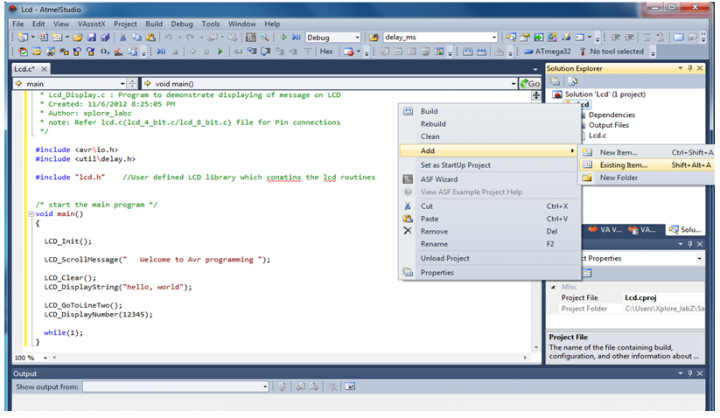
Step 6: Add the library files(.c,.h) to the project as shown below. Note:
- Copy the library files into the project folder before including them into the project.
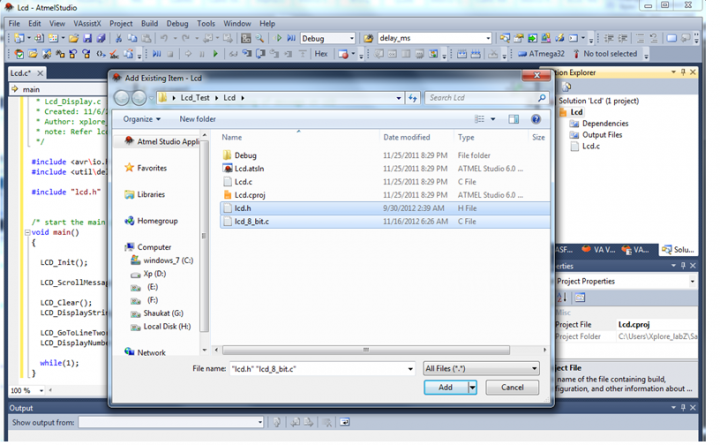
Step 7: Add the Source(.c) and header( .h) files by browsing to the project folder.
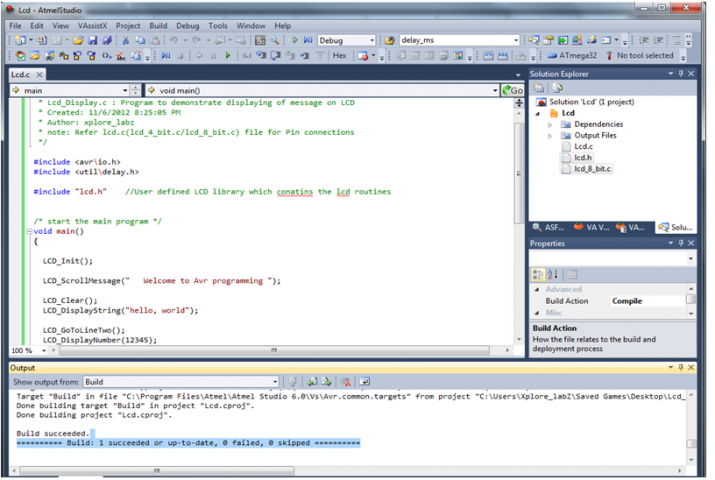
Step 8: The included library files can be seen in Solution Explorer on the right side.
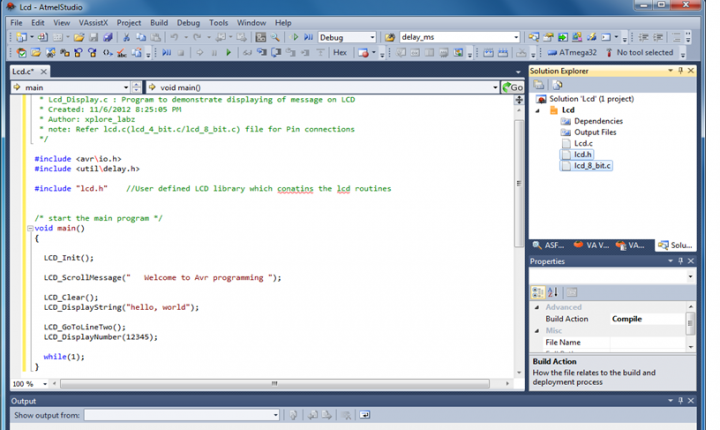
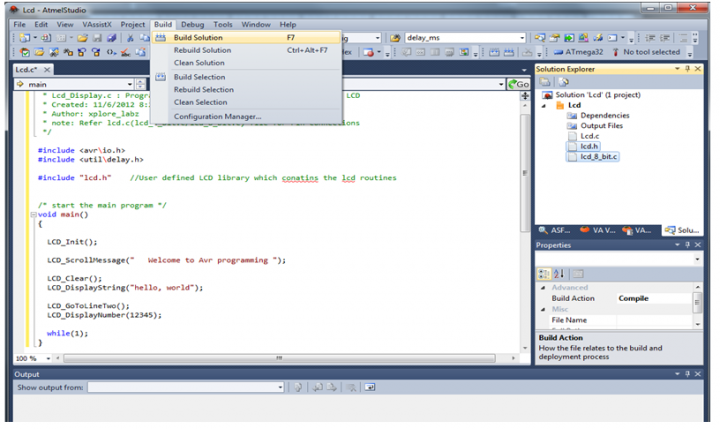
Step 9: Compile the project by clicking on Build Solution from Build menu (or press F7). Project complies if there are no errors. If there are any errors fix them and re-compile.
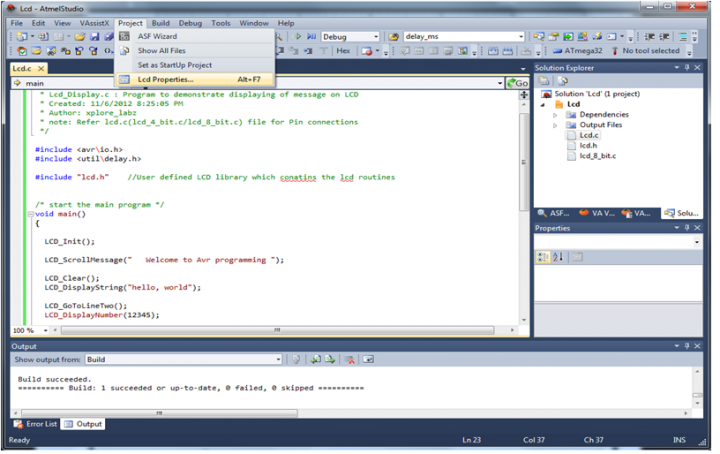
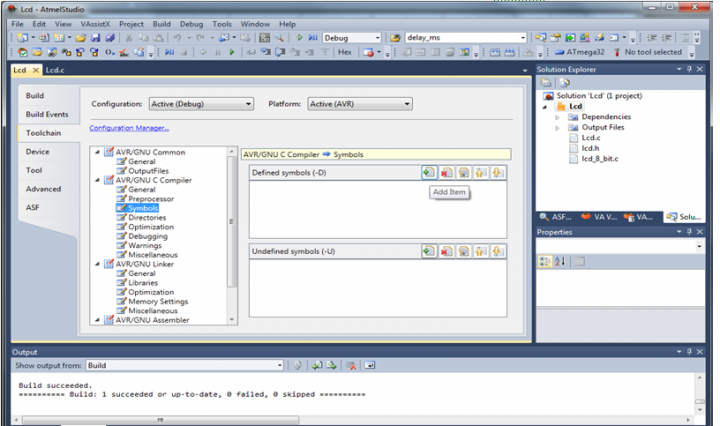
Step 10: Configure the Controller Freq by selecting the project properties from Project menu.<br\> Note:
- As the Inbuilt delay routines as used the freq needs to be specified to generate accurate delays.
Step 11: Select the Symbols from Tool Chain menu and Click on Add Item in Defined Symbols(-D) box.
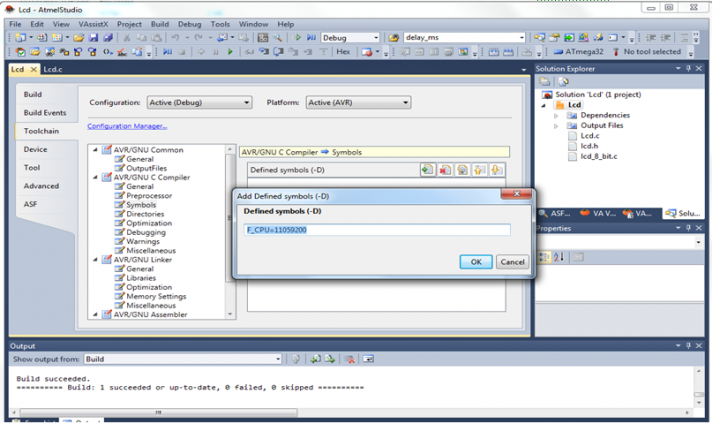
Step 12: Provide the Controller (Target Board) frequency as F_CPU=xxx Hz .In this case it is 11.0592Mhz.
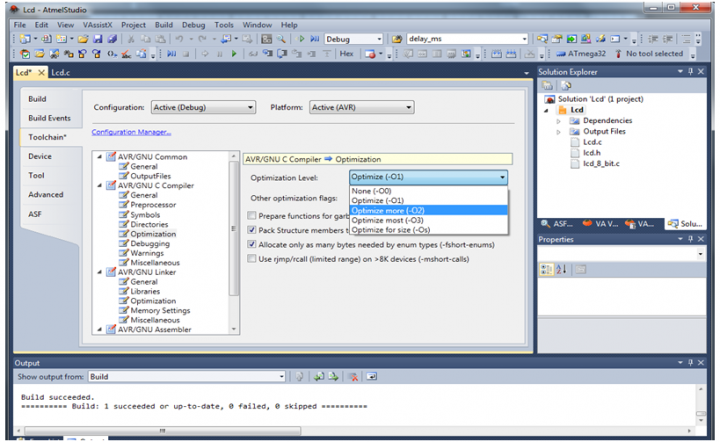
Step 13: Configuring the optimization levels: Select the Optimization from ToolChain menu. Select the required optimization level from drop down. Refer WinAvr/Gcc documents for more optimization details.
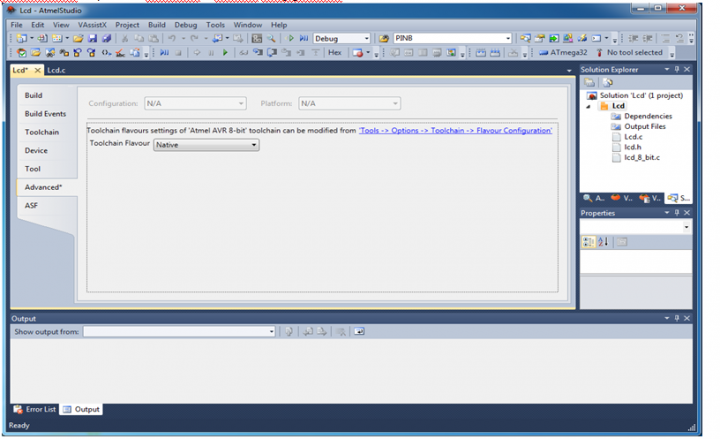
Step 14: Seletcting the targed tool chain : Select the Advanced option on the left side, now click the link shown in blue colour”Tools->Options->Toochain ->Flavour Configuretion“.
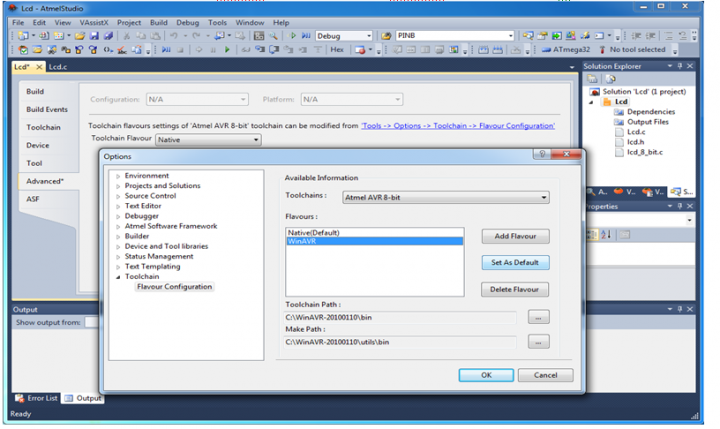
Step 15: From the drop down select WinAVR and set it as Default toolchain by clicking on “Set As Default”.
 <br\>
Note:
- Above two Steps( 14 & 15) needs to be performed for the first time, ie till the WinAVR is configured as default Toolchain .
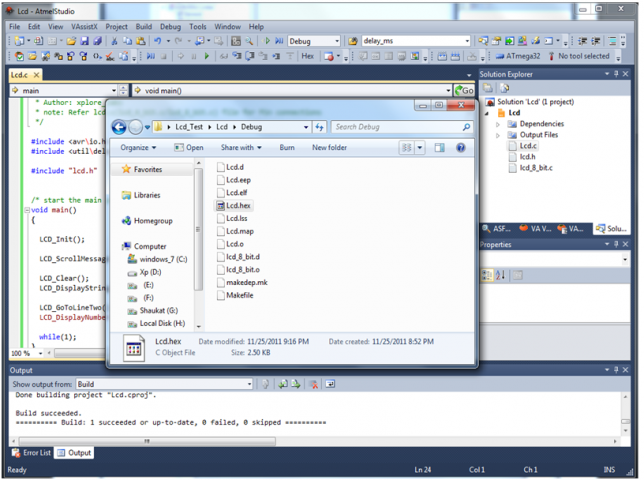
Step 16: Finally recompile after all configurations. Hex file will be generated with the project name in the selected Project->Debug folder.
