Difference between revisions of "PIC Internal Eeprom"
| (3 intermediate revisions by the same user not shown) | |||
| Line 1: | Line 1: | ||
[[Category:PIC Tutorials]] | [[Category:PIC Tutorials]] | ||
| − | In this tutorial we will discuss how to access the PIC16F877A internal EEPROM memory to store and retrieve the data. Eeprom is basically used to store the non volatile data which is required to be stored even if there is power loss or controller resets. | + | In this tutorial we will discuss how to access the PIC16F877A internal EEPROM memory to store and retrieve the data. Eeprom is basically used to store the non volatile data which is required to be stored even if there is power loss or controller resets. |
| + | [[FILE:Pic16f877a_Eeprom.png]] | ||
=PIC16F877A Memories= | =PIC16F877A Memories= | ||
| Line 85: | Line 86: | ||
<script src="https://gist.github.com/SaheblalBagwan/fbe889e4d93ee9b2af5ccc1e5a03e7f7.js"></script> | <script src="https://gist.github.com/SaheblalBagwan/fbe889e4d93ee9b2af5ccc1e5a03e7f7.js"></script> | ||
</html> | </html> | ||
| + | <br><br> | ||
=Code= | =Code= | ||
| Line 91: | Line 93: | ||
<script src="https://gist.github.com/SaheblalBagwan/b1087ae6b897c9815e0d59f410039ae1.js"></script> | <script src="https://gist.github.com/SaheblalBagwan/b1087ae6b897c9815e0d59f410039ae1.js"></script> | ||
</html> | </html> | ||
| + | |||
| + | [[FILE:Pic16f877a_EepromOutput.png]] | ||
| + | <br><br> | ||
| + | |||
| + | =Downloads= | ||
| + | Download the complete project folder from the below link:<br> | ||
| + | [https://github.com/ExploreEmbedded/Pic16f877a_ExploreUltraPicDevKit/archive/master.zip Hardware design Files and Code Library] | ||
| + | |||
| + | |||
| + | Have a opinion, suggestion , question or feedback about the article let it out here! | ||
| + | {{DISQUS}} | ||
Latest revision as of 11:21, 24 May 2016
In this tutorial we will discuss how to access the PIC16F877A internal EEPROM memory to store and retrieve the data. Eeprom is basically used to store the non volatile data which is required to be stored even if there is power loss or controller resets.

Contents
PIC16F877A Memories
PIC16F877A comes with three memories Flash,RAM and EEPROM. Below table shows the memory capacity of PIC16F877A:
| Memory | Size | Description |
|---|---|---|
| FLASH | 8k-bytes | Used to store the programs |
| RAM | 368-bytes | Temporary/ScratchPad memory used during program execution. |
| EEPROM | 256-bytes | Used to store the non-volatile data across power cycles |
EEPROM Registers
The below table shows the registers associated with PIC16F877A UART.
| Register | Description |
|---|---|
| EECON1 | Eeprom read/Write Control register |
| EECON2 | Used to execute special instruction sequence(0x55-0xAA) during write |
| EEDATA | Holds the data to be Written/Read to/from Eeprom. |
| EEADR | Hold the Eeprom memory address from where the data needs to be read/written. |
| EEPCON1 | |||||||
| 7 | 6 | 5 | 4 | 3 | 2 | 1 | 0 |
| EEPGD | - | - | - | WRERR | WREN | WR | RD |
EEPGD: Program/Data EEPROM Select bit
1 = Accesses program memory
0 = Accesses data memory
WRERR: EEPROM Error Flag bit
1 = A write operation is prematurely terminated
0 = The write operation completed
WREN: EEPROM Write Enable bit
1 = Allows write cycles
0 = Inhibits write to the EEPROM
WR: Write Control bit
1 = Initiates a write cycle. The bit is cleared by hardware once write is complete. The WR bit can only be set (not cleared) in software.
0 = Write cycle to the EEPROM is complete
RD: Read Control bit
1 = Initiates an EEPROM read; RD is cleared in hardware. The RD bit can only be set (not cleared) in software.
0 = Does not initiate an EEPROM read
Steps For Eeprom Write
- Check the WR bit to see if a write is in progress and wait till it becomes zero.
- Write the address to EEADR. Make sure that the address is not larger than the memory size of the device.
- Write the 8-bit data value to be programmed in the EEDATA register.
- Clear the EEPGD bit to point to EEPROM data memory.
- Set the WREN bit to enable program operations.
- Disable interrupts (if enabled).
- Write 55h to EECON2
- Write AAh to EECON2
- Set the WR bit
- Restore the Interrupts.
- Clear the WREN bit to disable program operations.
Steps For Eeprom Read
- Check the WR bit to see if a write is in progress and wait till it becomes zero.
- Write the address to EEADR from where the data needs to be read. Make sure that the address is not larger than the memory size of the device.
- Set the RD bit to start the read operation
- Read the data from the EEDATA register.
Code
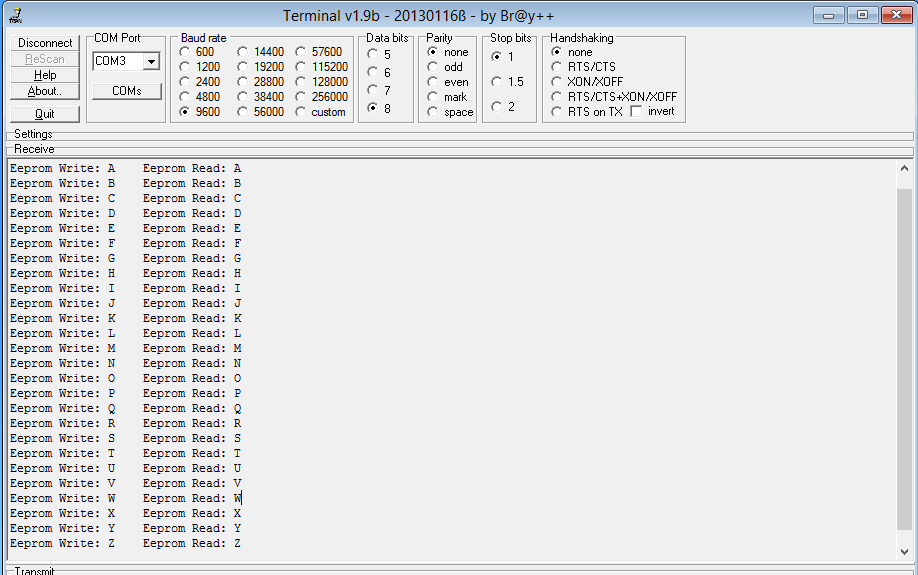
Lets put all together whatever we have discussed and write a simple program to write the data(A-Z) to eeprom and then read it back.
Downloads
Download the complete project folder from the below link:
Hardware design Files and Code Library
Have a opinion, suggestion , question or feedback about the article let it out here!

