Difference between revisions of "AVR Interfacing:Hex Kepad"
m (Sandeep moved page A2.AVR Interfacing:Hex Kepad to AVR Interfacing:Hex Kepad) |
Raghavendra (Talk | contribs) |
||
| (12 intermediate revisions by 2 users not shown) | |||
| Line 1: | Line 1: | ||
[[Category:AVR Tutorials]] | [[Category:AVR Tutorials]] | ||
| − | [ | + | Let's look at interfacing a Hex keypad, the one with 16 switches; arranged in 4 columns and 4 rows. The interesting challenge is to interface 16 switches on 8 pins. |
| + | So how does this work? The simple answer is the MCU is faster than the your fingers. | ||
| + | The code has been tested and demonstrated on Ultra AVR Dev Kit with Atmega32, however it should work on any AVR MCU with appropriate modifications. | ||
| + | =Basics= | ||
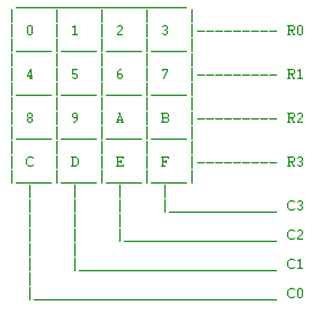
| + | Figure below shows the way in which the keys of a hex hey pad are arranged. | ||
| + | [[File:Keypad.png|class="img center-block"]] | ||
| − | [[File: | + | =Hook Up= |
| − | Code and | + | [[File:0 Keypad LCD bb.png|none]] |
| + | |||
| + | =Code= | ||
| + | <syntaxhighlight> | ||
| + | #include "keypad.h" | ||
| + | #include "lcd.h" | ||
| + | int main() | ||
| + | { | ||
| + | uint8_t key; | ||
| + | |||
| + | /*Connect RS->PB0, RW->PB1, EN->PB2 and data bus PORTB.4 to PORTB.7*/ | ||
| + | LCD_SetUp(PB_0,PB_1,PB_2,P_NC,P_NC,P_NC,P_NC,PB_4,PB_5,PB_6,PB_7); | ||
| + | LCD_Init(2,16); | ||
| + | |||
| + | /*Connect R1->PD0, R2->PD1, R3->PD2 R4->PD3, C1->PD4, C2->PD5 C3->PD6, C4->PD7 */ | ||
| + | KEYPAD_Init(PD_0,PD_1,PD_2,PD_3,PD_4,PD_5,PD_6,PD_7); | ||
| + | |||
| + | LCD_Printf("Key Pressed:"); | ||
| + | while (1) | ||
| + | { | ||
| + | key = KEYPAD_GetKey(); | ||
| + | LCD_GoToLine(1); | ||
| + | LCD_DisplayChar(key); | ||
| + | |||
| + | } | ||
| + | |||
| + | return (0); | ||
| + | } | ||
| + | |||
| + | </syntaxhighlight> | ||
| + | Let's look at the most important function in the code in a little more details | ||
| + | <syntaxhighlight> | ||
| + | key = KEYPAD_GetKey(); | ||
| + | </syntaxhighlight> | ||
| + | As you can guess, the function return the ASCII value of the key being pressed. | ||
| + | It follows the following sequences to decode the key pressed: | ||
| + | # Wait till the previous key is released. | ||
| + | # Wait for the new key press. | ||
| + | # Scan all the rows one at a time for the pressed key. | ||
| + | # Decodes the key pressed depending on ROW-COL combination and returns its ASCII value. | ||
| + | |||
| + | |||
| + | It is defined in ''keypad.c'' as below: | ||
| + | <syntaxhighlight> | ||
| + | uint8_t KEYPAD_GetKey(void) | ||
| + | { | ||
| + | uint8_t i,j,v_KeyPressed_u8 = 0; | ||
| + | |||
| + | |||
| + | keypad_WaitForKeyRelease(); | ||
| + | keypad_WaitForKeyPress(); | ||
| + | |||
| + | for (i=0;i<C_MaxRows_U8;i++) | ||
| + | { | ||
| + | GPIO_PinWrite(A_RowsPins_U8[i],HIGH); | ||
| + | } | ||
| + | |||
| + | for (i=0;(i<C_MaxRows_U8);i++) | ||
| + | { | ||
| + | GPIO_PinWrite(A_RowsPins_U8[i],LOW); | ||
| + | |||
| + | for(j=0; (j<C_MaxCols_U8); j++) | ||
| + | { | ||
| + | if(GPIO_PinRead(A_ColsPins_U8[j]) == 0) | ||
| + | { | ||
| + | v_KeyPressed_u8 = 1; | ||
| + | break; | ||
| + | } | ||
| + | } | ||
| + | |||
| + | if(v_KeyPressed_u8 ==1) | ||
| + | { | ||
| + | break; | ||
| + | } | ||
| + | |||
| + | GPIO_PinWrite(A_RowsPins_U8[i],HIGH); | ||
| + | } | ||
| + | |||
| + | if(i<C_MaxRows_U8) | ||
| + | v_KeyPressed_u8 = A_KeyLookUptable_U8[i][j]; | ||
| + | else | ||
| + | v_KeyPressed_u8 = C_DefaultKey_U8; | ||
| + | |||
| + | |||
| + | return v_KeyPressed_u8; | ||
| + | } | ||
| + | </syntaxhighlight> | ||
| + | |||
| + | [[File:0AVR InterfacingHex Kepad.gif|none]] | ||
| + | |||
| + | =Video Tutorial= | ||
| + | For those of you, who would like to watch instead of read we have made a video with all the gyan. | ||
| + | <br> | ||
| + | {{#ev:youtubehd|-lNAmSNV2-Q|640}} | ||
| + | |||
| + | |||
| + | = Downloads= | ||
| + | Download the complete project folder from the below link: | ||
| + | https://github.com/ExploreEmbedded/ATmega32_ExploreUltraAvrDevKit/archive/master.zip<br> | ||
| + | |||
| + | |||
| + | |||
| + | Have a opinion, suggestion , question or feedback about the article let it out here! | ||
| + | {{DISQUS}} | ||
Latest revision as of 11:30, 19 April 2016
Let's look at interfacing a Hex keypad, the one with 16 switches; arranged in 4 columns and 4 rows. The interesting challenge is to interface 16 switches on 8 pins. So how does this work? The simple answer is the MCU is faster than the your fingers. The code has been tested and demonstrated on Ultra AVR Dev Kit with Atmega32, however it should work on any AVR MCU with appropriate modifications.
Contents
Basics
Figure below shows the way in which the keys of a hex hey pad are arranged.

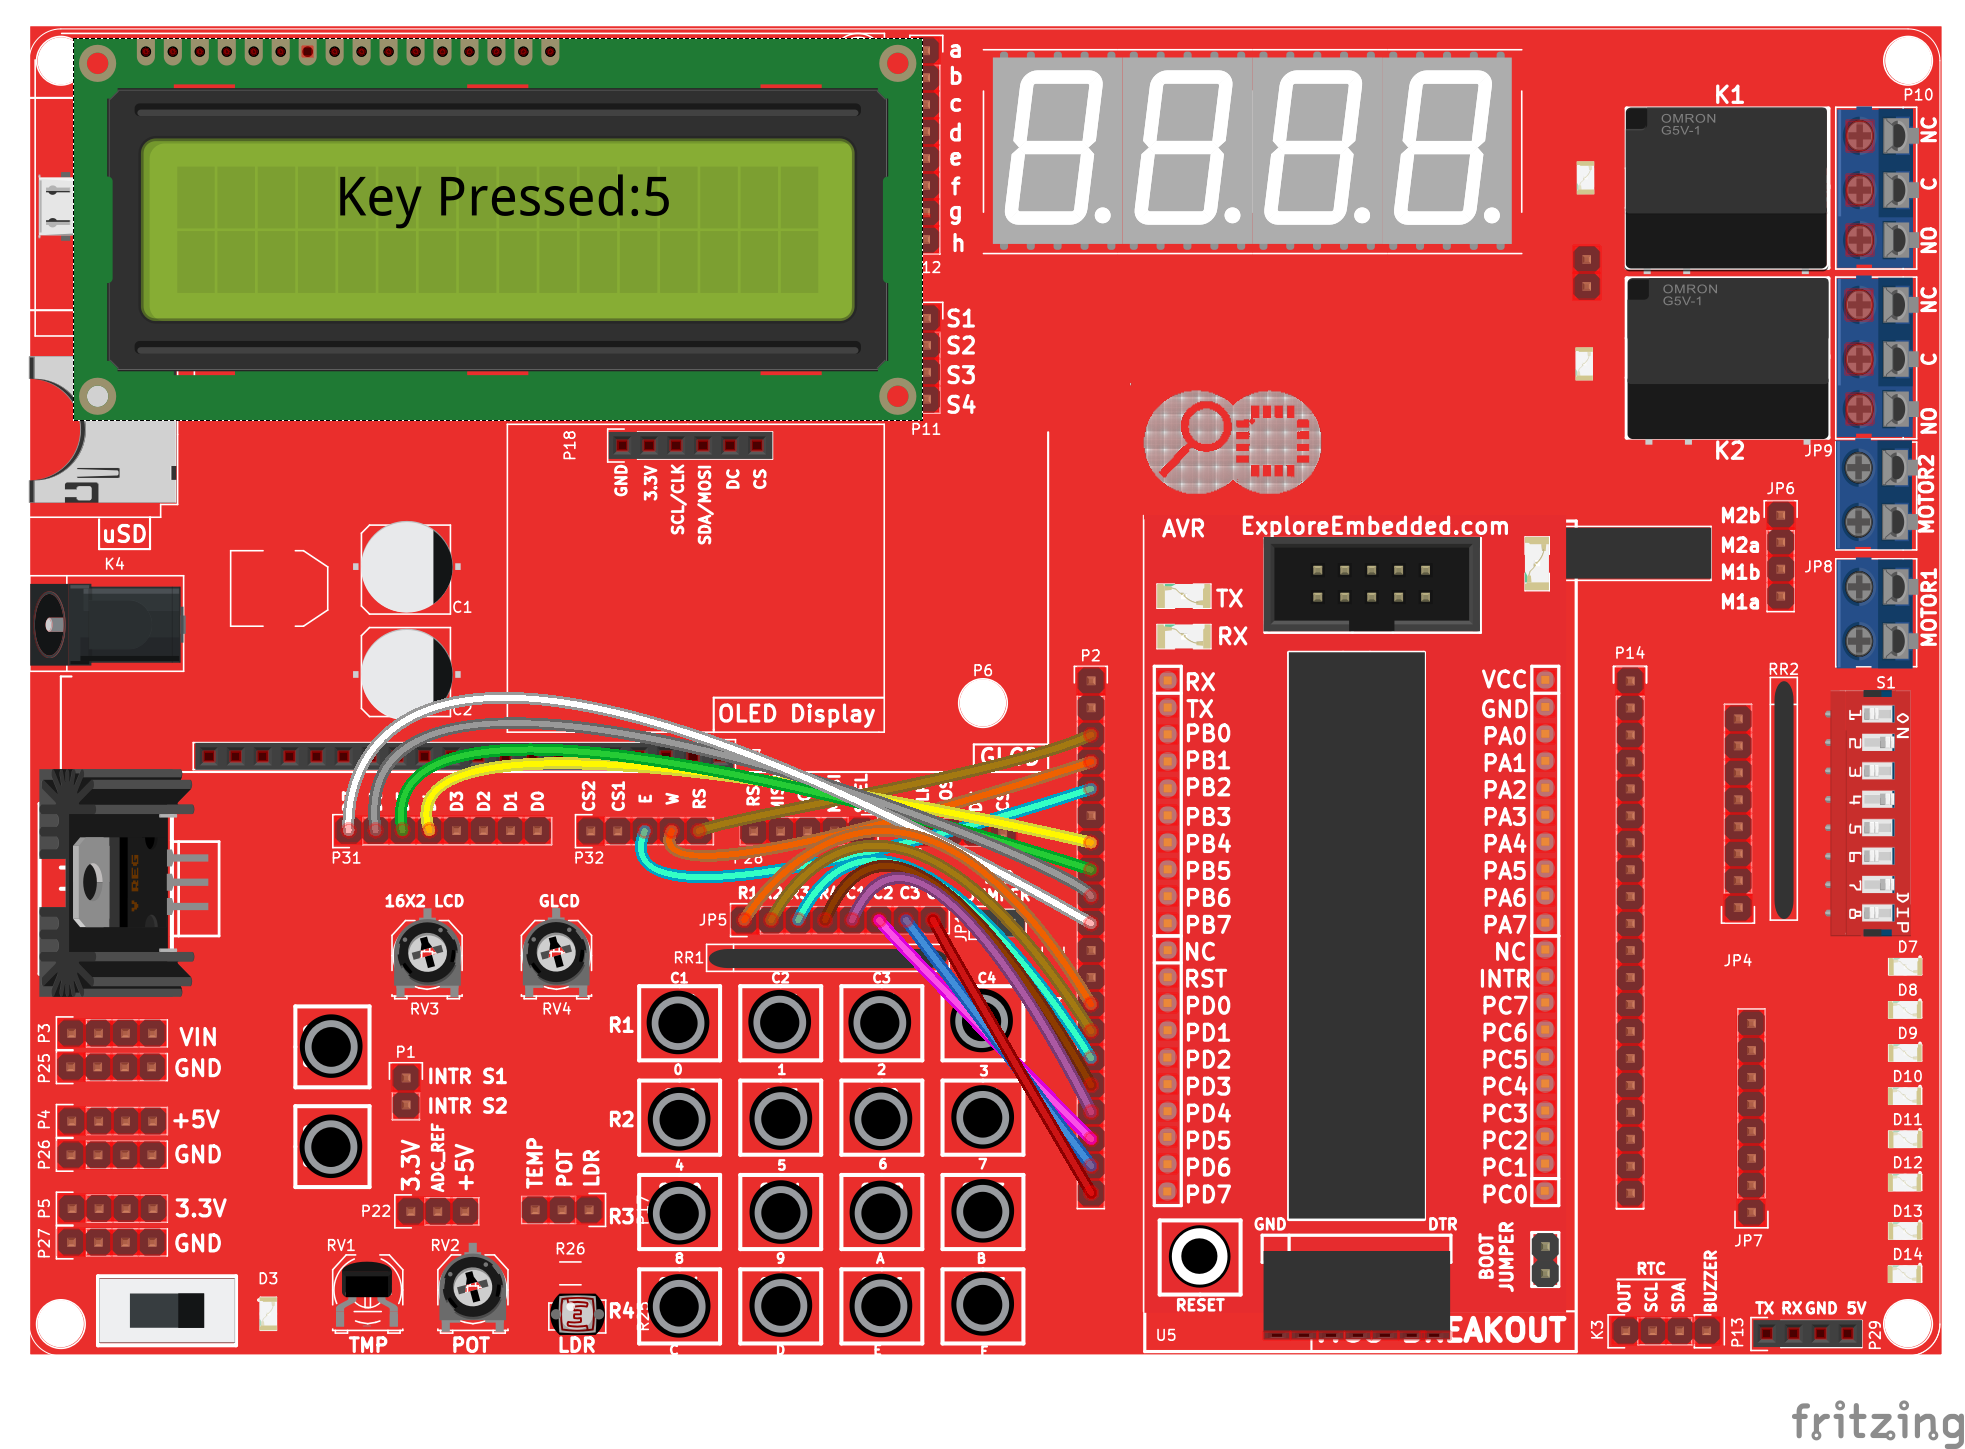
Hook Up
Code
#include "keypad.h"
#include "lcd.h"
int main()
{
    uint8_t key;

    /*Connect RS->PB0, RW->PB1, EN->PB2 and data bus PORTB.4 to PORTB.7*/
    LCD_SetUp(PB_0,PB_1,PB_2,P_NC,P_NC,P_NC,P_NC,PB_4,PB_5,PB_6,PB_7);
    LCD_Init(2,16);

	/*Connect R1->PD0, R2->PD1, R3->PD2 R4->PD3, C1->PD4, C2->PD5 C3->PD6, C4->PD7 */
    KEYPAD_Init(PD_0,PD_1,PD_2,PD_3,PD_4,PD_5,PD_6,PD_7);

    LCD_Printf("Key Pressed:");
    while (1)
    {
        key = KEYPAD_GetKey();
        LCD_GoToLine(1);
        LCD_DisplayChar(key);

    }

    return (0);
}
Let's look at the most important function in the code in a little more details
key = KEYPAD_GetKey();
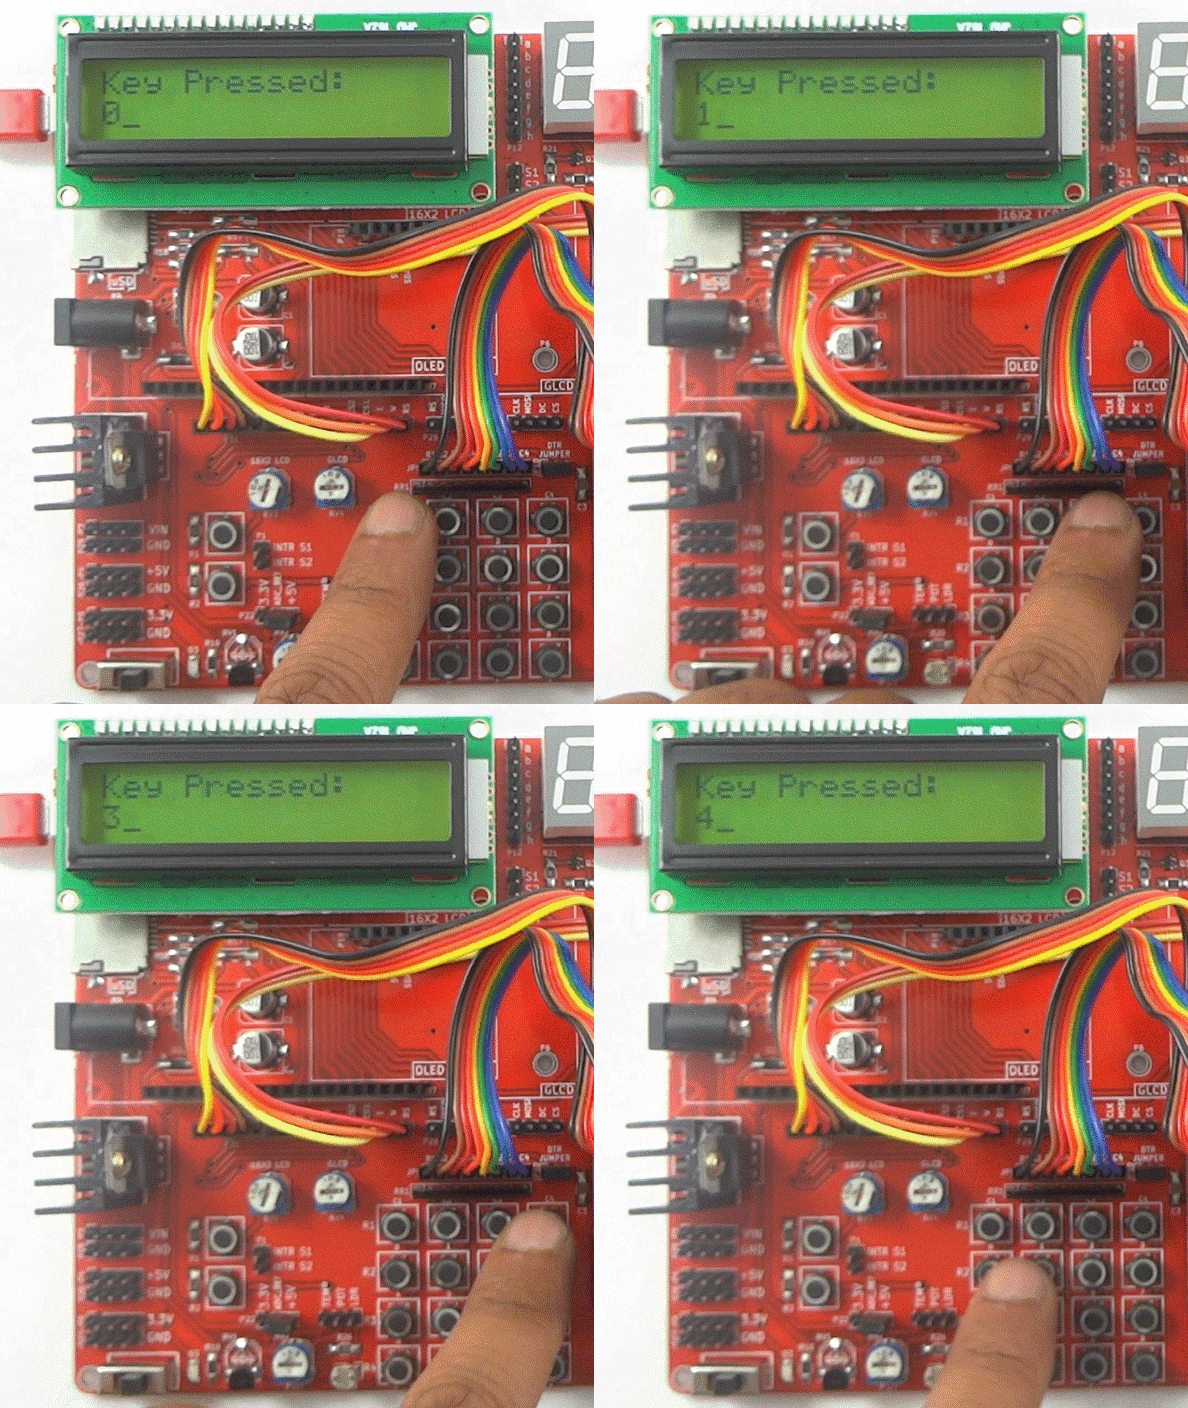
As you can guess, the function return the ASCII value of the key being pressed. It follows the following sequences to decode the key pressed:
- Wait till the previous key is released.
- Wait for the new key press.
- Scan all the rows one at a time for the pressed key.
- Decodes the key pressed depending on ROW-COL combination and returns its ASCII value.
It is defined in keypad.c as below:
uint8_t KEYPAD_GetKey(void)
{
    uint8_t i,j,v_KeyPressed_u8 = 0;


    keypad_WaitForKeyRelease();
    keypad_WaitForKeyPress();

    for (i=0;i<C_MaxRows_U8;i++)
    {
        GPIO_PinWrite(A_RowsPins_U8[i],HIGH);
    }

    for (i=0;(i<C_MaxRows_U8);i++)
    {
        GPIO_PinWrite(A_RowsPins_U8[i],LOW);

        for(j=0; (j<C_MaxCols_U8); j++)
        {
            if(GPIO_PinRead(A_ColsPins_U8[j]) == 0)
            {
                v_KeyPressed_u8 = 1;
                break;
            }
        }

        if(v_KeyPressed_u8 ==1)
        {
            break;
        }

        GPIO_PinWrite(A_RowsPins_U8[i],HIGH);
    }

    if(i<C_MaxRows_U8)
        v_KeyPressed_u8 = A_KeyLookUptable_U8[i][j];
    else
        v_KeyPressed_u8 = C_DefaultKey_U8;


    return v_KeyPressed_u8;
}
Video Tutorial
For those of you, who would like to watch instead of read we have made a video with all the gyan.
Downloads
Download the complete project folder from the below link:
https://github.com/ExploreEmbedded/ATmega32_ExploreUltraAvrDevKit/archive/master.zip
Have a opinion, suggestion , question or feedback about the article let it out here!


