Difference between revisions of "Distance Meter with Big Fonts"
| (2 intermediate revisions by the same user not shown) | |||
| Line 1: | Line 1: | ||
| + | <div class="col-md-12 col-sm-12 col-xs-12"> | ||
[[User:Guru|Guru]] ([[User talk:Guru|talk]]) 10:33, 14 October 2015 (IST) | [[User:Guru|Guru]] ([[User talk:Guru|talk]]) 10:33, 14 October 2015 (IST) | ||
---- | ---- | ||
| Line 28: | Line 29: | ||
==Wiring diagram== | ==Wiring diagram== | ||
| − | + | <html> | |
| + | <img class="img-responsive" src="https://exploreembedded.com/wiki/images/thumb/f/f8/Explore_Distance_meter.png/701px-Explore_Distance_meter.png"> | ||
| + | </html> | ||
==Arduino code for Distance Meter== | ==Arduino code for Distance Meter== | ||
| Line 40: | Line 43: | ||
==References and Credits== | ==References and Credits== | ||
* http://mikeyancey.com/hamcalc/lcd_characters.php | * http://mikeyancey.com/hamcalc/lcd_characters.php | ||
| − | + | </div> | |
{{DISQUS}} | {{DISQUS}} | ||
Latest revision as of 16:07, 23 February 2016
Guru (talk) 10:33, 14 October 2015 (IST)
In this simple tutorial, I will show you how to make a distance meter. It uses a ultrasonic sensor to read distance and display it in custom big fonts on a LCD display. It is powered up by a battery, so that you can take it around for a ride. We also plan to put up a case around it and make a kit. How does that sound?
Contents
Components/Boards Used
You'll require the components below to make it happen. Please consider buying them from the Explore Embedded Store to help us make all the awesome stuff.
| 1 | Explore One for Arduino | 
| |
| 2 | Character LCD 16 x 2 - White on Blue | 
| |
| 3 | HC-SR04 Ultrasonic Sensor Module | 
| |
| 4 | LCD Breakout Board for 16x1 16x2 20x4 128x64 | 
|
|
| 5 | Large Breadboard | 
|
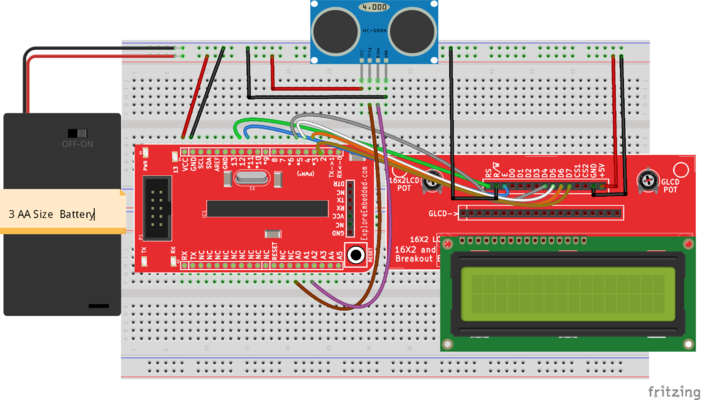
Wiring diagram

Arduino code for Distance Meter
Downloads
References and Credits

