Difference between revisions of "LCD 16 x 2 Basics"
m |
m |
||
| (5 intermediate revisions by the same user not shown) | |||
| Line 3: | Line 3: | ||
=Video Tutorial= | =Video Tutorial= | ||
| − | |||
| − | |||
| − | |||
| − | |||
=Introduction:LCD= | =Introduction:LCD= | ||
| Line 14: | Line 10: | ||
== LCD Internal Controller== | == LCD Internal Controller== | ||
| − | The LCD is a simple device to use but the internal details are complex. Most of the 16x2 LCDs use a '''Hitachi HD44780''' or a compatible controller. Yes, a micrcontroller is present inside a Liquid crystal display as shown in figure | + | The LCD is a simple device to use but the internal details are complex. Most of the 16x2 LCDs use a '''Hitachi HD44780''' or a compatible controller. Yes, a micrcontroller is present inside a Liquid crystal display as shown in figure 2. |
| − | The Display Controller takes commands and data from a external microcontroller and drivers the LCD panel'''(LCDP)'''. | + | The Display Controller takes commands and data from a external microcontroller and drivers the LCD panel '''(LCDP)'''. |
| − | It takes a ASCII value as input and generate a patter for the dot matrix. E.g., to display letter 'A', it takes its value '''0X42(hex)''' or '''66(dec)''' decodes it into a dot matrix of 5x7 as shown in figure | + | It takes a ASCII value as input and generate a patter for the dot matrix. E.g., to display letter 'A', it takes its value '''0X42(hex)''' or '''66(dec)''' decodes it into a dot matrix of 5x7 as shown in figure 1. |
| − | [[File: | + | |
| − | [[File: | + | [[File:LCD Char 5x7 Matrix.jpg|550px|framed|left|Fig 1: LCD Char 5x7 Matrix]] |
| + | [[File:HD44780U Block diagram.png|570x250px|framed|Fig 2: LCD Block diagram]] | ||
==Basic Commands== | ==Basic Commands== | ||
| Line 319: | Line 316: | ||
| 16 || Back-Light Cathode(-) | | 16 || Back-Light Cathode(-) | ||
|} | |} | ||
| − | |||
| − | |||
| − | |||
| − | |||
| − | = | + | ===Schematic=== |
| − | LCD can be interfaced with the | + | LCD can be interfaced with the micrcontroller in two modes, 8 bit and 4 bit. |
Let us Interface it in 8 bit mode first. | Let us Interface it in 8 bit mode first. | ||
| − | |||
| − | + | [[File:8051 LCD8BIT Interface.PNG|Fig 3: Schematic LCD 8 bit mode]] | |
| − | + | ||
| − | [[File: | + | |
| − | + | ||
| − | + | ||
| − | + | ||
| − | + | ||
*'''Data Lines:''' In this mode, all of the 8 datalines DB0 to DB7 are connected from the micrcontroller to a LCD module as shown the schematic. | *'''Data Lines:''' In this mode, all of the 8 datalines DB0 to DB7 are connected from the micrcontroller to a LCD module as shown the schematic. | ||
*'''Control Lines:'''' The RS, RW and E are control lines, as discussed earlier. | *'''Control Lines:'''' The RS, RW and E are control lines, as discussed earlier. | ||
*'''Power & contrast''':Apart from that the LCD should be powered with 5V between '''PIN 2(VCC)''' and '''PIN 1(gnd)'''. '''PIN 3''' is the contrast pin and is output of center terminal of potentiometer(voltage divider) which varies voltage between 0 to 5v to vary the contrast. | *'''Power & contrast''':Apart from that the LCD should be powered with 5V between '''PIN 2(VCC)''' and '''PIN 1(gnd)'''. '''PIN 3''' is the contrast pin and is output of center terminal of potentiometer(voltage divider) which varies voltage between 0 to 5v to vary the contrast. | ||
| − | *'''Back-light:''' The PIN 15 and 16 are used as backlight. The led backlight can be powered through a simple current limiting resistor as we do with normal leds. | + | *'''Back-light:''' The PIN 15 and 16 are used as backlight. The led backlight can be powered through a simple current limiting resistor as we do with normal leds. |
| − | + | ||
| − | + | ||
| − | + | ||
| − | + | ||
| − | + | ||
===Practical Example=== | ===Practical Example=== | ||
Latest revision as of 18:12, 21 March 2015
Contents
Video Tutorial
Introduction:LCD
Liquid Crystal Display(LCDs) provide a cost effective way to put a text output unit for a microcontroller. As we have seen in the previous tutorial, LEDs or 7 Segments do no have the flexibility to display informative messages. This display has 2 lines and can display 16 characters on each line. Nonetheless, when it is interfaced with the micrcontroller, we can scroll the messages with software to display information which is more than 16 characters in length.
LCD Internal Controller
The LCD is a simple device to use but the internal details are complex. Most of the 16x2 LCDs use a Hitachi HD44780 or a compatible controller. Yes, a micrcontroller is present inside a Liquid crystal display as shown in figure 2.
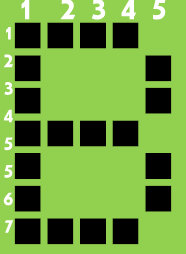
The Display Controller takes commands and data from a external microcontroller and drivers the LCD panel (LCDP). It takes a ASCII value as input and generate a patter for the dot matrix. E.g., to display letter 'A', it takes its value 0X42(hex) or 66(dec) decodes it into a dot matrix of 5x7 as shown in figure 1.
Basic Commands
The LCD controller uses RS and RW lines along with E to operate the LCD.
- Resister Select (RS): Determines weather a command(RS = 0) is sent (to set up the display) or actual data(RS=1) is sent.
- Read/Write RW=0; writes to the LCD. RW=1;Reads from the LCD.
The commonly used instructions are shown in the instruction set below. Observe the Bit names: I/D, S, D, C etc at the bottom of instruction set to decode the instructions completely.
- Clear Display
- Cursor Home
- Set Entry Mode
- Display on/off control
- Cursor/display shift
- Function Set
- Read Busy Flag
- Data Read
- Data Write
Instruction Set
| Instruction | Code | Description | ||||||||||
|---|---|---|---|---|---|---|---|---|---|---|---|---|
| RS | R/W | B7 | B6 | B5 | B4 | B3 | B2 | B1 | B0 | |||
| Clear display | 0 | 0 | 0 | 0 | 0 | 0 | 0 | 0 | 0 | 1 | Clears display and returns cursor to the home position (address 0). | |
| Cursor home | 0 | 0 | 0 | 0 | 0 | 0 | 0 | 0 | 1 | * | Returns cursor to home position. Also returns display being shifted to the original position. DDRAM content remains unchanged.
| |
| Entry mode set | 0 | 0 | 0 | 0 | 0 | 0 | 0 | 1 | I/D | S | Sets cursor move direction (I/D); specifies to shift the display (S). These operations are performed during data read/write.
| |
| Display on/off control | 0 | 0 | 0 | 0 | 0 | 0 | 1 | D | C | B | Sets on/off of all display (D), cursor on/off (C), and blink of cursor position character (B).
| |
| Cursor/display shift | 0 | 0 | 0 | 0 | 0 | 1 | S/C | R/L | * | * | Sets cursor-move or display-shift (S/C), shift direction (R/L). DDRAM content remains unchanged.
| |
| Function set | 0 | 0 | 0 | 0 | 1 | DL | N | F | * | * | Sets interface data length (DL), number of display line (N), and character font (F). | |
| Read busy flag & address counter |
0 | 1 | BF | CGRAM/DDRAM address | Reads busy flag (BF) indicating internal operation being performed and reads CGRAM or DDRAM address counter contents (depending on previous instruction). | |||||||
| Write CGRAM or DDRAM |
1 | 0 | Write Data | Write data to CGRAM or DDRAM. | ||||||||
| Write CGRAM or DDRAM |
1 | 0 | Write Data | Write data to CGRAM or DDRAM. | ||||||||
| Instruction bit names — I/D - 0 = decrement cursor position, 1 = increment cursor position; S - 0 = no display shift, 1 = display shift; | ||||||||||||
LCD UNIT
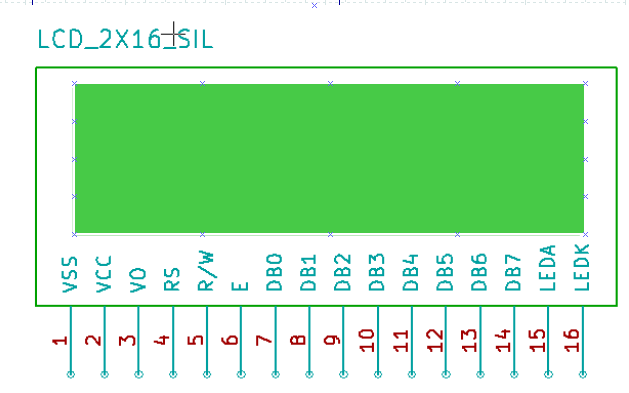
Let us look at a pin diagram of a commercially available LCD like JHD162 which uses a HD44780 controller and then describe its operation.
All the pins are identically to the lcd internal controller discussed above
| PIN NUMBER | FUNCTION |
|---|---|
| 1 | Ground |
| 2 | VCC |
| 3 | Contrast adjustment (VO) |
| 4 | Register Select (RS). RS=0: Command, RS=1: Data |
| 5 | Read/Write (R/W). R/W=0: Write, R/W=1: Read |
| 6 | Clock (Enable). Falling edge triggered |
| 7 | Bit 0 (Not used in 4-bit operation) |
| 8 | Bit 1 (Not used in 4-bit operation) |
| 9 | Bit 2 (Not used in 4-bit operation) |
| 10 | Bit 3 (Not used in 4-bit operation) |
| 11 | Bit 4 |
| 12 | Bit 5 |
| 13 | Bit 6 |
| 14 | Bit 7 |
| 15 | Back-light Anode(+) |
| 16 | Back-Light Cathode(-) |
Schematic
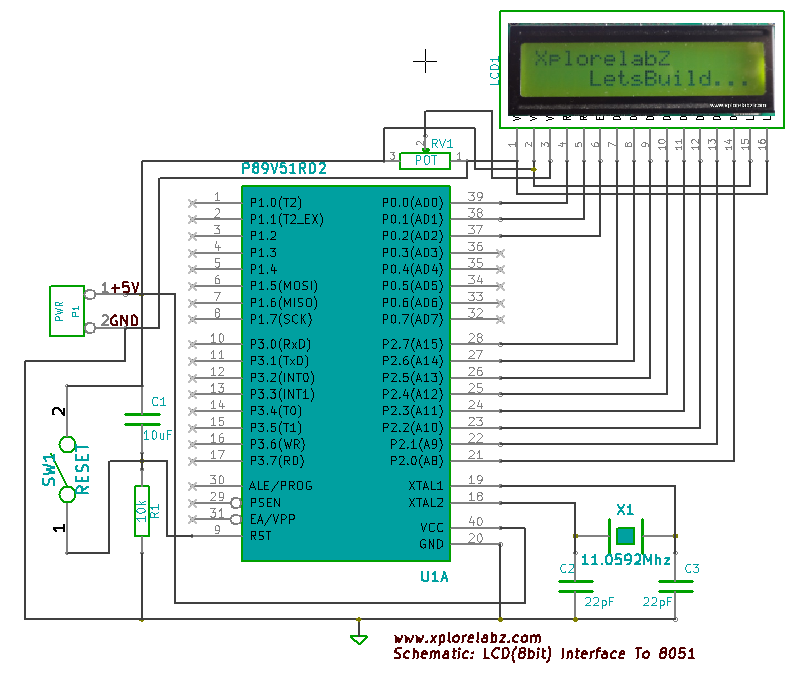
LCD can be interfaced with the micrcontroller in two modes, 8 bit and 4 bit. Let us Interface it in 8 bit mode first.
- Data Lines: In this mode, all of the 8 datalines DB0 to DB7 are connected from the micrcontroller to a LCD module as shown the schematic.
- Control Lines:' The RS, RW and E are control lines, as discussed earlier.
- Power & contrast:Apart from that the LCD should be powered with 5V between PIN 2(VCC) and PIN 1(gnd). PIN 3 is the contrast pin and is output of center terminal of potentiometer(voltage divider) which varies voltage between 0 to 5v to vary the contrast.
- Back-light: The PIN 15 and 16 are used as backlight. The led backlight can be powered through a simple current limiting resistor as we do with normal leds.
Practical Example
Have a opinion, suggestion , question or feedback about the article let it out here!


