Difference between revisions of "Setting up Eclipse for ESP-IDF"
| (17 intermediate revisions by the same user not shown) | |||
| Line 1: | Line 1: | ||
[[category:ESP32 BareMetal]] | [[category:ESP32 BareMetal]] | ||
| − | + | ||
Eclipse offers a very good development environment with numerous features, however setting it correctly is sometimes frustrating. Once it is done, it make the workflow quite simple. So let's set it up and see how it goes! | Eclipse offers a very good development environment with numerous features, however setting it correctly is sometimes frustrating. Once it is done, it make the workflow quite simple. So let's set it up and see how it goes! | ||
The first thing that needs to be done is to set-up ESP-IDF and ensure that all the dependencies are taken care of. [[Setting_up_Bare_Metal_Development_Toolchain_for_ESP32|Check the detailed tutorial on setting up ESP-IDF to get that done.]] | The first thing that needs to be done is to set-up ESP-IDF and ensure that all the dependencies are taken care of. [[Setting_up_Bare_Metal_Development_Toolchain_for_ESP32|Check the detailed tutorial on setting up ESP-IDF to get that done.]] | ||
| − | The ESP-IDF is setup in such a way that you can develop your application without modifying the ESP-IDF files. The application can reside in a completely separate directory from the ESP-IDF files. This allows the ESP-IDF core files to be updated independently of the application. We will be configuring the same ''' | + | [[File:0_eclipse_esp32.jpg]] |
| + | The ESP-IDF is setup in such a way that you can develop your application without modifying the ESP-IDF files. The application can reside in a completely separate directory from the ESP-IDF files. This allows the ESP-IDF core files to be updated independently of the application. We will be configuring the same '''01_hello_world''' example from the above tutorial. | ||
| + | <div class = "panel panel-danger"> | ||
| + | <div class = "panel-heading"> <p class= "fa fa-warning fa-4x"></p><p>Ensure that the tool-chain works from command line, before proceeding with this tutorial. In fact this tutorial uses the makefile setup from the previous tutorial to configure the tool-chain. </p> | ||
| + | </div> | ||
| + | </div> | ||
| + | |||
| + | =Download and Install Eclipse C/C++ IDE= | ||
To get started download the latest eclipse IDE for C/C++ | To get started download the latest eclipse IDE for C/C++ | ||
<syntaxhighlight> | <syntaxhighlight> | ||
| Line 12: | Line 19: | ||
</syntaxhighlight> | </syntaxhighlight> | ||
| − | + | =Create a New Project= | |
All the images below have steps marked with numbers, please perform them in a series. | All the images below have steps marked with numbers, please perform them in a series. | ||
| Line 21: | Line 28: | ||
# Enter the project Name as 01_hello_world | # Enter the project Name as 01_hello_world | ||
[[File:2_make_file_proj_esp32.JPG]] | [[File:2_make_file_proj_esp32.JPG]] | ||
| + | |||
| + | =Setup Environment Variables= | ||
| + | These variables are setup to tell eclipse where the tool-chain and the ESP-IDF core is located. | ||
| + | # Right Click on the Project Name. | ||
| + | # Select Properties. | ||
| + | <br /> | ||
| + | |||
[[File:3_proj_properties.jpg]] | [[File:3_proj_properties.jpg]] | ||
| + | <br/> | ||
| + | |||
| + | To add the environment variables: | ||
| + | # Expand ''C/C++ Build'' and click on ''Environment'' | ||
| + | # Click on the Add Button as shown below. Also notice that the IDE picks up some variable from the make file | ||
| + | <br/> | ||
[[File:4_env_variables.JPG]] | [[File:4_env_variables.JPG]] | ||
| + | |||
| + | Add the 3 variables as shown in the table below: | ||
| + | {| class="table table-striped" | ||
| + | |- | ||
| + | ! Variable !! Value !! Description | ||
| + | |- | ||
| + | | '''V''' || '''1'''|| Turns ON the verbose. The console shows a tons of messages that the build process outputs. <br/>You may turn it off later. It will be handy for troubleshooting. | ||
| + | |- | ||
| + | | '''IDF_PATH'''|| '''F:/esp32_bm/esp-idf'''|| This is path on my computer, put the path where you've downloaded the ESP-IDF | ||
| + | |- | ||
| + | |'''PATH'''|| '''C:\msys32\usr\bin;C:\msys32\mingw32\bin;C:\msys32\opt\xtensa-esp32-elf\bin''' ||Delete the existing value and replace it with this value | ||
| + | |} | ||
| + | |||
[[File:5_update_env_variables.JPG]] | [[File:5_update_env_variables.JPG]] | ||
| + | <br/> | ||
[[File:6_path_variables.JPG]] | [[File:6_path_variables.JPG]] | ||
| + | |||
| + | =Setup Build Variables= | ||
[[File:7_build_cmd.JPG]] | [[File:7_build_cmd.JPG]] | ||
| + | |||
| + | # Click on '''''C/C++ General''''' | ||
| + | # Then Click on '''''Preprocessor Include Paths''''' | ||
| + | # Now ''tick'' the '''''CDT Cross GCC Built-in Compiler Settings''''' | ||
| + | # Add the value '''''xtensa-esp32-elf-gcc ${FLAGS} -E -P -v -dD "${INPUTS}''''' | ||
[[File:9_compiler_settings.JPG]] | [[File:9_compiler_settings.JPG]] | ||
| + | |||
| + | We do similar step for build parser output like so: | ||
| + | # Click on '''''C/C++ General''''' | ||
| + | # Then Click on '''''Preprocessor Include Paths''''' | ||
| + | # Now ''tick'' the '''''CDT GCC Build Output Parser''''' | ||
| + | # Add the value '''''xtensa-esp32-elf-(g?cc)|([gc]\+\+)|(clang)''''' | ||
[[File:10_build_settings.JPG]] | [[File:10_build_settings.JPG]] | ||
| + | |||
| + | =Build/Compile the Project= | ||
| + | Add finally we '''right click''' on the project and select '''Build Project''' | ||
| + | <br/> | ||
| + | |||
[[File:11_build_proj.JPG]] | [[File:11_build_proj.JPG]] | ||
| + | <br/> | ||
| + | |||
| + | If everything we did has gone well so far, you'll see success. I messed up several times first to get it working and then while re-doing to capture the steps. | ||
| + | <br/> | ||
[[File:12_build_sucess.JPG]] | [[File:12_build_sucess.JPG]] | ||
| + | <br/> | ||
| + | Wait, do do you see some yellow exclamations there! These are files and folders eclipse is not able to find. So let's resolve these dependencies in the next step. | ||
=Resolving Dependencies= | =Resolving Dependencies= | ||
| + | * Click on ''C/C++ General'' this time, select ''Paths and Symbols'', under the ''includes tab click on ''Add..'' | ||
[[File:13_add_dependency_paths.JPG]] | [[File:13_add_dependency_paths.JPG]] | ||
| + | <br/> | ||
| + | |||
| + | Now add the following paths one by one. You may include more of these if you're project uses more ESP-IDF components. In the next tutorial I will try and cover the structure of the ESP-IDF and a simple example. | ||
| + | <syntaxhighlight> | ||
| + | ${IDF_PATH}/components/esp32/include | ||
| + | ${IDF_PATH}/components/newlib/include | ||
| + | ${IDF_PATH}/components/freertos/include | ||
| + | ${IDF_PATH}/components/nvs_flash/include | ||
| + | ${IDF_PATH}/components/driver/include | ||
| + | ${IDF_PATH}/components/log/include | ||
| + | </syntaxhighlight> | ||
[[File:14_add_dependency_paths.JPG]] | [[File:14_add_dependency_paths.JPG]] | ||
| − | = | + | Okay, now check the exclamations, they are gone! |
| + | |||
| + | =Configure targets= | ||
| + | Are we done yet? NO, no hardware setup is done unless we '''''program/flash''''' the '''''target'''''. So let us configure two targets. Once to make '''all''' and other to '''flash'''. | ||
| + | |||
| + | Right Click on the Project, click on '''Build Targets''' and select '''Create..''' | ||
| + | |||
| + | <br/> | ||
[[File:15_targets.JPG]] | [[File:15_targets.JPG]] | ||
| + | <br/> | ||
| + | |||
| + | Finally its time to ''Flash'' the target. Ensure that the board is connected, and the correct com port is chosen from the menu | ||
[[File:16_target_flash.JPG]] | [[File:16_target_flash.JPG]] | ||
| + | |||
[[File:17_flash_success.JPG]] | [[File:17_flash_success.JPG]] | ||
| + | |||
| + | |||
| + | '''''We are building with ESP32, are you?'''''<br/> | ||
| + | [https://docs.google.com/forms/d/e/1FAIpQLSctDit51-u4OmfBGbxc0enECy7_3mYRsQswM52lOBp-lfIoNw/viewform Do sign-up here, if you want be posted about more of these tutorials.] | ||
| + | |||
=References= | =References= | ||
| + | * [https://github.com/espressif/esp-idf/blob/master/docs/eclipse-setup.rst ESP-IDF Eclipse Setup documentation.] | ||
| + | * Kolban Video | ||
| + | The steps above are for windows, similar and less steps can lead to setting up on Linux/Ubuntu and MAC OS. Check this detailed video by Kolban | ||
| + | <div class="row"> | ||
| + | <div class="col-sm-12"> | ||
| + | <div class="embed-responsive embed-responsive-16by9"> | ||
| + | <html> | ||
| + | <iframe class="embed-responsive-item" src="https://www.youtube.com/embed/bYh2w0HzS7s"></iframe> | ||
| + | </html> | ||
| + | </div> | ||
| + | </div> | ||
| + | |||
| + | |||
| + | |||
| + | {{DISQUS}} | ||
Latest revision as of 18:23, 23 December 2016
Eclipse offers a very good development environment with numerous features, however setting it correctly is sometimes frustrating. Once it is done, it make the workflow quite simple. So let's set it up and see how it goes!
The first thing that needs to be done is to set-up ESP-IDF and ensure that all the dependencies are taken care of. Check the detailed tutorial on setting up ESP-IDF to get that done.
 The ESP-IDF is setup in such a way that you can develop your application without modifying the ESP-IDF files. The application can reside in a completely separate directory from the ESP-IDF files. This allows the ESP-IDF core files to be updated independently of the application. We will be configuring the same 01_hello_world example from the above tutorial.
Ensure that the tool-chain works from command line, before proceeding with this tutorial. In fact this tutorial uses the makefile setup from the previous tutorial to configure the tool-chain.
Contents
Download and Install Eclipse C/C++ IDE
To get started download the latest eclipse IDE for C/C++
http://www.eclipse.org/downloads/packages/eclipse-ide-cc-developers-includes-incubating-components/indigosr2
Create a New Project
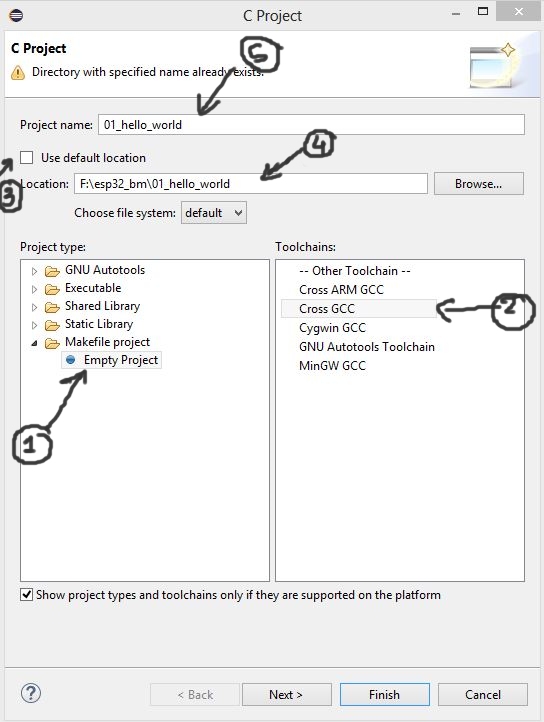
All the images below have steps marked with numbers, please perform them in a series. To start with
- Select the project type as Empty Project
- Toolchains as Cross GCC
- Uncheck Use Default Location
- Enter the project Name as 01_hello_world
Setup Environment Variables
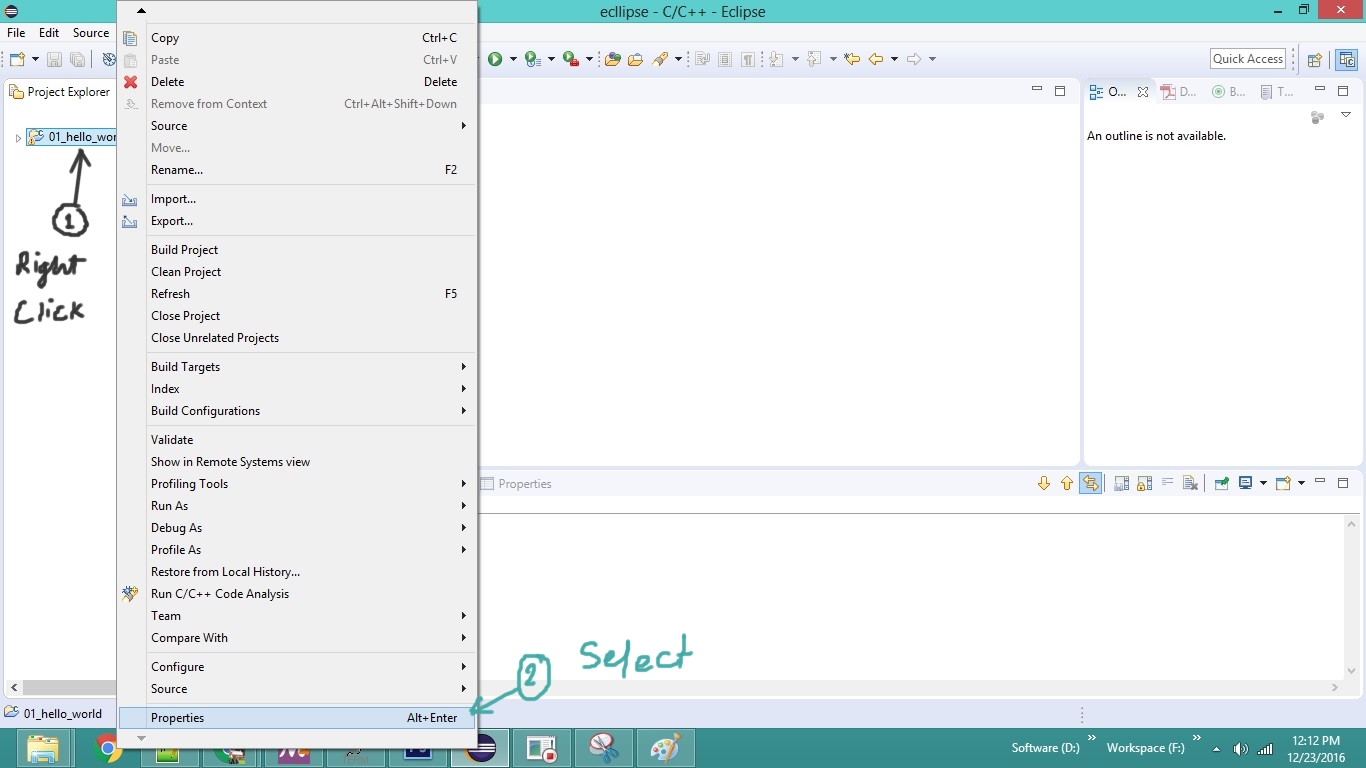
These variables are setup to tell eclipse where the tool-chain and the ESP-IDF core is located.
- Right Click on the Project Name.
- Select Properties.
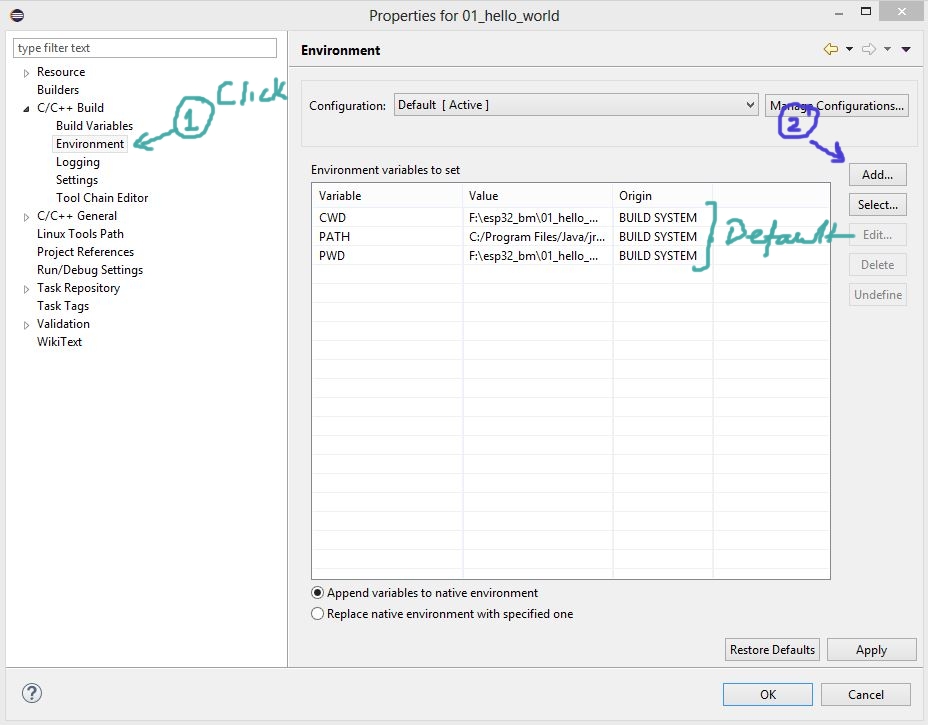
To add the environment variables:
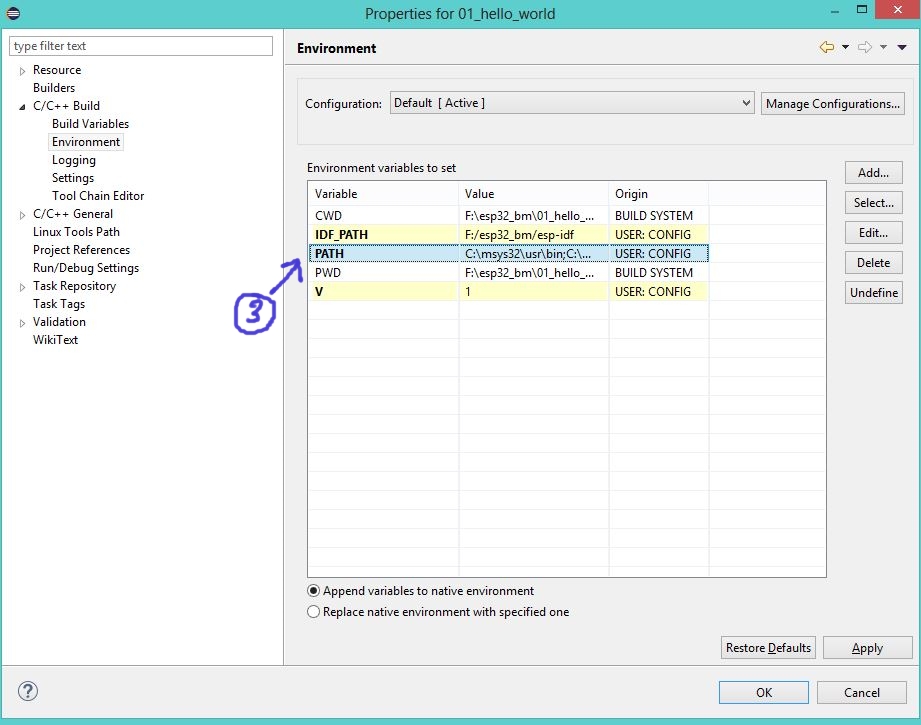
- Expand C/C++ Build and click on Environment
- Click on the Add Button as shown below. Also notice that the IDE picks up some variable from the make file
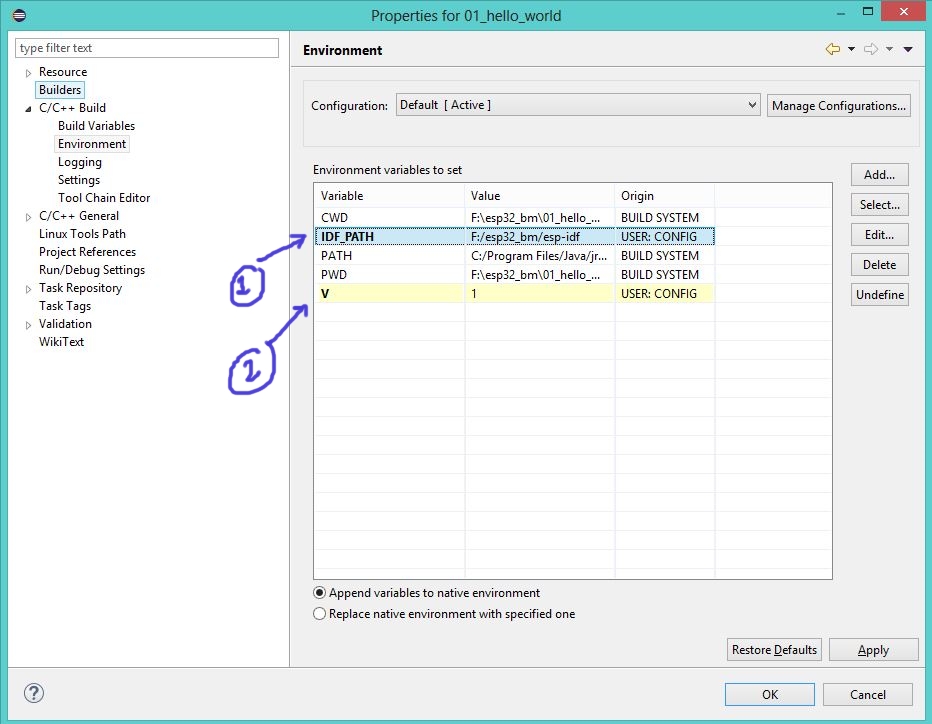
Add the 3 variables as shown in the table below:
| Variable | Value | Description |
|---|---|---|
| V | 1 | Turns ON the verbose. The console shows a tons of messages that the build process outputs. You may turn it off later. It will be handy for troubleshooting. |
| IDF_PATH | F:/esp32_bm/esp-idf | This is path on my computer, put the path where you've downloaded the ESP-IDF |
| PATH | C:\msys32\usr\bin;C:\msys32\mingw32\bin;C:\msys32\opt\xtensa-esp32-elf\bin | Delete the existing value and replace it with this value |
Setup Build Variables
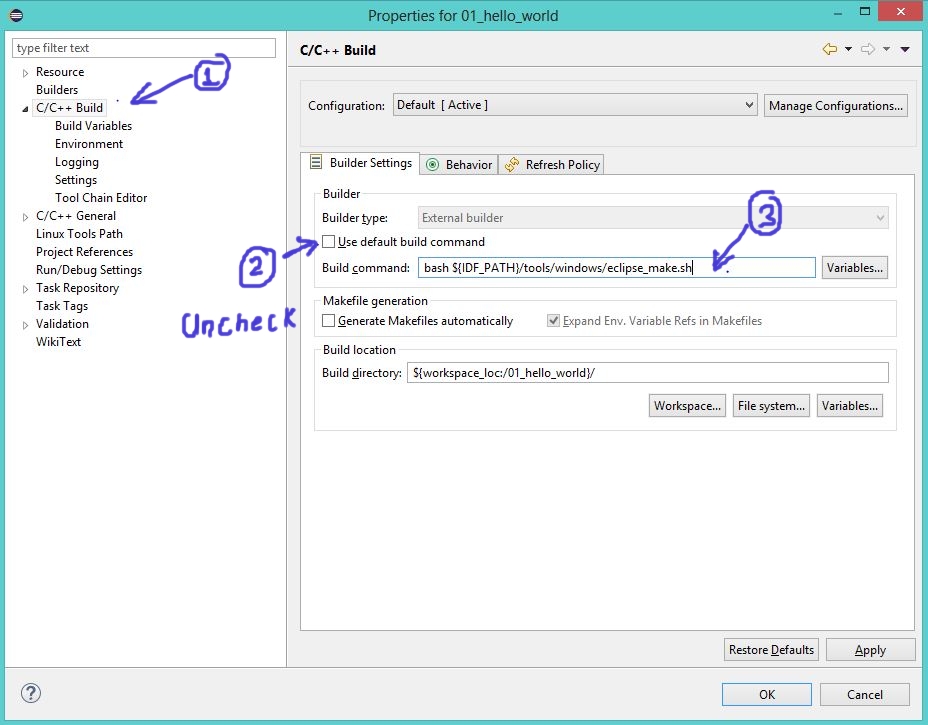
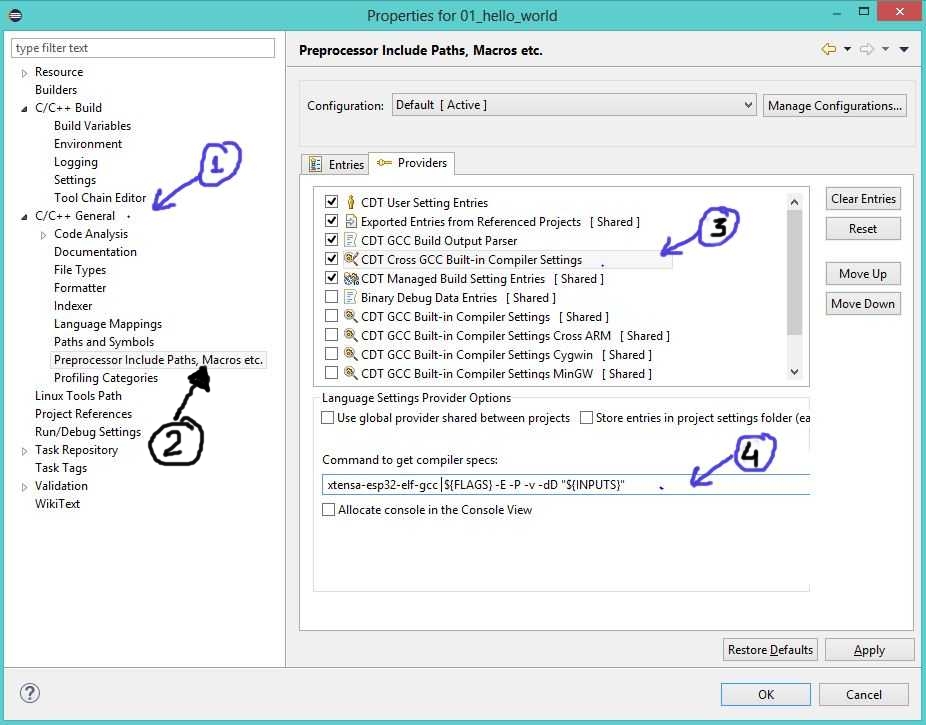
- Click on C/C++ General
- Then Click on Preprocessor Include Paths
- Now tick the CDT Cross GCC Built-in Compiler Settings
- Add the value xtensa-esp32-elf-gcc ${FLAGS} -E -P -v -dD "${INPUTS}
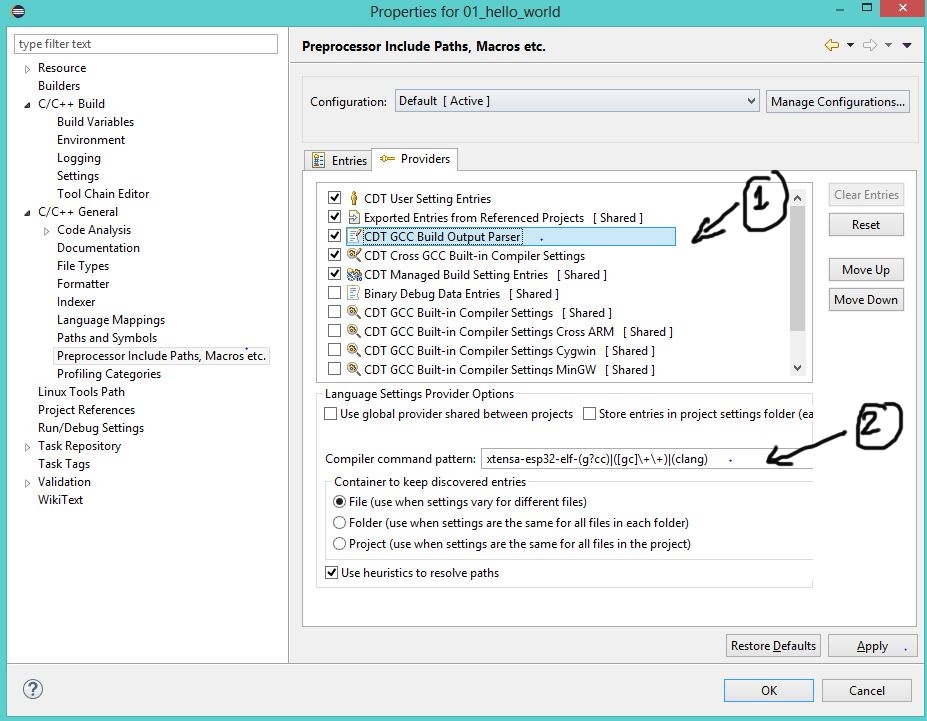
We do similar step for build parser output like so:
- Click on C/C++ General
- Then Click on Preprocessor Include Paths
- Now tick the CDT GCC Build Output Parser
- Add the value xtensa-esp32-elf-(g?cc)|([gc]\+\+)|(clang)
Build/Compile the Project
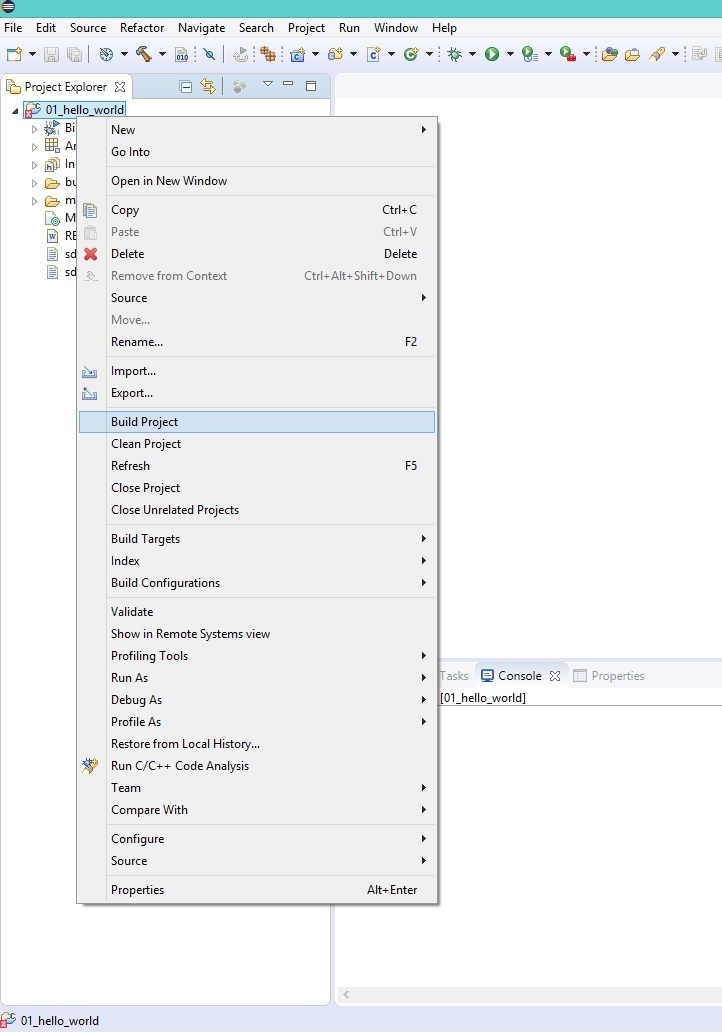
Add finally we right click on the project and select Build Project
If everything we did has gone well so far, you'll see success. I messed up several times first to get it working and then while re-doing to capture the steps.
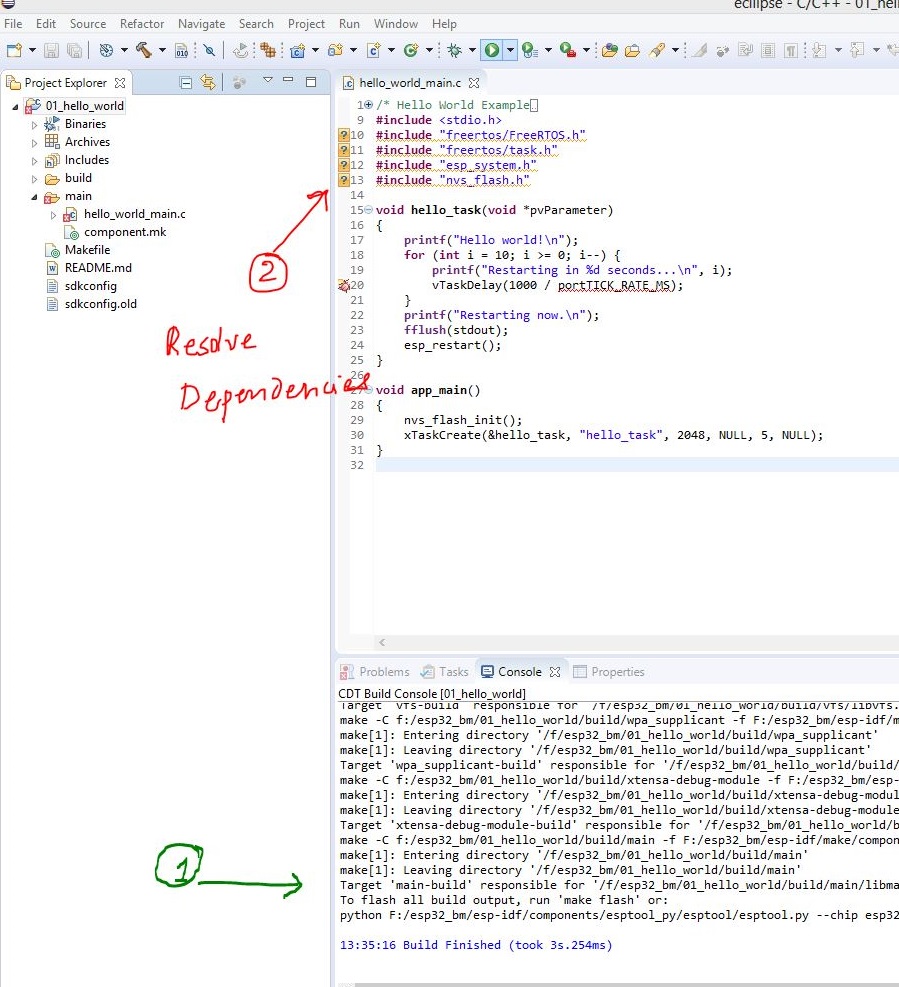
Wait, do do you see some yellow exclamations there! These are files and folders eclipse is not able to find. So let's resolve these dependencies in the next step.
Resolving Dependencies
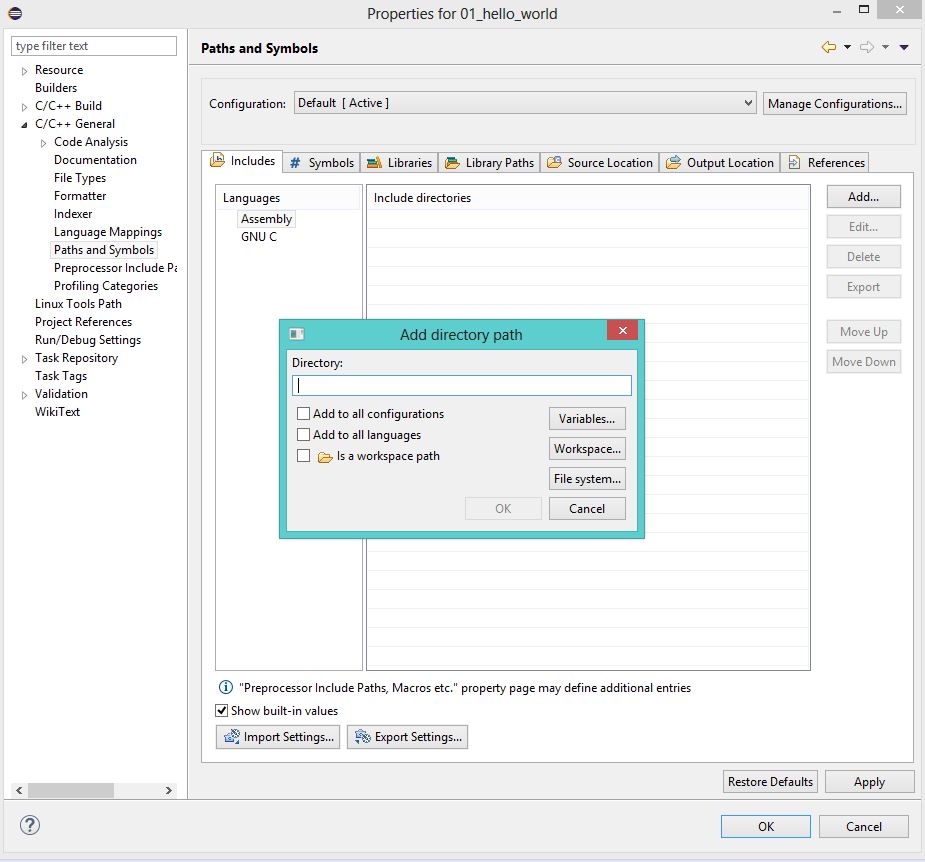
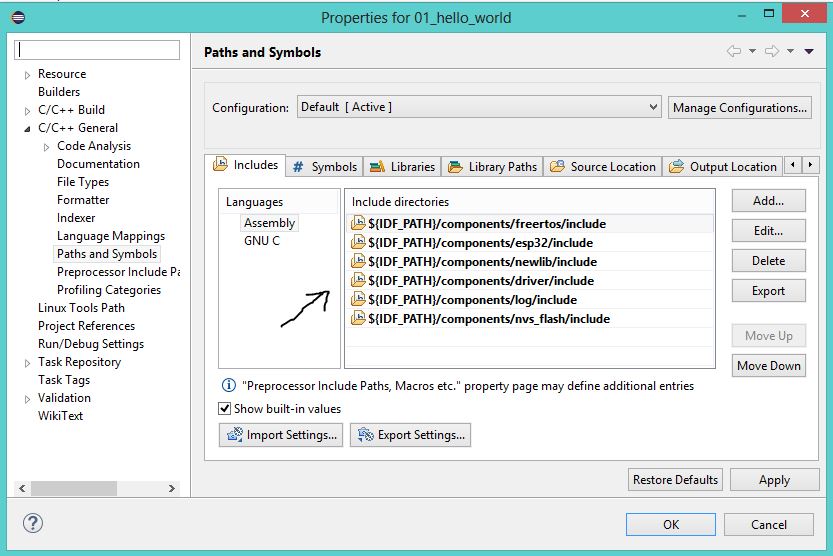
- Click on C/C++ General this time, select Paths and Symbols, under the includes tab click on Add..
Now add the following paths one by one. You may include more of these if you're project uses more ESP-IDF components. In the next tutorial I will try and cover the structure of the ESP-IDF and a simple example.
${IDF_PATH}/components/esp32/include
${IDF_PATH}/components/newlib/include
${IDF_PATH}/components/freertos/include
${IDF_PATH}/components/nvs_flash/include
${IDF_PATH}/components/driver/include
${IDF_PATH}/components/log/include
Configure targets
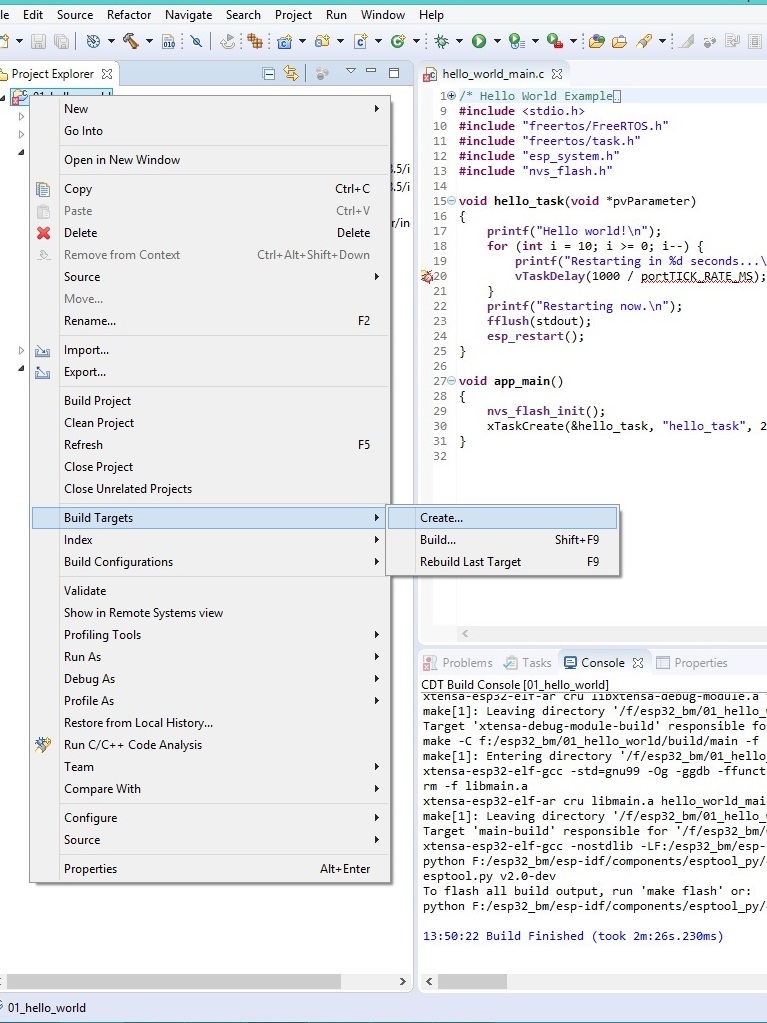
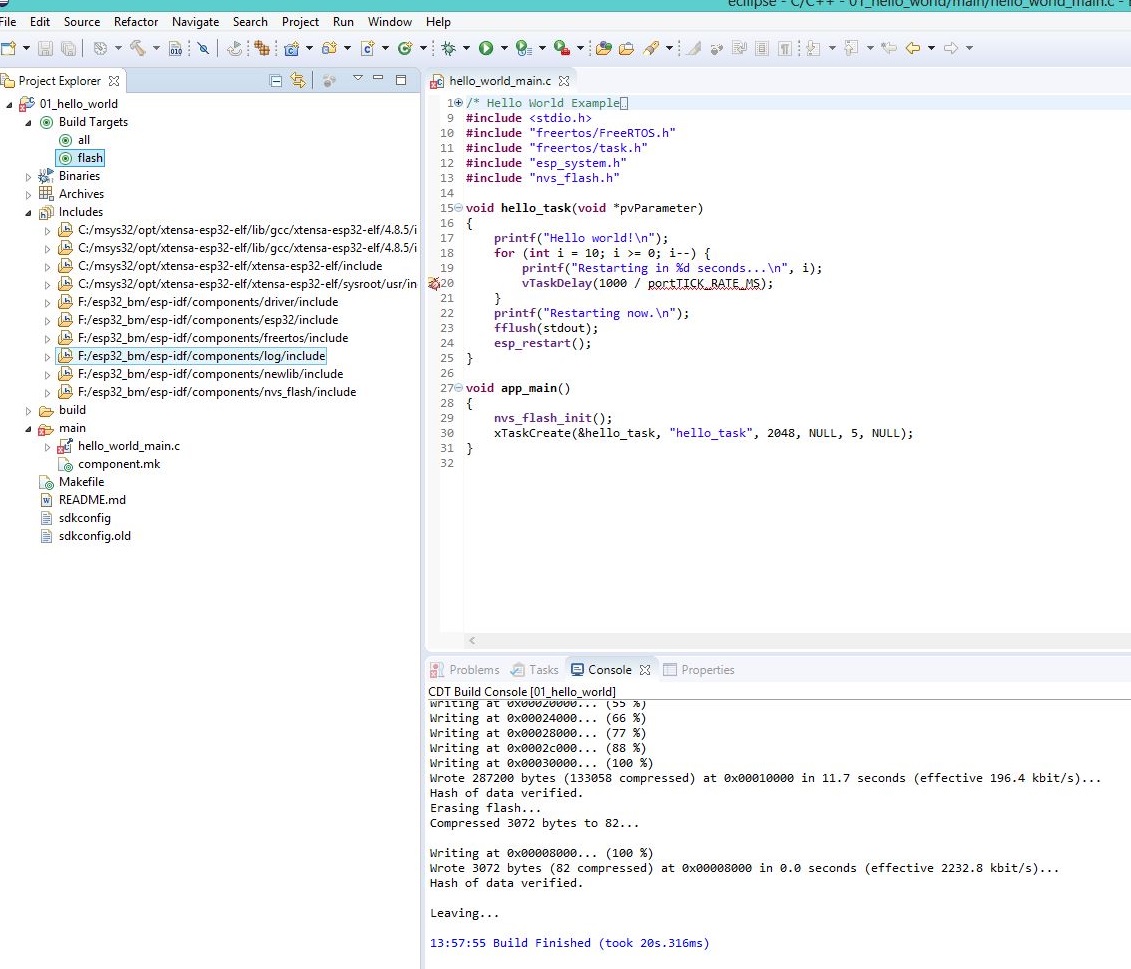
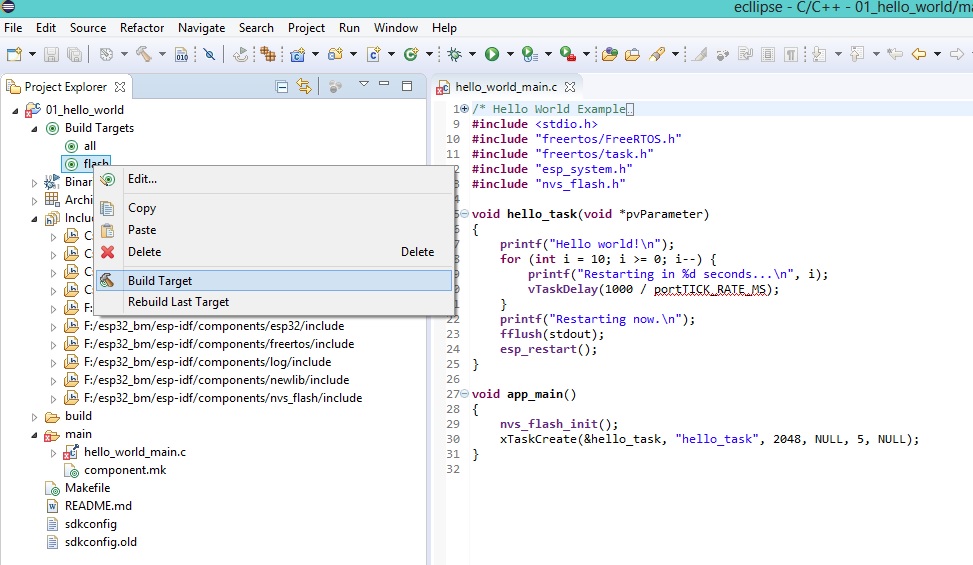
Are we done yet? NO, no hardware setup is done unless we program/flash the target. So let us configure two targets. Once to make all and other to flash.
Right Click on the Project, click on Build Targets and select Create..
Finally its time to Flash the target. Ensure that the board is connected, and the correct com port is chosen from the menu
We are building with ESP32, are you?
Do sign-up here, if you want be posted about more of these tutorials.
References
- ESP-IDF Eclipse Setup documentation.
- Kolban Video
The steps above are for windows, similar and less steps can lead to setting up on Linux/Ubuntu and MAC OS. Check this detailed video by Kolban

