Difference between revisions of "Task Idle Hook"
| (One intermediate revision by one other user not shown) | |||
| Line 2: | Line 2: | ||
In the earlier example, we created 2 high priority task and an Idle task.<br> | In the earlier example, we created 2 high priority task and an Idle task.<br> | ||
In this tutorial, we will see how to use the scheduler Idle task to run the user function.<br><br> | In this tutorial, we will see how to use the scheduler Idle task to run the user function.<br><br> | ||
| + | This can be used to monitor the system when there is no other work or tasks running. It can also be used to handle data given out by high priority tasks. | ||
=What is Idle Task= | =What is Idle Task= | ||
| Line 9: | Line 10: | ||
=Using Idle Task Hook= | =Using Idle Task Hook= | ||
| − | To use the Idle task, configUSE_IDLE_HOOK should be set to 1.<br> | + | To use the Idle task, '''configUSE_IDLE_HOOK''' should be set to 1.<br> |
| − | In Arduino the loop() function is hooked to freeRtos Idle Task and will be called whenever the scheduler runs its Idle Task.<br><br> | + | In Arduino the '''loop()''' function is hooked to freeRtos Idle Task and will be called whenever the scheduler runs its Idle Task.<br><br> |
=Example= | =Example= | ||
In this example, we are going to create 2-Tasks with different priorities.<br> | In this example, we are going to create 2-Tasks with different priorities.<br> | ||
| − | Each task will run for some time and then goes to blocked state allowing the other tasks to run. Once the waiting time is elapsed the scheduler will bring the task to ready state and eventually | + | Each task will run for some time and then goes to blocked state allowing the other tasks to run. Once the waiting time is elapsed the scheduler will bring the task to ready state and eventually to the run state, if its priority is higher compared to the currently running task. |
The loop() function will run whenever the CPU is idle. | The loop() function will run whenever the CPU is idle. | ||
<html><script src="https://gist.github.com/SaheblalBagwan/1497322b65b41211f626d1bc3c013521.js"></script> | <html><script src="https://gist.github.com/SaheblalBagwan/1497322b65b41211f626d1bc3c013521.js"></script> | ||
| Line 38: | Line 39: | ||
=Downlaods= | =Downlaods= | ||
| + | Download the complete project and libraries from [https://github.com/ExploreEmbedded/Arduino_FreeRTOS/archive/master.zip here].<br><br> | ||
Have an opinion, suggestion , question or feedback about the article let it out here! | Have an opinion, suggestion , question or feedback about the article let it out here! | ||
{{DISQUS}} | {{DISQUS}} | ||
Latest revision as of 11:49, 16 July 2016
In the earlier example, we created 2 high priority task and an Idle task.
In this tutorial, we will see how to use the scheduler Idle task to run the user function.
This can be used to monitor the system when there is no other work or tasks running. It can also be used to handle data given out by high priority tasks.
What is Idle Task
Idle task is automatically created when the scheduler starts.
When no tasks are available for the CPU then this task will run.
When a task is deleted, the memory used by it will not be free immediately. This will be done in the idle task.
Using Idle Task Hook
To use the Idle task, configUSE_IDLE_HOOK should be set to 1.
In Arduino the loop() function is hooked to freeRtos Idle Task and will be called whenever the scheduler runs its Idle Task.
Example
In this example, we are going to create 2-Tasks with different priorities.
Each task will run for some time and then goes to blocked state allowing the other tasks to run. Once the waiting time is elapsed the scheduler will bring the task to ready state and eventually to the run state, if its priority is higher compared to the currently running task.
The loop() function will run whenever the CPU is idle.
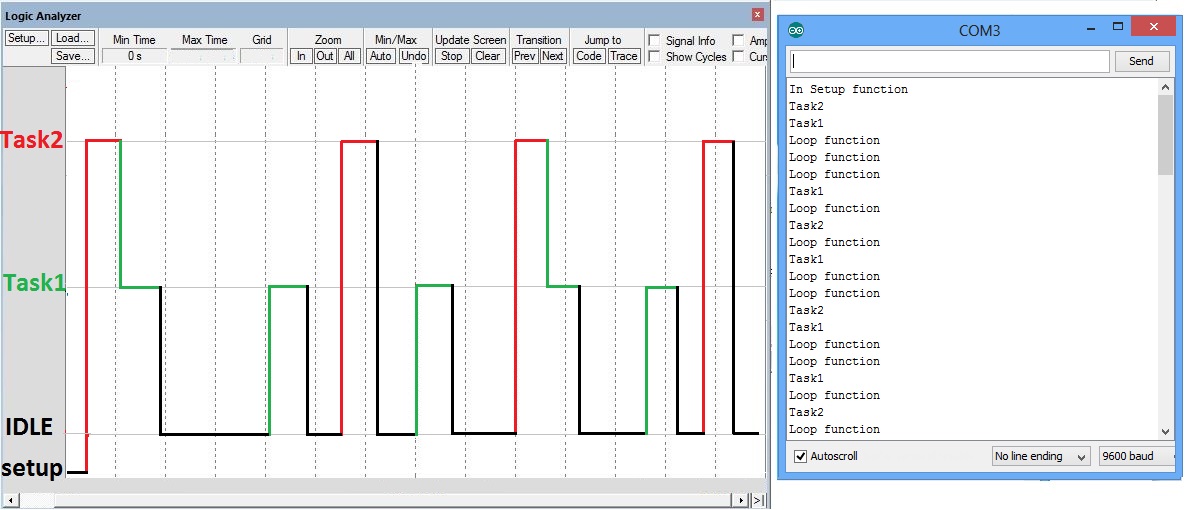
Output
- Note:: Here loop() function is hooked to scheduler Idle task and it will be considered as Idle task in below summary.
- The controller starts the execution from setup function. The Serial port is initialized at 9600 baud rate and setup message is printed.
- Later 3-Tasks(Task1, Task2 and Idle) are created in order with priorities 2,1,0. At the end of the Setup function, scheduler/kernel takes the control.
- There are 3-tasks in the Ready state and since Task2 has the highest priority it will run first and goes to block state for 150ms.
- Now 2-tasks are available for scheduler and it chooses Task1 as it is the available higher priority task.
- Now Task1 runs for some time and then goes to blocked state for 100ms.
- CPU is left out with the Idle task and it starts running.
- Task2 will be in blocked state for 150ms and task1 will 100ms. So task1 will come out of blocked state first.
- After Task1 waiting time is elapsed, it comes to the Ready state. Since it has got higher priority compared to the Idle task, it will preempt Idle task and starts running. It again goes to blocked state for 100ms.
- Now CPU is left out with IDLE task and it starts running it.
- After Task2 waiting time is elapsed, it comes to the Ready state. Since it has got higher priority compared to the Idle task, it will preempt Idle task and starts running. It again goes to blocked state for 150ms.
- Same thing continues.
Downlaods
Download the complete project and libraries from here.
Have an opinion, suggestion , question or feedback about the article let it out here!

