Difference between revisions of "Programming nRF51822 with STlink on Windows"
| (17 intermediate revisions by 2 users not shown) | |||
| Line 1: | Line 1: | ||
| + | <html> | ||
| + | <meta property="og:image" content="http://exploreembedded.com/wiki/File:K.png" /> | ||
| + | </html> | ||
| + | |||
[[User:Sandeep|Sandeep]] ([[User talk:Sandeep|talk]]) and | [[User:Sandeep|Sandeep]] ([[User talk:Sandeep|talk]]) and | ||
[[User:Vaibhav Katkar|Vaibhav Katkar]] ([[User talk:Vaibhav Katkar|talk]]) 17:43, 10 September 2015 (IST) | [[User:Vaibhav Katkar|Vaibhav Katkar]] ([[User talk:Vaibhav Katkar|talk]]) 17:43, 10 September 2015 (IST) | ||
| Line 5: | Line 9: | ||
==Configuring Open OCD== | ==Configuring Open OCD== | ||
| + | |||
| + | #Download OpenOCD zip file and extract its contents in any directory. There are two bin folders "bin" and "bin-x64" inside this directory. Depending on the version of the OS utilize the OpenOCD version. | ||
| + | |||
| + | '''Setting OpenOCD path''' | ||
| + | #Right click on '''This PC''' and select '''properties'''. this will open "System" window, in system window click on '''Advanced System <br/>Settings''', it will open system properties. Now click on '''Environment Variables'''. <br/>In this window select '''Path''' under '''System variables''' and click on '''Edit''' button as shown below | ||
| + | |||
| + | [[File:path1.png|550x400px]] | ||
| + | |||
| + | |||
| + | #Give the path of bin file in openocd as C:\openocd\bin-x64, if you are usin 64-bit OS or C:\openocd\bin, if you are using 32-bit OS and click '''OK''' | ||
| + | |||
| + | |||
| + | [[File:path2.png|450x300px]] | ||
==Connecting STlink with nRF51822== | ==Connecting STlink with nRF51822== | ||
| − | ===Reassigning WinUSB for | + | |
| + | |||
| + | '''Do the following connections''' | ||
| + | #Remove links on '''CN3''' connector of STlink | ||
| + | #Power up NRF board from STlink | ||
| + | #Do the connections of '''CN2''' connector as shown in diagram | ||
| + | |||
| + | [[File:k.png|600x400px]] | ||
| + | |||
| + | ==Reassigning the Driver== | ||
| + | #Now we have to install necessary drivers for STlink for working with openOCD. When we connect STM32 board to laptop drivers gets automatically installed and STM32 detected as a USB mass storage device | ||
| + | #If we start openOCD session it will not start as drivers are not supported and we will get error message on terminal | ||
| + | |||
| + | |||
| + | [[File:usb_err.png|550x400px]] | ||
| + | |||
| + | '''Reassigning Drivers''' | ||
| + | #Download '''Zadig''' software to convert the driver | ||
| + | #Open Zadig, click on '''Options''' and select '''List All Devices'''. Select '''STM32 Mass Storage''' among available devices. | ||
| + | |||
| + | [[File:a.png|450x300px]] | ||
| + | |||
| + | #Select '''WinUSB(v6.1.7600.16385)''' and click on '''Install WCID Driver'''. You will get a warning message for permission, simply click on '''Yes''' | ||
| + | |||
| + | [[File:b.png|450x300px]] | ||
| + | |||
| + | |||
| + | #Now you can check, the STlink will be detected under '''Universal Serial Bus Devices''' | ||
| + | |||
| + | [[File:e.png|550x400px]] | ||
==Using Open OCD== | ==Using Open OCD== | ||
| − | + | After doing all the setup for openOCD, first step is to write a configuration file for NRF51822. Keep this config file in '''bin-x64''' folder and open command window in the same folder and open session as shown below | |
| − | + | ||
| − | + | [[File:f.png|550x400px]] | |
| + | #If configuration file and all the connections are correct openOCD session will start | ||
| − | [[File: | + | [[File:g.png|550x400px]] |
| − | + | #Once the session is started we have to start '''Telnet'''. For this open another terminal from anywhere and start telnet by using '''telnet localhost 4444''' command and click enter. | |
| − | [[File: | + | [[File:h.png|550x400px]] |
| − | |||
| − | + | ===Open OCD as debugger=== | |
| − | + | #Once the telnet session is opened, we can use OpenOCD debugger. For flashing a program in the target device that is NRF51822, first halt the device using '''halt''' command. Then use '''flash write_image erase File_name.bin''' command to flash device and reset the device using '''reset''' command. | |
| − | |||
| − | [[File: | + | [[File:i.png|550x400px]] |
| + | |||
| + | #For erasing the chip halt the device then use '''nrf51 mass_erase 0''' command and reset the chip. | ||
| + | |||
| + | |||
| + | [[File:i1.png|550x400px]] | ||
| + | |||
| + | ===Open OCD as programmer/flasher=== | ||
| + | |||
| + | ==References== | ||
| + | * [http://andybrown.me.uk/2014/09/09/stlinkv2/ STLINK V2 One programmer for all STM devices] | ||
| + | * [http://electronut.in/nrf51-adc-test/ nRF51822 Begins - nRF-DK, GCC, ADC, UART/BLE] | ||
| + | * [https://github.com/RIOT-OS/RIOT/wiki/Board:-yunjia-nrf51822 Board: yunjia nrf51822] | ||
| + | |||
| − | + | {{DISQUS}} | |
Latest revision as of 15:41, 1 October 2015
Sandeep (talk) and Vaibhav Katkar (talk) 17:43, 10 September 2015 (IST)
Getting STlink v1 working with openOCD is a pain. The USB driver implementation has flaws. The PC picks different drivers for the same device depending on its mood! Initially I got it working on my computer and to check I asked Vaibhav to try on his computer. He too wanted to use it to debug the LPC1114 MCU that he is working on for a last few weeks. It did not work, even after following the exact same steps. So we debugged and found out what the issue was.
Contents
Configuring Open OCD
- Download OpenOCD zip file and extract its contents in any directory. There are two bin folders "bin" and "bin-x64" inside this directory. Depending on the version of the OS utilize the OpenOCD version.
Setting OpenOCD path
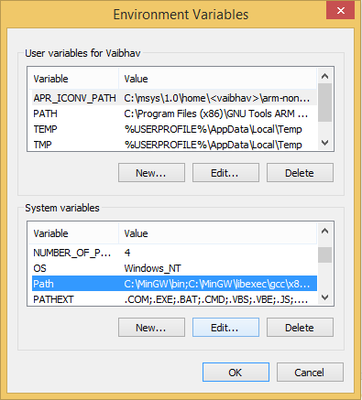
- Right click on This PC and select properties. this will open "System" window, in system window click on Advanced System
Settings, it will open system properties. Now click on Environment Variables.
In this window select Path under System variables and click on Edit button as shown below
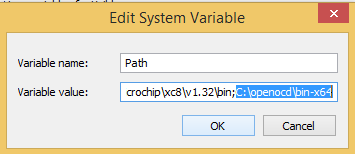
- Give the path of bin file in openocd as C:\openocd\bin-x64, if you are usin 64-bit OS or C:\openocd\bin, if you are using 32-bit OS and click OK
Connecting STlink with nRF51822
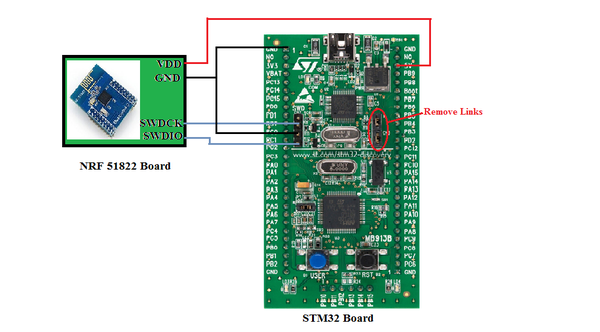
Do the following connections
- Remove links on CN3 connector of STlink
- Power up NRF board from STlink
- Do the connections of CN2 connector as shown in diagram
Reassigning the Driver
- Now we have to install necessary drivers for STlink for working with openOCD. When we connect STM32 board to laptop drivers gets automatically installed and STM32 detected as a USB mass storage device
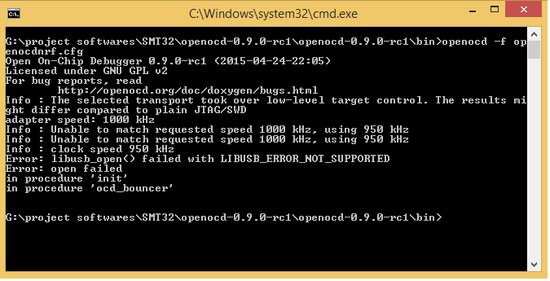
- If we start openOCD session it will not start as drivers are not supported and we will get error message on terminal
Reassigning Drivers
- Download Zadig software to convert the driver
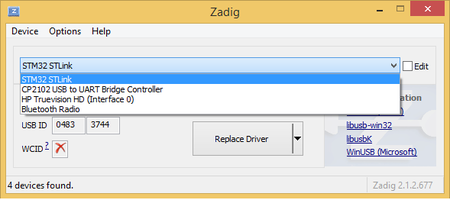
- Open Zadig, click on Options and select List All Devices. Select STM32 Mass Storage among available devices.
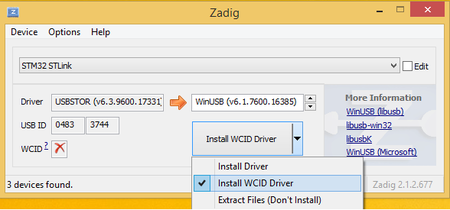
- Select WinUSB(v6.1.7600.16385) and click on Install WCID Driver. You will get a warning message for permission, simply click on Yes
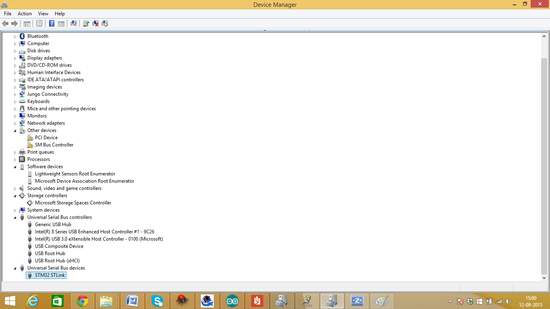
- Now you can check, the STlink will be detected under Universal Serial Bus Devices
Using Open OCD
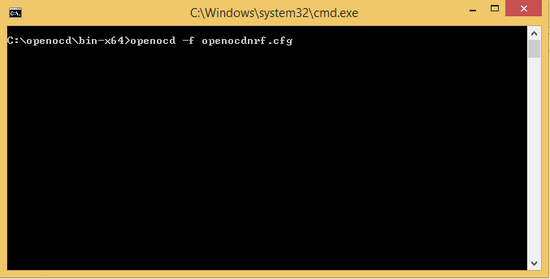
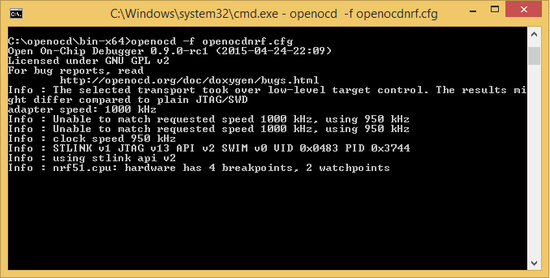
After doing all the setup for openOCD, first step is to write a configuration file for NRF51822. Keep this config file in bin-x64 folder and open command window in the same folder and open session as shown below
- If configuration file and all the connections are correct openOCD session will start
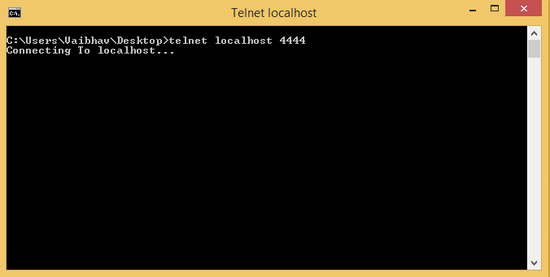
- Once the session is started we have to start Telnet. For this open another terminal from anywhere and start telnet by using telnet localhost 4444 command and click enter.
Open OCD as debugger
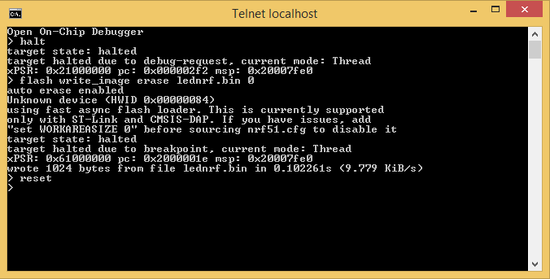
- Once the telnet session is opened, we can use OpenOCD debugger. For flashing a program in the target device that is NRF51822, first halt the device using halt command. Then use flash write_image erase File_name.bin command to flash device and reset the device using reset command.
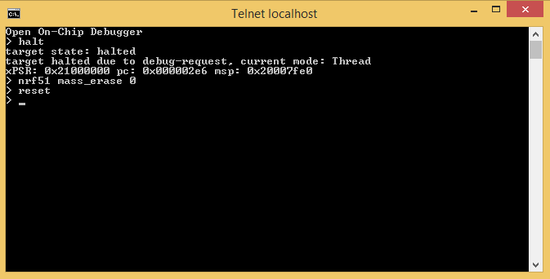
- For erasing the chip halt the device then use nrf51 mass_erase 0 command and reset the chip.
Open OCD as programmer/flasher
References
- STLINK V2 One programmer for all STM devices
- nRF51822 Begins - nRF-DK, GCC, ADC, UART/BLE
- Board: yunjia nrf51822

