Difference between revisions of "Explore M3 Arduino Installer"
m |
|||
| (6 intermediate revisions by one other user not shown) | |||
| Line 1: | Line 1: | ||
Lets get started with the Arduino way of programming Explore M3. | Lets get started with the Arduino way of programming Explore M3. | ||
| − | + | == Prerequisites == | |
# Arduino IDE 1.6.5 ([https://www.arduino.cc/en/Main/OldSoftwareReleases download]) | # Arduino IDE 1.6.5 ([https://www.arduino.cc/en/Main/OldSoftwareReleases download]) | ||
| − | # Explore M3 package ([https://github.com/jaiminajmeri/ExploreM3-Installer-Win Windows]/[https://github.com/jaiminajmeri/ExploreM3-Installer-Linux Linux]/ | + | # Explore M3 package ([https://github.com/jaiminajmeri/ExploreM3-Installer-Win Windows]/[https://github.com/jaiminajmeri/ExploreM3-Installer-Linux Linux]) |
| + | |||
| + | == The Package == | ||
| + | Once you have the installer package (.zip) extract it and go to the extracted location. It contains, | ||
| + | |||
| + | '''./Explore-M3/''' | ||
| + | |||
| + | '''./ExploreM3Installer.exe''' | ||
| + | |||
| + | '''./ExploreM3TestSketch.bin''' | ||
| + | |||
| + | == Install Explore M3 board == | ||
| + | ; 1. Run the installer (ExploreM3Installer.exe) : For windows users, run as '''Administrator'''. | ||
| + | : For non-windows users, you will need to run as '''root''' user. | ||
| + | |||
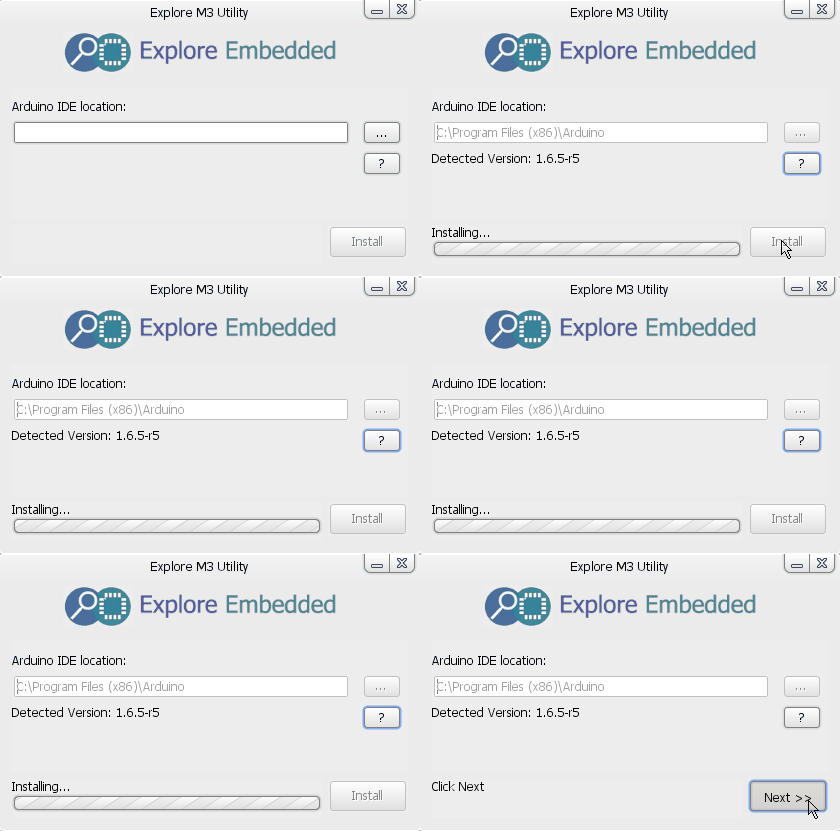
| + | ; 2. Select the Arduino IDE installed directory. | ||
| + | : Click on Browse, select the Arduino IDE installed directory. | ||
| + | : Arduino IDE version will be detected. Ensure that it says 1.6.5 | ||
| + | : Click Install, It will install Explore M3 board for Arduino. | ||
| + | : Click Next. | ||
| + | [[File:Explore-m3-installer-step2.gif|none]] | ||
| + | |||
| + | |||
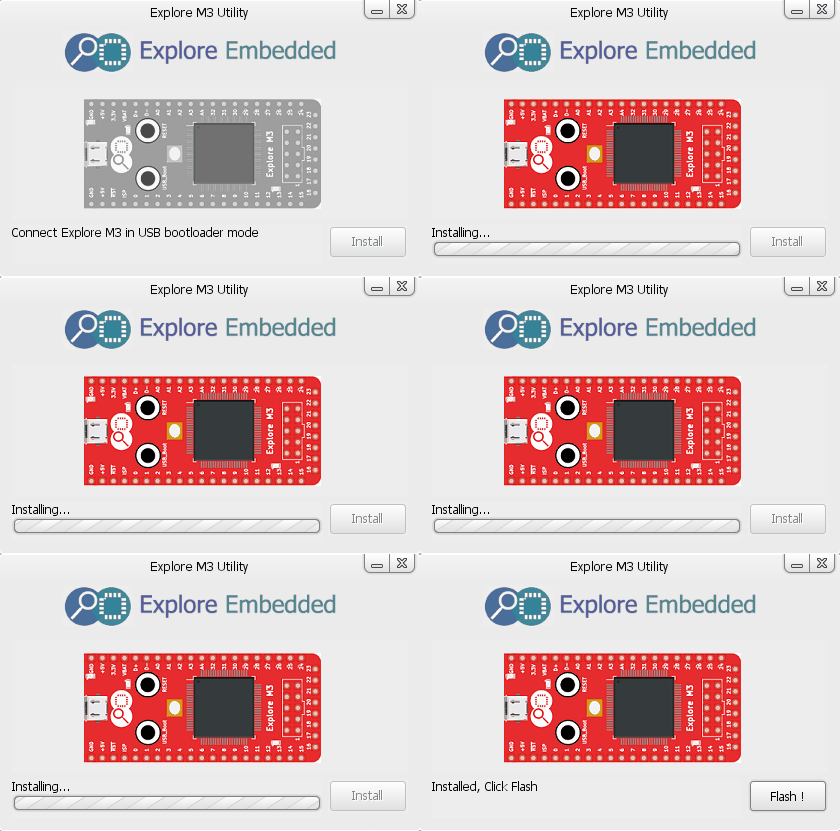
| + | ; 3. Connect the board. | ||
| + | : Connect Explore M3 board in USB bootloader mode. Once the board is detected Click Install. | ||
| + | : This installs the drivers. | ||
| + | [[File:Explore-m3-installer-step3.gif|none]] | ||
| + | |||
| + | |||
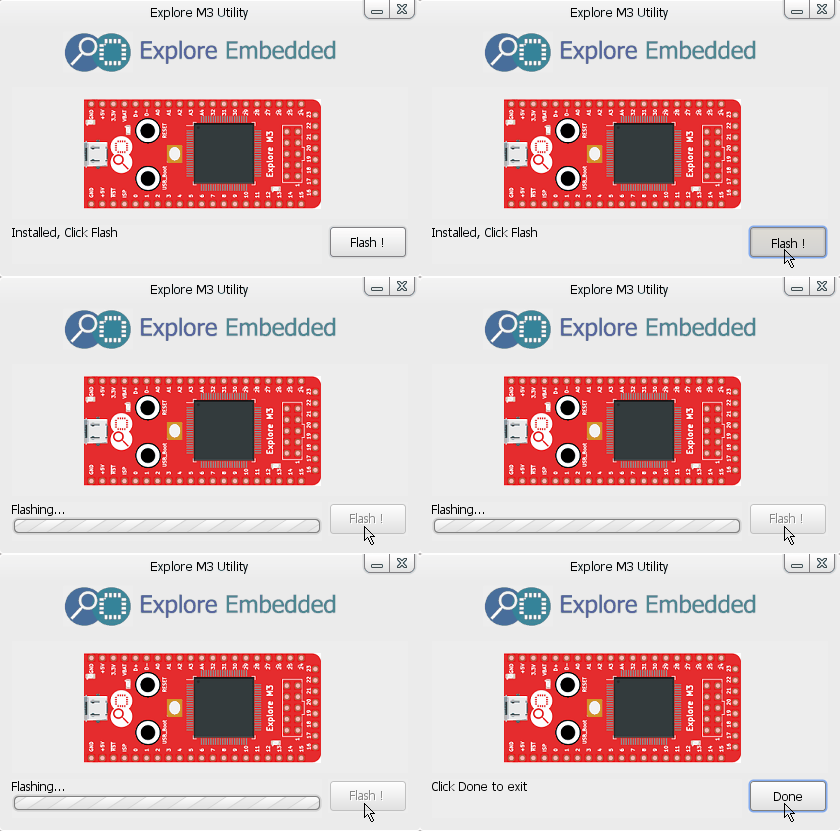
| + | ; 4. Flash a test sketch to verify the drivers. | ||
| + | : Click Flash button, once its flashed click done button to exit. | ||
| + | [[File:Explore-m3-installer-step4.gif|none]] | ||
Latest revision as of 12:21, 4 November 2017
Lets get started with the Arduino way of programming Explore M3.
Prerequisites
The Package
Once you have the installer package (.zip) extract it and go to the extracted location. It contains,
./Explore-M3/
./ExploreM3Installer.exe
./ExploreM3TestSketch.bin
Install Explore M3 board
- 1. Run the installer (ExploreM3Installer.exe)
- For windows users, run as Administrator.
- For non-windows users, you will need to run as root user.
- 2. Select the Arduino IDE installed directory.
- Click on Browse, select the Arduino IDE installed directory.
- Arduino IDE version will be detected. Ensure that it says 1.6.5
- Click Install, It will install Explore M3 board for Arduino.
- Click Next.
- 3. Connect the board.
- Connect Explore M3 board in USB bootloader mode. Once the board is detected Click Install.
- This installs the drivers.
- 4. Flash a test sketch to verify the drivers.
- Click Flash button, once its flashed click done button to exit.


