(4 intermediate revisions by 2 users not shown)
Line 1: Line 1:
 
[[category:ESP32 BareMetal]]
 
[[category:ESP32 BareMetal]]
In this tutorial we will discuss how to configure the AWS for amazon user account and later we will see how to setup a new '''things''' and generate '''certificates''' to communicate with your IOT device using AWS MQTT services.
+
[[category:ESP32 Arduino]]
 +
Security of connected devices is of paramount concern. There are several possible ways to make the devices secure. One of the most essential and widely used options is to use end to end encryption. The widely used Transport Layer Security (TLS) version 1.2 is the latest standard used on web for secure connections including banking.  There are very few micro-controller based solutions that implement TLS 1.2 due to lack of resources. ESP32 is one of the most affordable options out there. So let’s look at securely connecting Hornbill ESP32 Dev board to Amazon web services (AWS) IOT.
 +
 
 +
We will start with configuring AWS account, setting up the '''thing''', generating the security certificates, testing with a MQTT desktop client and then communicating with the hardware.  
 +
 
 +


=AWS User Account=
 
=AWS User Account=
Line 81: Line 86:
  
 
Certificates:<br>
 
Certificates:<br>
aws-root-ca.pem  
+
aws-root-ca.pem <br>
certificate.pem.crt  
+
certificate.pem.crt <br>
private.pem.key
+
private.pem.key<br>
 
[[File:MqttFx Setup.jpg]]
 
[[File:MqttFx Setup.jpg]]
 
<br><br>
 
<br><br>
  
 +
After doing the above setting, connect to the AWS.
 
[[File:Mqtt Connect.jpg]]
 
[[File:Mqtt Connect.jpg]]
 
<br><br>
 
<br><br>
  
 +
Subscribe to the thing that we created in the above tutorial.
 
[[File:Mqtt Subscribe.JPG]]
 
[[File:Mqtt Subscribe.JPG]]
 
<br><br>
 
<br><br>
  
 
+
Successfully subscribed to the myTestThing.
 
[[File:Mqtt SubscribeSucess.JPG]]
 
[[File:Mqtt SubscribeSucess.JPG]]
 
<br><br>
 
<br><br>
  
 +
Now select the myTestThing topic and publish a message.
 
[[File:Mqtt Publish.JPG]]
 
[[File:Mqtt Publish.JPG]]
 
<br><br>
 
<br><br>
  
 +
The published message is successfully received.
 
[[File:Mqtt SubscribeTopicRcvd.JPG]]
 
[[File:Mqtt SubscribeTopicRcvd.JPG]]
 +
 +
=Industrial data Logger=
 +
Below is the sample code for logging the temperature and Current using HornBill ESP32.
 +
<html>
 +
<script src="https://gist.github.com/SaheblalBagwan/793a1bb6c8d55d454436508c0fba2d7b.js"></script>
 +
</html>
 +
 +
Download the complete IDF project from [https://github.com/ExploreEmbedded/Hornbill-Examples/tree/master/esp-idf/Hornbill-Industrial-Data-Logger this link].
 +
<br>
 +
 +
Have an opinion, suggestion , question or feedback about the article let it out here!
 +
{{DISQUS}}

Latest revision as of 21:03, 12 April 2017

Security of connected devices is of paramount concern. There are several possible ways to make the devices secure. One of the most essential and widely used options is to use end to end encryption. The widely used Transport Layer Security (TLS) version 1.2 is the latest standard used on web for secure connections including banking. There are very few micro-controller based solutions that implement TLS 1.2 due to lack of resources. ESP32 is one of the most affordable options out there. So let’s look at securely connecting Hornbill ESP32 Dev board to Amazon web services (AWS) IOT.

We will start with configuring AWS account, setting up the thing, generating the security certificates, testing with a MQTT desktop client and then communicating with the hardware.


AWS User Account

For using the AWS services you need to have a user account and login using the AWS Login link

Existing users can directly login and directly jump to next. New users should register first and link the credit card for payments. Basic plan is free for first Year, other plans are chargeable. Check this link for available plans. AwsIOT Login page.JPG

Creating a new thing

After Login, click on Signin To Console to go to AWS dash board. Now type AWS IOT and Select the AWS IOT (Connect Devices to Cloud) from drop down as shown below. AwsIOT Start.png
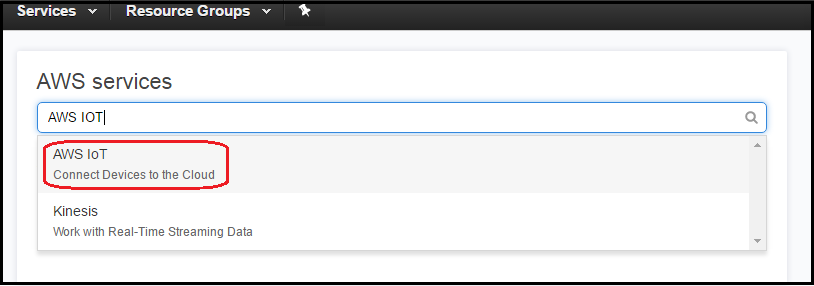
Now the AWS GetStarted Window will open only for the first time. Click on GetStarted to go to dash board. AwsIOT GetStarted.jpg

Click on Register-->Things for registering a new Thing as shown below. AwsIOT registerThing.jpg
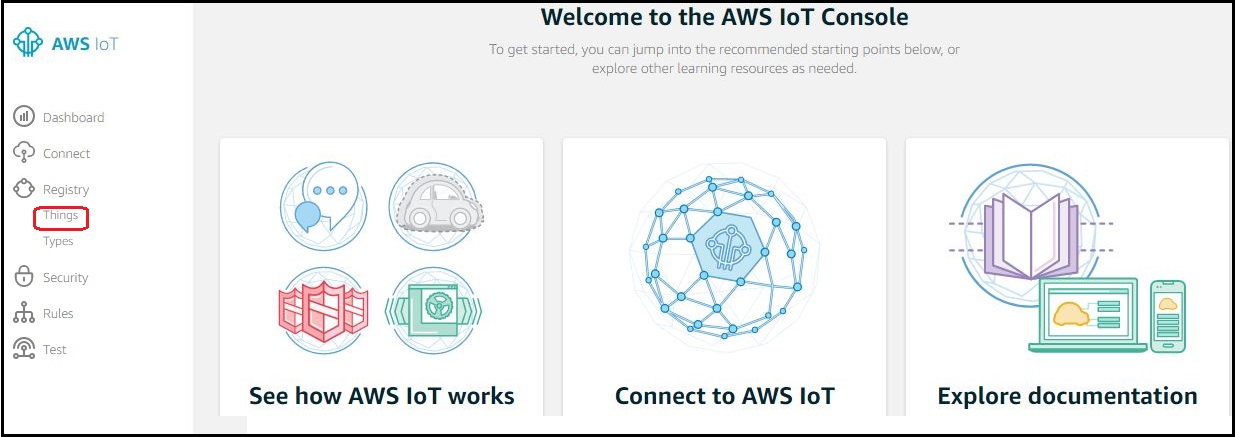
Click on Create to create a new Thing. AwsIOT ThingCreate.jpg
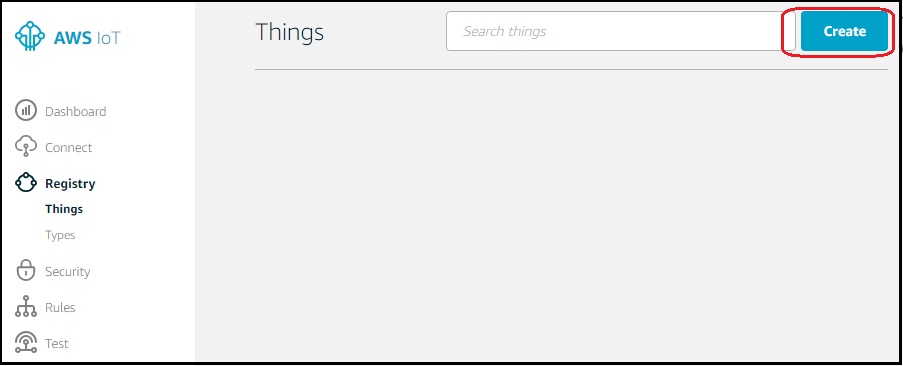
Provide a unique Thing name and click on Create to proceed. AwsIOT TestThingName.jpg
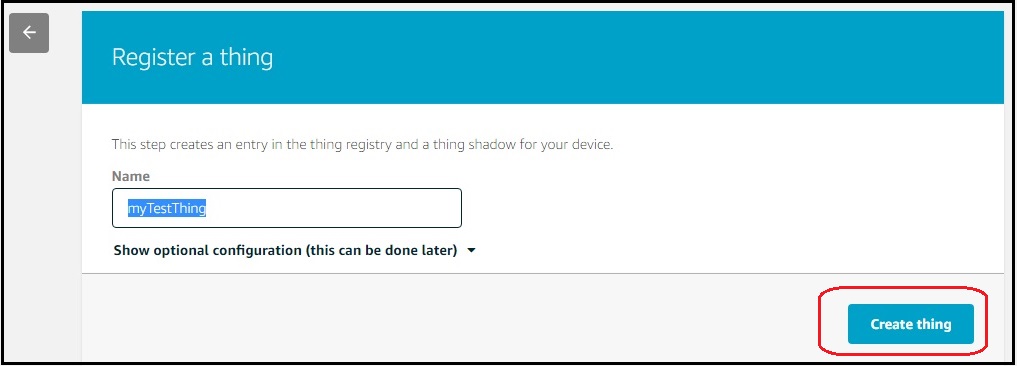
myTestThing is SuccessFul created as shown below. AwsIOT ThingCreatedSuccessfully.jpg
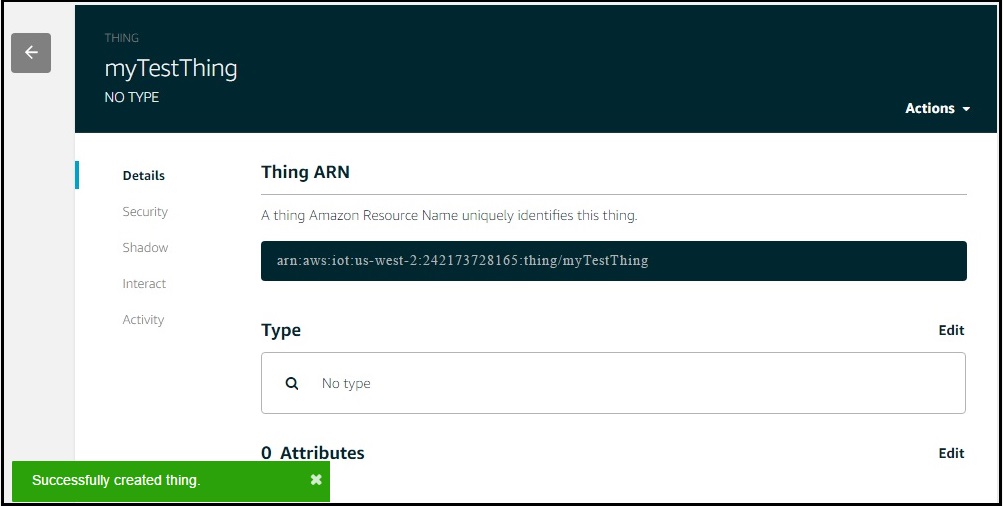
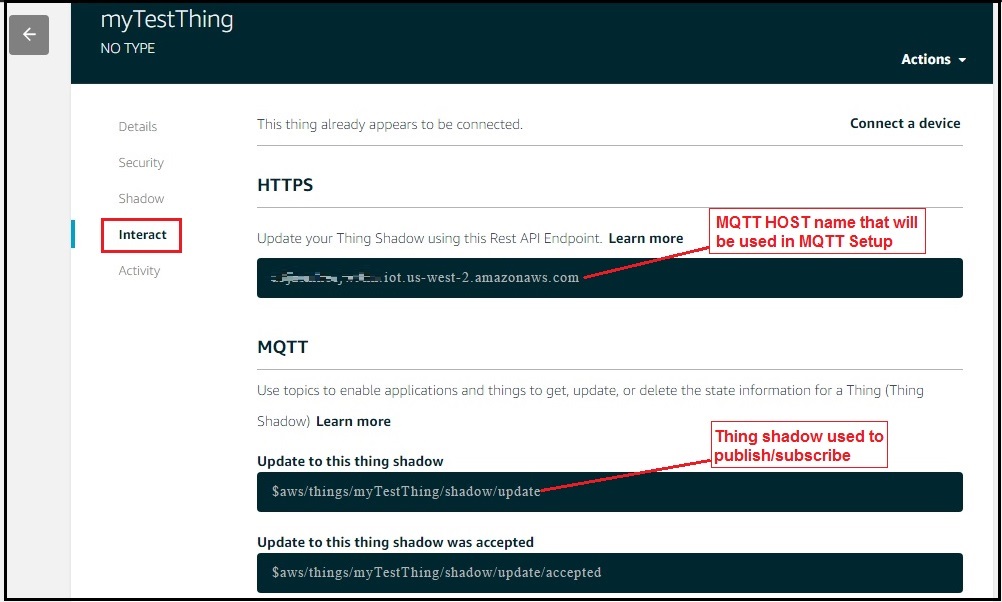
Get the MQTT HOST name and thing name from Interact menu. These will be used to connect with AWS MQTT and also to subscribe/publish the topics. AwsIOT ThingInteract.jpg
Generate certificates for new thing

Go to Security menu and click on Create Certificate to register the certificates. AwsIOT ThingCreateCertificate.jpg
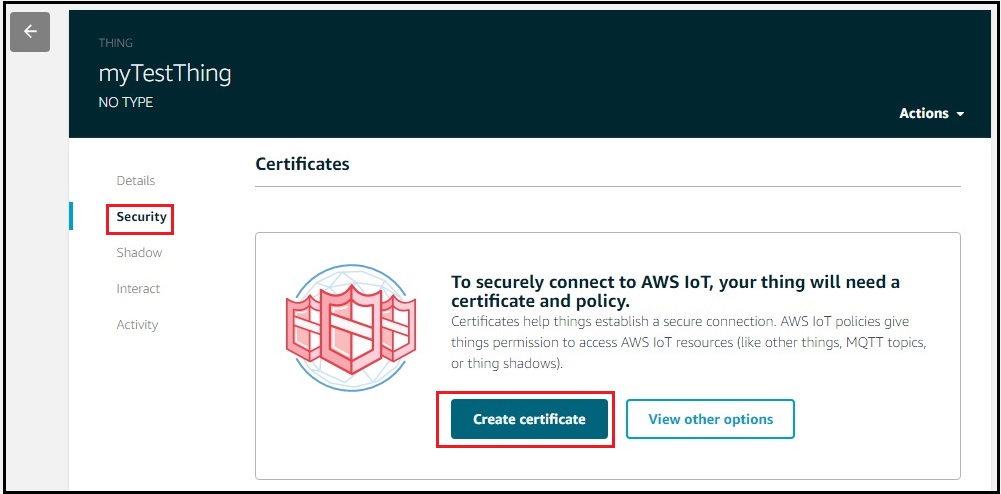
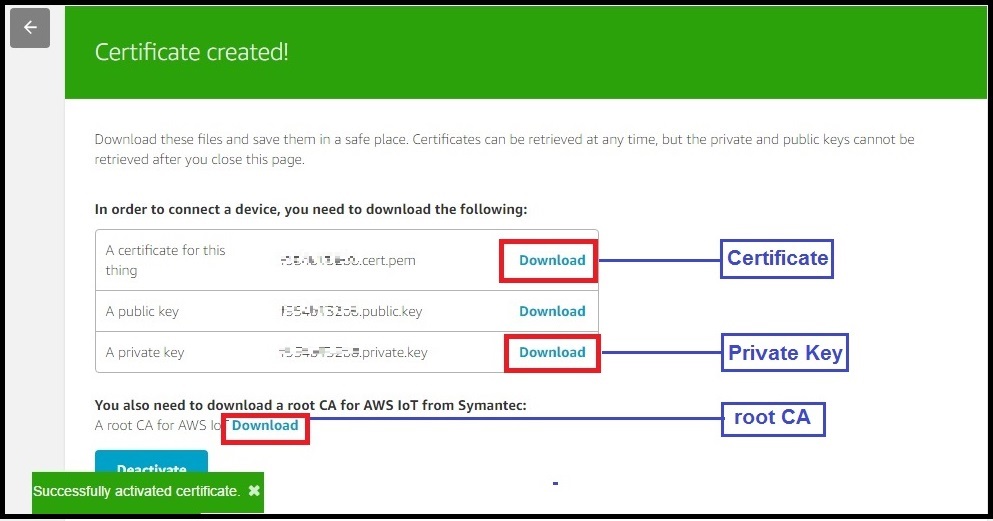
Click on the activate button to activate the certificates and download the certificate,private key and root CA as name them as below.

  1. aws-root-ca.pem
  2.  
  3. certificate.pem.crt
  4.  
  5. private.pem.key
  6.  

AwsIOT ThingCertActivateSuccess.jpg

Define and Attach Policies

Go do AWS dash board and select the Security-->Policies and click on Create a Policy as shown below. AwsIOT ThingPolicyCreate.jpg

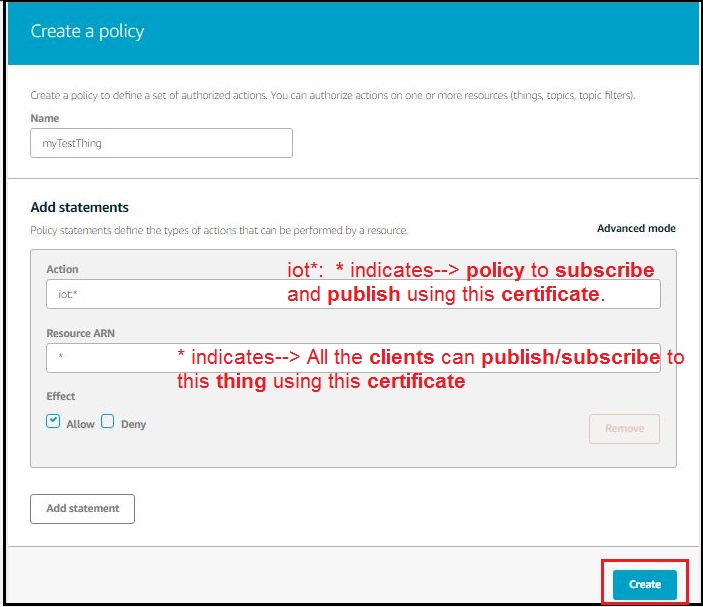
Define the policy for myTestThing as shown below AwsIOT ThingPolicyDefine.jpg
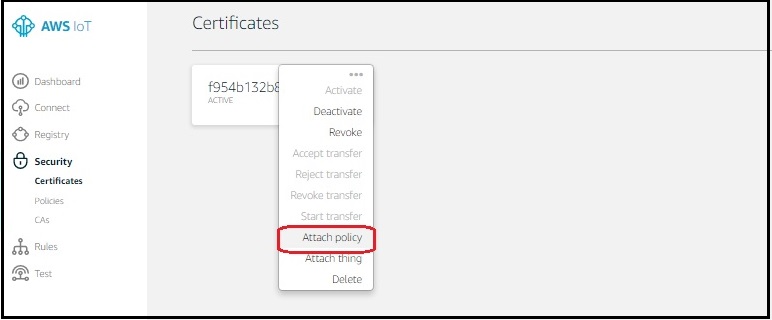
Now go back to Certificates and attach the policy that was defined above AwsIOT ThingPolicyAttach.jpg
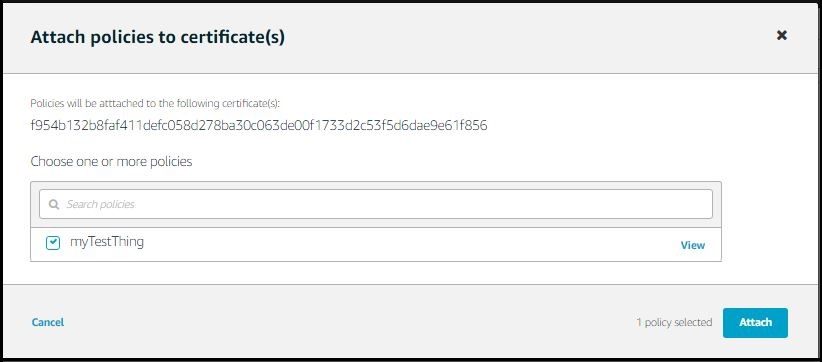
Select the thing and attach the policies define above. AwsIOT ThingPolicyAttach 1.jpg

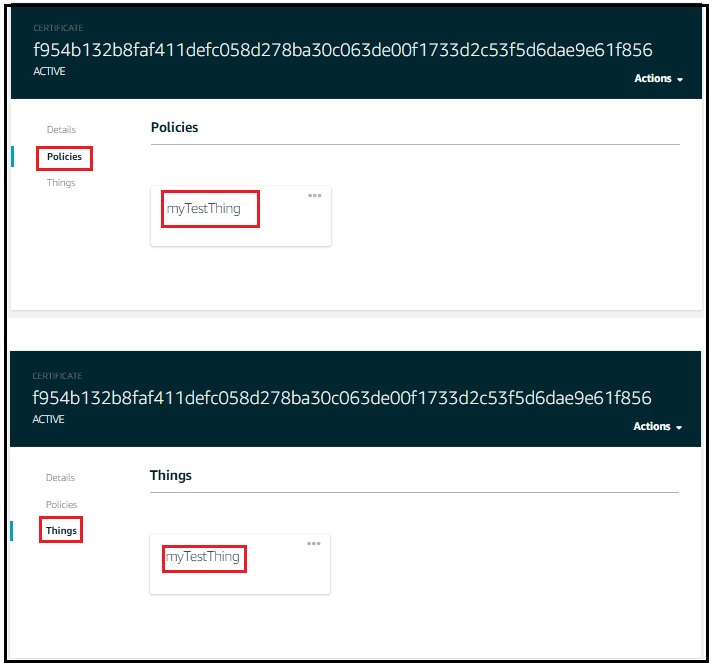
Verify the Attached Policies

Now verify whether the policies are attached to newly created thing as shown below. AwsIOT VerifyPolicy.jpg

Testing Using MQTT Fx tool

As we have a test thing and also the certificates assigned with required policies. We can test it using the MQTT Fx broker tool. Lets list all the info we had while creating the thing and it certificates.

Broker Address / HOST Name: a3jzsmkecjw9hn.iot.us-west-2.amazonaws.com
Broker Port : 8883

Certificates:
aws-root-ca.pem
certificate.pem.crt
private.pem.key
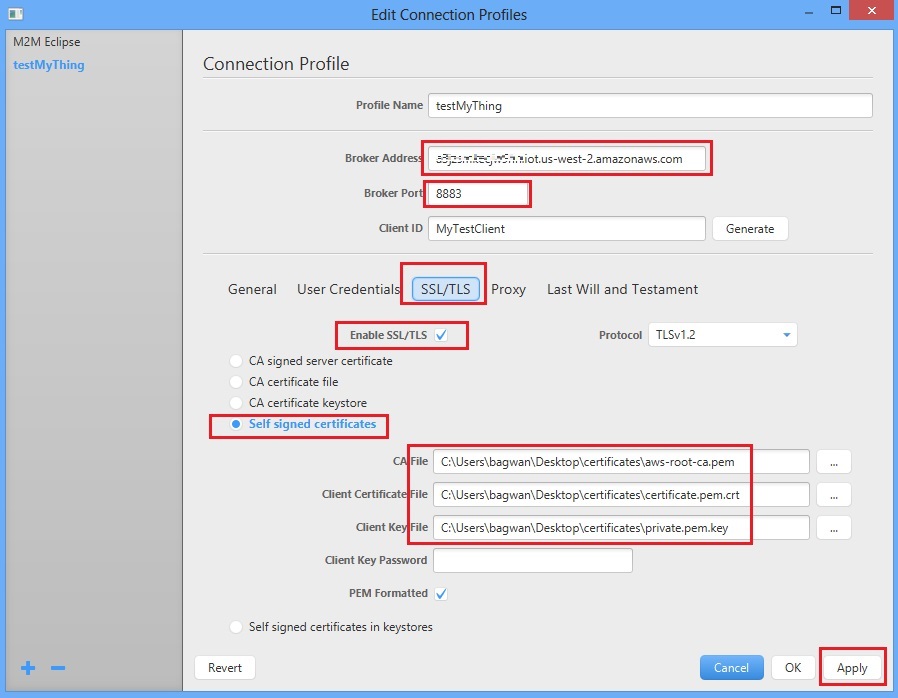
MqttFx Setup.jpg

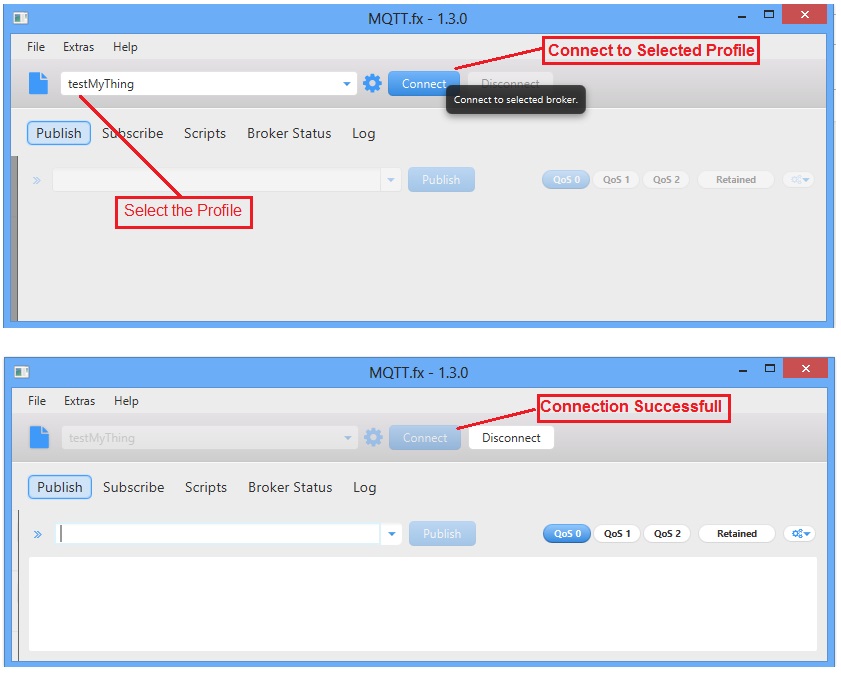
After doing the above setting, connect to the AWS. Mqtt Connect.jpg
Subscribe to the thing that we created in the above tutorial. Mqtt Subscribe.JPG

Successfully subscribed to the myTestThing. Mqtt SubscribeSucess.JPG

Now select the myTestThing topic and publish a message. Mqtt Publish.JPG

The published message is successfully received. Mqtt SubscribeTopicRcvd.JPG

Industrial data Logger

Below is the sample code for logging the temperature and Current using HornBill ESP32.

#include <stdio.h>
#include <stdlib.h>
#include <ctype.h>
#include <unistd.h>
#include <limits.h>
#include <string.h>
#include "freertos/FreeRTOS.h"
#include "freertos/task.h"
#include "freertos/event_groups.h"
#include "esp_wifi.h"
#include "esp_system.h"
#include "esp_event.h"
#include "esp_event_loop.h"
#include "nvs_flash.h"
#include "driver/gpio.h"
#include "certs.h"
#include "aws_iot_config.h"
#include "aws_iot_log.h"
#include "aws_iot_version.h"
#include "aws_iot_mqtt_client_interface.h"
#include "currentSensor.h"
#include "max6675.h"
#include "driver/gpio.h"
#include "rom\gpio.h"
#include "driver/adc.h"
#define WIFI_SSID "my_ssid"
#define WIFI_PASS "my_ssid_pwd"
static EventGroupHandle_t wifi_event_group;
const int CONNECTED_BIT = BIT0;
double tempCelcius, tempFahr, currentIrms;
void disconnectCallbackHandler(AWS_IoT_Client *pClient, void *data) {
IOT_WARN("MQTT Disconnect");
IoT_Error_t rc = FAILURE;
if(NULL == pClient) {
return;
}
IOT_UNUSED(data);
if(aws_iot_is_autoreconnect_enabled(pClient)) {
IOT_INFO("Auto Reconnect is enabled, Reconnecting attempt will start now");
} else {
IOT_WARN("Auto Reconnect not enabled. Starting manual reconnect...");
rc = aws_iot_mqtt_attempt_reconnect(pClient);
if(NETWORK_RECONNECTED == rc) {
IOT_WARN("Manual Reconnect Successful");
} else {
IOT_WARN("Manual Reconnect Failed - %d", rc);
}
}
}
static esp_err_t event_handler(void *ctx, system_event_t *event)
{
switch(event->event_id) {
case SYSTEM_EVENT_STA_START:
esp_wifi_connect();
break;
case SYSTEM_EVENT_STA_GOT_IP:
xEventGroupSetBits(wifi_event_group, CONNECTED_BIT);
break;
case SYSTEM_EVENT_STA_DISCONNECTED:
/* This is a workaround as ESP32 WiFi libs don't currently
auto-reassociate. */
esp_wifi_connect();
xEventGroupClearBits(wifi_event_group, CONNECTED_BIT);
break;
default:
break;
}
return ESP_OK;
}
static void initialise_wifi(void)
{
tcpip_adapter_init();
wifi_event_group = xEventGroupCreate();
ESP_ERROR_CHECK( esp_event_loop_init(event_handler, NULL) );
wifi_init_config_t cfg = WIFI_INIT_CONFIG_DEFAULT();
ESP_ERROR_CHECK( esp_wifi_init(&cfg) );
ESP_ERROR_CHECK( esp_wifi_set_storage(WIFI_STORAGE_RAM) );
wifi_config_t wifi_config = {
.sta = {
.ssid = WIFI_SSID,
.password = WIFI_PASS,
},
};
fprintf(stderr, "Setting WiFi configuration SSID %s...\n", wifi_config.sta.ssid);
ESP_ERROR_CHECK( esp_wifi_set_mode(WIFI_MODE_STA) );
ESP_ERROR_CHECK( esp_wifi_set_config(WIFI_IF_STA, &wifi_config) );
ESP_ERROR_CHECK( esp_wifi_start() );
}
static void record_temp_task(void *pvParameters)
{
xEventGroupWaitBits(wifi_event_group, CONNECTED_BIT, false, true, portMAX_DELAY);
fprintf(stderr, "Connected to AP\n");
IoT_Client_Init_Params mqttInitParams = iotClientInitParamsDefault;
IOT_INFO("\nAWS IoT SDK Version %d.%d.%d-%s\n", VERSION_MAJOR, VERSION_MINOR, VERSION_PATCH, VERSION_TAG);
mqttInitParams.enableAutoReconnect = false; // We enable this later below
mqttInitParams.pHostURL = AWS_IOT_MQTT_HOST;
mqttInitParams.port = AWS_IOT_MQTT_PORT;
mqttInitParams.pRootCALocation = "root-CA.crt";
mqttInitParams.pDeviceCertLocation = "certificate.pem.crt";
mqttInitParams.pDevicePrivateKeyLocation = "private.pem.key";
mqttInitParams.mqttCommandTimeout_ms = 20000;
mqttInitParams.tlsHandshakeTimeout_ms = 20000;
mqttInitParams.isSSLHostnameVerify = true;
mqttInitParams.disconnectHandler = disconnectCallbackHandler;
mqttInitParams.disconnectHandlerData = NULL;
IoT_Error_t rc = FAILURE;
AWS_IoT_Client client;
rc = aws_iot_mqtt_init(&client, &mqttInitParams);
if(SUCCESS != rc) {
IOT_ERROR("aws_iot_mqtt_init returned error : %d ", rc);
abort();
}
IoT_Client_Connect_Params connectParams = iotClientConnectParamsDefault;
connectParams.keepAliveIntervalInSec = 10;
connectParams.isCleanSession = true;
connectParams.MQTTVersion = MQTT_3_1_1;
connectParams.pClientID = AWS_IOT_MQTT_CLIENT_ID;
connectParams.clientIDLen = (uint16_t) strlen(AWS_IOT_MQTT_CLIENT_ID);
connectParams.isWillMsgPresent = false;
IOT_INFO("Connecting...");
rc = aws_iot_mqtt_connect(&client, &connectParams);
if(SUCCESS != rc) {
IOT_ERROR("Error(%d) connecting to %s:%d", rc, mqttInitParams.pHostURL, mqttInitParams.port);
abort();
}
rc = aws_iot_mqtt_autoreconnect_set_status(&client, true);
if(SUCCESS != rc) {
IOT_ERROR("Unable to set Auto Reconnect to true - %d", rc);
abort();
}
const char *topicName = "$aws/things/c0ee87d2bd955a0cf217bbc263/shadow/update";
char cPayload[150];
uint32_t payloadCount = 0;
sprintf(cPayload, "%s : %d ", "hello from SDK", payloadCount);
IoT_Publish_Message_Params paramsQOS0;
paramsQOS0.qos = QOS0;
paramsQOS0.payload = (void *) cPayload;
paramsQOS0.isRetained = 0;
Timer sendit;
countdown_ms(&sendit, 1500);
uint32_t reconnectAttempts = 0;
uint32_t reconnectedCount = 0;
while((NETWORK_ATTEMPTING_RECONNECT == rc || NETWORK_RECONNECTED == rc || SUCCESS == rc)) {
IOT_DEBUG("Top of loop: payloadCount=%d, reconnectAttempts=%d, reconnectedCount=%d\n", payloadCount, reconnectAttempts, reconnectedCount);
// Max time the yield function will wait for read messages
rc = aws_iot_mqtt_yield(&client, 1000);
if(NETWORK_ATTEMPTING_RECONNECT == rc) {
reconnectAttempts++;
IOT_DEBUG("Reconnecting...\n");
// If the client is attempting to reconnect we will skip the rest of the loop.
continue;
}
if(NETWORK_RECONNECTED == rc) {
reconnectedCount++;
IOT_DEBUG(stderr, "Reconnected...\n");
}
if(!has_timer_expired(&sendit)) {
IOT_INFO("--> sleeping it off");
vTaskDelay(1000 / portTICK_PERIOD_MS);
continue;
}
tempCelcius = max6675_readCelsius();
currentIrms = currentSensor_calcIrms(2000);
sprintf(cPayload,"{\"state\": { \"desired\" : {\"temperature\" : %f, \"power\" : %f }}}",tempCelcius,currentIrms*230);
printf("\n{\"state\": { \"desired\" : {\"temperature\" : %f, \"power\" : %f }}}",tempCelcius,currentIrms*230);
paramsQOS0.payloadLen = strlen(cPayload);
rc = aws_iot_mqtt_publish(&client, topicName, strlen(topicName), &paramsQOS0);
if (rc == MQTT_REQUEST_TIMEOUT_ERROR) {
IOT_DEBUG("QOS0 publish ack not received.\n");
rc = SUCCESS;
}
if(SUCCESS != rc) {
IOT_ERROR("An error occurred in the loop.\n");
} else {
IOT_INFO("Publish done\n");
}
countdown_ms(&sendit, 150);
}
IOT_ERROR("Escaped loop...\n");
abort();
}
void app_main(void)
{
nvs_flash_init();
initialise_wifi();
max6675_init(12,14,27); // SCK:6 CS:15 MISO:7
currentSensor_currentPin(ADC1_CHANNEL_0,111.1);
xTaskCreate(&record_temp_task, "record_temp_task", 8192*2, NULL, 5, NULL);
}

Download the complete IDF project from this link.

Have an opinion, suggestion , question or feedback about the article let it out here!