Interfacing Seven Segment Displays with AVR
Guru (talk) 18:10, 17 November 2015 (IST)
In this tutorial we will looking at interfacing a Seven Segment Display to Atmega32 MCU. We will also look at multiplexing 4 seven segment displays and programming them.
Contents
Seven Segment Display
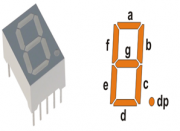
Well, the name 7 segments implies there are 7 LED segments arranged as shown in figure 1. After LEDs they are the easiest interfaces to a microcontroller. There is also a decimal point or dp. It is used when decimal digits like 5.1 etc are displayed.
Applications
Seven segment are widely used in applications where digits[0-9] are required to be displayed.Although they also display letters A to F as shown in figure(2) simulation. This is a very simple and convenient way to display numbers in a bright fashion.
Form Factor
- Sizes:They come in various sizes; 0.28”, 0.3”, 0.32”, 0.36”, 0.39”, 0.4”, 0.5”, 0.56”, 0.6”, 0.8”, 1.0”, 1.2”, 1.5”, 1.8”, 2.0”, 2.3”, 3.0”, 4.0”, 5.0”, 7.0”)
- Colors: and varied colors too; Red, Green, Yellow, Orange, Blue, and White.
Working
Since these are basically LEDs arranged as a group they can either have anode in common or cathode.
- Common Cathode: This type of 7 segments, requires a positive voltage(5v) to given to the segments a to g in order to glow. This is shown in figure(3). Providing a positive voltage with respect to common cathode makes the LED forward biased.
- Common Anode: This type of 7 segments, requires a negativevoltage(GND) to given to the segments a to g in order to glow. This is shown in figure(4). A ground connection to cathode with respect to common anode again forward biases the LED which glows.
Hookup
You may look this up with the simple breadboard as shown in section below or you could use the Ultra AVR dev kit if do not wish to jumble with wires and resistors.
Type 1:Breadboard with Explore AVR 40 Pin Breakout Board with Atmega32
Components Used
| 1 |
|
AVR 40 pin breakout board with Atmega32 |
| 2 |
|
Breadboard |
| 3 |
|
Male to Male Jumper Wires |
| 4 |
|
7 Segment Display - RED |
| 5 |
|
Resistor |
| 6 |
|
Transistor - BC547 [ Click here to buy from our store] |
Wiring diagram

Type 2:Using Explore Ultra AVR Dev Kit
Components Used
The Explore Ultra AVR Kit comes with all the things required, not just for this experiment but for the entire series. And even if you think of migrating to PIC or Arduino, you'll have breakout boards that fit on to this, hence we believe it is a great investment for learning hands on Embedded Systems. The kit is fully open source, you may use the schematics, the design files and all of the source code and build something cool on your own. And when you do that do not forget to share with us what you've done. We would be happy to see you building something cool.
- Explore Ultra AVR Dev Kit: Buy from EE Store


Code
/*-----------------------------------------------------------------------------
   Program to demonstrate 4digit counter on 4-SevenSegment(CommonAnode) display
  -----------------------------------------------------------------------------
  note: Code is for CommonAnode type of segment, seg_code[] must
  be complemented for CommonCathode
------------------------------------------------------------------------------*/


/*contains the definition of all ports and SFRs */
#include <avr\io.h>

#include "delay.h"	//User defined delay library which contains the delay routines

#define SegmentValue PORTB
#define SegmentSlection PORTC

#define SegOne   0x01
#define SegTwo   0x02
#define SegThree 0x04
#define SegFour  0x08


void display_number(unsigned int number)
{
    unsigned char seg_code[]={0xC0,0xF9,0xA4,0xB0,0x99,0x92,0x82,0xF8,0x80,0x90,0x88,
0x83,0xC6,0xA1,0x86,0x8E};
    unsigned char temp,i;
    unsigned int num;


   for(i=0;i<200;i++)
   	 {
	   num=number;

	   temp = num/1000;
	   num=num%1000;
	   SegmentSlection=SegOne;
	   SegmentValue = seg_code[temp];
	   DELAY_ms(1);

	   temp = num/100;
	   num=num%100;
	   SegmentSlection=SegTwo;
	   SegmentValue = seg_code[temp];
	   DELAY_ms(1);

           temp = num/10;
	   SegmentSlection=SegThree;
	   SegmentValue = seg_code[temp];
	   DELAY_ms(1);

	   temp = num%10;
	   SegmentSlection=SegFour;
	   SegmentValue = seg_code[temp];
	   DELAY_ms(1);
	  }
 }
/* start the main program */
void main()
{

   unsigned int cnt=0;
 /* Configure the ports as output */
  DDRB = C_PortOutput_U8;
  DDRC = C_PortOutput_U8;
   while(1)
    {

	    for(cnt=0;cnt<=9999;cnt++)	 // loop to display 0000-9999
		 {
		   display_number(cnt);
		 }
	}

  }


